

Owner's Manual
Page 32
... Gauges...37 Speedometer...37 Trip Meter...37 Odometer...37 Temperature Gauge...38 Fuel Gauge...38 Maintenance Required Indicator...38 Controls Near the Steering Wheel...39 Headlights...40 All the essential controls are within easy reach. Instruments and Controls This section gives information about the controls and displays that contribute to the...
... Gauges...37 Speedometer...37 Trip Meter...37 Odometer...37 Temperature Gauge...38 Fuel Gauge...38 Maintenance Required Indicator...38 Controls Near the Steering Wheel...39 Headlights...40 All the essential controls are within easy reach. Instruments and Controls This section gives information about the controls and displays that contribute to the...
Owner's Manual
Page 37
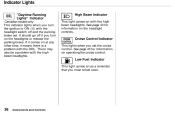
...be a problem with the DRL. CRUISE CONTROL Cruise Control Indicator This lights when you set . See page 46 for information on the headlight controls. Instruments and Controls DRL High Beam Indicator This light comes on operating the cruise control. It should go off and the parking ...refuel soon. If it means there is a problem with the high beam headlights. See page 40 for information on with the headlight switch off if you turn the ignition to ON (II) with the high beam headlights. Indicator Lights "Daytime Running Lights" Indicator Canadian models only This indicator ...
...be a problem with the DRL. CRUISE CONTROL Cruise Control Indicator This lights when you set . See page 46 for information on the headlight controls. Instruments and Controls DRL High Beam Indicator This light comes on operating the cruise control. It should go off and the parking ...refuel soon. If it means there is a problem with the high beam headlights. See page 40 for information on with the headlight switch off if you turn the ignition to ON (II) with the high beam headlights. Indicator Lights "Daytime Running Lights" Indicator Canadian models only This indicator ...

Owner's Manual
Page 40
...switch are for driving features you to tilt the steering wheel. The controls near the left lever controls the turn signals, headlights, and high beams. The right lever controls the windshield wipers. CRUISE CONTROL HAZARD WARNING LIGHT SHIFT LEVER REAR WINDOW DEFOGGER ...HORN BUTTONS SUNROOF SWITCH INSTRUMENT BRIGHTNESS HEADLIGHTS/ TURN SIGNALS TILT ADJUSTMENT WINDSHIELD WIPERS/WASHERS Instruments and Controls The lever on the underside of the steering column allows you ...
...switch are for driving features you to tilt the steering wheel. The controls near the left lever controls the turn signals, headlights, and high beams. The right lever controls the windshield wipers. CRUISE CONTROL HAZARD WARNING LIGHT SHIFT LEVER REAR WINDOW DEFOGGER ...HORN BUTTONS SUNROOF SWITCH INSTRUMENT BRIGHTNESS HEADLIGHTS/ TURN SIGNALS TILT ADJUSTMENT WINDSHIELD WIPERS/WASHERS Instruments and Controls The lever on the underside of the steering column allows you ...

Owner's Manual
Page 41
...beams and high beams, pull back on the turn signal lever until you turn the ignition off, even if you set the parking brake The headlights revert to normal operation when you turn them on with reduced brightness when you turn signal lever. The blue high beam indicator will hear a ... (II) and release the parking brake. Instruments and Controls To flash the high beams, pull back and hold the lever, no matter what position the headlight switch is in ACCESSORY (I) or LOCK (0), you will light (see page 36). The high beams will go . Turning this switch to the second position ...
...beams and high beams, pull back on the turn signal lever until you turn the ignition off, even if you set the parking brake The headlights revert to normal operation when you turn them on with reduced brightness when you turn signal lever. The blue high beam indicator will hear a ... (II) and release the parking brake. Instruments and Controls To flash the high beams, pull back and hold the lever, no matter what position the headlight switch is in ACCESSORY (I) or LOCK (0), you will light (see page 36). The high beams will go . Turning this switch to the second position ...

Owner's Manual
Page 65
... the ignition switch ON (II). 2. Move the selector switch to select the day or night position. Instruments and Controls The night position reduces glare from headlights behind you start driving. Be sure to open the sunroof in belowfreezing temperatures, or when it . Keep the inside mirror has day and night positions...
... the ignition switch ON (II). 2. Move the selector switch to select the day or night position. Instruments and Controls The night position reduces glare from headlights behind you start driving. Be sure to open the sunroof in belowfreezing temperatures, or when it . Keep the inside mirror has day and night positions...

Owner's Manual
Page 127
... and proper pressure. Have the windshield wiper blades replaced if they can change from large vehicles reduces your windshield wipers and washers frequently. Check your headlights. Be very cautious when passing, or being visible to see page 79 ). Being able to other vehicles. Both are important in preventing "hydroplaning" (loss of...
... and proper pressure. Have the windshield wiper blades replaced if they can change from large vehicles reduces your windshield wipers and washers frequently. Check your headlights. Be very cautious when passing, or being visible to see page 79 ). Being able to other vehicles. Both are important in preventing "hydroplaning" (loss of...

Owner's Manual
Page 134
...Drive Belts...Tires...Inflation...Inspection...Maintenance...Tire Rotation...Replacing Tires and Wheels ...Wheels and Tires...Winter Driving...Snow Tires...Tire Chains...Lights...Headlight Aiming...Replacing Bulbs...Storing Your Car...160 160 161 162 165 168 169 169 170 171 171 172 172 173 173 174 ... This section also includes Maintenance Schedules for normal driving and severe driving conditions, a Maintenance Record, and instructions for information on your Honda, you may want to take care of yourself. If you have the skills and tools required to perform more complex maintenance tasks ...
...Drive Belts...Tires...Inflation...Inspection...Maintenance...Tire Rotation...Replacing Tires and Wheels ...Wheels and Tires...Winter Driving...Snow Tires...Tire Chains...Lights...Headlight Aiming...Replacing Bulbs...Storing Your Car...160 160 161 162 165 168 169 169 170 171 171 172 172 173 173 174 ... This section also includes Maintenance Schedules for normal driving and severe driving conditions, a Maintenance Record, and instructions for information on your Honda, you may want to take care of yourself. If you have the skills and tools required to perform more complex maintenance tasks ...

Owner's Manual
Page 143
... operation weekly. Periodic Checks You should check the following items at the specified intervals. Engine coolant level - Automatic transmission - If you are unsure of the headlights, parking lights, taillights, high-mount brake light, turn to use the washers frequently, check the reservoir each time you to the page given. If weather...
... operation weekly. Periodic Checks You should check the following items at the specified intervals. Engine coolant level - Automatic transmission - If you are unsure of the headlights, parking lights, taillights, high-mount brake light, turn to use the washers frequently, check the reservoir each time you to the page given. If weather...

Owner's Manual
Page 153
... Do not use the washers often, check the level every time you stop for fuel. Maintenance The windshield washer reservoir is located behind the left headlight. Check the reservoir's fluid level by removing the cap and looking at least monthly during normal usage. In bad weather, when you use engine antifreeze...
... Do not use the washers often, check the level every time you stop for fuel. Maintenance The windshield washer reservoir is located behind the left headlight. Check the reservoir's fluid level by removing the cap and looking at least monthly during normal usage. In bad weather, when you use engine antifreeze...

Owner's Manual
Page 174
...attach it as possible. You should be sitting in the cargo area or pull a trailer. Park the car on the gauge. Headlight Aiming The headlights were properly aimed when your intentions to make sure the car is sitting normally. 3. HORIZONTAL ANGLE GAUGE If you usually pull a.... Push down on page 219 to determine what type of your car with the "0" mark on level ground. 2. CONTINUED Maintenance Each headlight assembly has horizontal and vertical adjustment indicators. Load your car's exterior lights at the factory. Lights Check the operation of replacement bulb is...
...attach it as possible. You should be sitting in the cargo area or pull a trailer. Park the car on the gauge. Headlight Aiming The headlights were properly aimed when your intentions to make sure the car is sitting normally. 3. HORIZONTAL ANGLE GAUGE If you usually pull a.... Push down on page 219 to determine what type of your car with the "0" mark on level ground. 2. CONTINUED Maintenance Each headlight assembly has horizontal and vertical adjustment indicators. Load your car's exterior lights at the factory. Lights Check the operation of replacement bulb is...

Owner's Manual
Page 176
... alcohol and a clean cloth. 4. Remove the electrical connector from the bulb by its steel base and protect the glass from its slot. NOTICE Halogen headlight bulbs get very hot when lit. Insert the new bulb into the hole, making sure the tabs are in place and clip the end into... air intake cover. Pivot the hold -down wire back in their slots. If you touch the glass, clean it by squeezing the connector on the headlights to unlock the tab. Oil, perspiration, or a scratch on the passenger's side, remove the air intake cover (see page 158). 2. Unclip the end of ...
... alcohol and a clean cloth. 4. Remove the electrical connector from the bulb by its steel base and protect the glass from its slot. NOTICE Halogen headlight bulbs get very hot when lit. Insert the new bulb into the hole, making sure the tabs are in place and clip the end into... air intake cover. Pivot the hold -down wire back in their slots. If you touch the glass, clean it by squeezing the connector on the headlights to unlock the tab. Oil, perspiration, or a scratch on the passenger's side, remove the air intake cover (see page 158). 2. Unclip the end of ...

Owner's Manual
Page 197
... things: Check the transmission interlock. Check the condition of the engine trying to start falls into two areas, depending on page 213.) If the headlights dim noticeably or go out when you turn the key to start up and run. Turn on page 200. Turn the ignition switch to ON... the battery is probably something wrong with the electrical circuit for the ignition switch or starter motor. Taking Care of clicks, or nothing . If the headlights do not hear the normal noise of the battery and terminal connections (see page 200 ). The engine's starter motor does not operate at all . ...
... things: Check the transmission interlock. Check the condition of the engine trying to start falls into two areas, depending on page 213.) If the headlights dim noticeably or go out when you turn the key to start up and run. Turn on page 200. Turn the ignition switch to ON... the battery is probably something wrong with the electrical circuit for the ignition switch or starter motor. Taking Care of clicks, or nothing . If the headlights do not hear the normal noise of the battery and terminal connections (see page 200 ). The engine's starter motor does not operate at all . ...
Owner's Manual
Page 207
... the cover from the chart on pages 211 and 212 , or the diagram on the right side. 3. Check each of the Unexpected Make sure the headlights and all the fuses before deciding that component. Removing these fuses requires a Phillips-head screwdriver. CONTINUED Taking Care of the large fuses in the under...
... the cover from the chart on pages 211 and 212 , or the diagram on the right side. 3. Check each of the Unexpected Make sure the headlights and all the fuses before deciding that component. Removing these fuses requires a Phillips-head screwdriver. CONTINUED Taking Care of the large fuses in the under...

Owner's Manual
Page 233
... Bulb Replacement Back-up Lights...179 Brake Lights...179 Ceiling Light...181 Front Parking Lights...178 Front Side Marker Lights...178 Headlights...177 License Plate Lights...180 Specifications...219 Turn Signal Lights...178 Bulbs, Halogen...177 Center Pocket...68 Certification Label...216 Chains...174 Change Oil How ...
... Bulb Replacement Back-up Lights...179 Brake Lights...179 Ceiling Light...181 Front Parking Lights...178 Front Side Marker Lights...178 Headlights...177 License Plate Lights...180 Specifications...219 Turn Signal Lights...178 Bulbs, Halogen...177 Center Pocket...68 Certification Label...216 Chains...174 Change Oil How ...

Owner's Manual
Page 234
... Do...200 Defects, Reporting Safety...232 Defogger, Rear Window...43 Defrosting the Windows...79 DEXRON® II Automatic Transmission Fluid...155 Dimensions...218 Dimming the Headlights...40 Dipstick Automatic Transmission...155 Engine Oil...146 Directional Signals...43 Disabled, Towing Your Car If...213 Disc Brake Wear Indicators...124 Disposal of Used...
... Do...200 Defects, Reporting Safety...232 Defogger, Rear Window...43 Defrosting the Windows...79 DEXRON® II Automatic Transmission Fluid...155 Dimensions...218 Dimming the Headlights...40 Dipstick Automatic Transmission...155 Engine Oil...146 Directional Signals...43 Disabled, Towing Your Car If...213 Disc Brake Wear Indicators...124 Disposal of Used...
Owner's Manual
Page 235
... Hood, Opening the ...111 Horn...39 Hot Coolant, Warning about...151 Hydroplaning...127 Gas Mileage, Improving...114 Gasohol...108 Gasoline...108 Halogen Headlight Bulbs...177 Hazard Warning Flashers...43 Headlights...40 Aiming...175 Daytime Running Lights...40 High Beam Indicator...36 High Beams, Turning on...40 Low Beams, Turning on...40 Reminder...
... Hood, Opening the ...111 Horn...39 Hot Coolant, Warning about...151 Hydroplaning...127 Gas Mileage, Improving...114 Gasohol...108 Gasoline...108 Halogen Headlight Bulbs...177 Hazard Warning Flashers...43 Headlights...40 Aiming...175 Daytime Running Lights...40 High Beam Indicator...36 High Beams, Turning on...40 Low Beams, Turning on...40 Reminder...

Owner's Manual
Page 236
......216 Keys...49 Label, Certification...216 Lane Change, Signaling...41 Lap Belt...7 Lap/Shoulder Belts...6 Leaking of Exhaust into Car...29 Lighter, Cigarette...69 Lights Headlight Aiming...175 Bulb Replacement...177 Indicator...33 Parking...40 Turn Signal...41 Loading Cargo...116 LOCK (Ignition Key Position)...50 Maintenance...135 Periodic Items...144...
......216 Keys...49 Label, Certification...216 Lane Change, Signaling...41 Lap Belt...7 Lap/Shoulder Belts...6 Leaking of Exhaust into Car...29 Lighter, Cigarette...69 Lights Headlight Aiming...175 Bulb Replacement...177 Indicator...33 Parking...40 Turn Signal...41 Loading Cargo...116 LOCK (Ignition Key Position)...50 Maintenance...135 Periodic Items...144...

