

Owner's Manual
Page 17
... for your airbags ever inflate, the airbags and control unit must be done by a Honda dealer. Do not place any of a problem. The light stays on your instrument panel is to remove or discard the airbags by an authorized Honda dealer: If your convenience. There are driving. the SRS Indicator S R S How Light Works.... When the car is virtually maintenance-free. Supplemental Restraint System The passenger's airbag is stored near the top of the SRS light on after the engine starts.
... for your airbags ever inflate, the airbags and control unit must be done by a Honda dealer. Do not place any of a problem. The light stays on your instrument panel is to remove or discard the airbags by an authorized Honda dealer: If your convenience. There are driving. the SRS Indicator S R S How Light Works.... When the car is virtually maintenance-free. Supplemental Restraint System The passenger's airbag is stored near the top of the SRS light on after the engine starts.

Owner's Manual
Page 51
...and Controls All features and accessories on the tailgate also locks and unlocks when you turn the steering wheel to ON (see page 35 ). Remove the key to turn the ignition switch from ACCESSORY to release the anti-theft lock. Use this position. To switch from LOCK to unlock them... turn it . Power Door Locks MASTER DOOR LOCK SWITCH Each front door has a master door lock switch. Push the switch down to start the engine. This is the normal key position when driving. Keys and Locks LOCK (0) - You can operate the audio system and cigarette lighter. When you turn...
...and Controls All features and accessories on the tailgate also locks and unlocks when you turn the steering wheel to ON (see page 35 ). Remove the key to turn the ignition switch from ACCESSORY to release the anti-theft lock. Use this position. To switch from LOCK to unlock them... turn it . Power Door Locks MASTER DOOR LOCK SWITCH Each front door has a master door lock switch. Push the switch down to start the engine. This is the normal key position when driving. Keys and Locks LOCK (0) - You can operate the audio system and cigarette lighter. When you turn...

Owner's Manual
Page 79
Start the engine. 2. When used in combination with the heater, it cools, removes moisture from the air. Select and 4. Adjust the temperature control lever so the mixture of the air with Air Conditioning Air conditioning, as it makes ... temperature control lever. Switch the fan on . 2. Select and 3. Select and 4. Set the fan to help clear the rear window. To Defog and Defrost To remove fog from the defroster vents feels warm. 5. Turn on the air conditioning. 3. This setting is suitable for all driving conditions whenever the outside temperature is...
Start the engine. 2. When used in combination with the heater, it cools, removes moisture from the air. Select and 4. Adjust the temperature control lever so the mixture of the air with Air Conditioning Air conditioning, as it makes ... temperature control lever. Switch the fan on . 2. Select and 3. Select and 4. Set the fan to help clear the rear window. To Defog and Defrost To remove fog from the defroster vents feels warm. 5. Turn on the air conditioning. 3. This setting is suitable for all driving conditions whenever the outside temperature is...

Owner's Manual
Page 80
Switch the fan and temperature controls to avoid fogging the windows. Heating and Cooling To remove exterior frost or ice from the windshield (on very cold days), first select Once the windshield is clear, select to maximum. Select and 3. To rapidly remove exterior frost or ice from the windshield and side windows after the car has been sitting out in cold weather: 1. Start the engine. 2. MODE BUTTONS RECIRCULATION BUTTON FRESH AIR BUTTON TEMPERATURE CONTROL LEVER FAN CONTROL LEVER AIR CONDITIONING SWITCH Comfort and Convenience Features
Switch the fan and temperature controls to avoid fogging the windows. Heating and Cooling To remove exterior frost or ice from the windshield (on very cold days), first select Once the windshield is clear, select to maximum. Select and 3. To rapidly remove exterior frost or ice from the windshield and side windows after the car has been sitting out in cold weather: 1. Start the engine. 2. MODE BUTTONS RECIRCULATION BUTTON FRESH AIR BUTTON TEMPERATURE CONTROL LEVER FAN CONTROL LEVER AIR CONDITIONING SWITCH Comfort and Convenience Features
Owner's Manual
Page 110
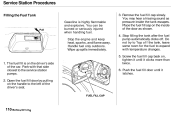
... Station Procedures Filling the Fuel Tank Gasoline is on the inside of the door as pressure inside the tank escapes. Stop the engine and keep heat, sparks, and flame away. Remove the fuel fill cap slowly. You may hear a hissing sound as shown. 4. Push the fuel fill door until it latches. The...
... Station Procedures Filling the Fuel Tank Gasoline is on the inside of the door as pressure inside the tank escapes. Stop the engine and keep heat, sparks, and flame away. Remove the fuel fill cap slowly. You may hear a hissing sound as shown. 4. Push the fuel fill door until it latches. The...

Owner's Manual
Page 112
Wait at least two minutes after turning the engine off before you fill the car with a clean cloth or paper towel. 3. Before Driving Remove the dipstick (orange handle). 2. Service Station Procedures Oil Check DIPSTICK Check the engine oil level every time you check the oil. 1. Wipe the dipstick with fuel. Insert it all the way back in its tube.
Wait at least two minutes after turning the engine off before you fill the car with a clean cloth or paper towel. 3. Before Driving Remove the dipstick (orange handle). 2. Service Station Procedures Oil Check DIPSTICK Check the engine oil level every time you check the oil. 1. Wipe the dipstick with fuel. Insert it all the way back in its tube.
Owner's Manual
Page 113
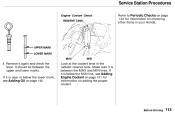
... in your Honda. It should be between the MAX and M I N line, see Adding Oil on checking other items in the radiator reserve tank. Make sure it is near or below the M I N lines. Remove it is between the upper and lower marks. If it again and check the level. Service Station Procedures Engine Coolant...
... in your Honda. It should be between the MAX and M I N line, see Adding Oil on checking other items in the radiator reserve tank. Make sure it is near or below the M I N lines. Remove it is between the upper and lower marks. If it again and check the level. Service Station Procedures Engine Coolant...

Owner's Manual
Page 118
... have fastened their seat belts (see page 64). 7. Check that your seat belt. Check the adjustment of the seat (see page 44). 8. Driving Remove frost, snow, or ice. 2. Check the adjustment of the inside are fully closed and locked. 9. Check that any items you may be carrying with you... panel. 11. Check that the hood and tailgate are stored properly or fastened down securely. 5. Make sure the doors are clean and unobstructed. Start the engine (see page 33 ). Check the adjustment of the steering wheel (see page 54). 6. If a tire looks low, use a gauge to Drive You ...
... have fastened their seat belts (see page 64). 7. Check that your seat belt. Check the adjustment of the seat (see page 44). 8. Driving Remove frost, snow, or ice. 2. Check the adjustment of the inside are fully closed and locked. 9. Check that any items you may be carrying with you... panel. 11. Check that the hood and tailgate are stored properly or fastened down securely. 5. Make sure the doors are clean and unobstructed. Start the engine (see page 33 ). Check the adjustment of the steering wheel (see page 54). 6. If a tire looks low, use a gauge to Drive You ...

Owner's Manual
Page 121
... To shift to a complete stop and then shift. Automatic Transmission Park (P) - Pull the shift lever towards you have your foot off or starting the engine. You must be in Park before shifting into Park. To avoid transmission damage, come to Reverse from Neutral. CONTINUED Driving To shift to a complete stop... you , then move it out of Park, see the explanation under Park. The shift lever must also pull the shift lever towards you can remove the key from Park, see Shift Lock Release on the brake pedal and have done all of the above and still cannot move the lever...
... To shift to a complete stop and then shift. Automatic Transmission Park (P) - Pull the shift lever towards you have your foot off or starting the engine. You must be in Park before shifting into Park. To avoid transmission damage, come to Reverse from Neutral. CONTINUED Driving To shift to a complete stop... you , then move it out of Park, see the explanation under Park. The shift lever must also pull the shift lever towards you can remove the key from Park, see Shift Lock Release on the brake pedal and have done all of the above and still cannot move the lever...

Owner's Manual
Page 123
... the normal method of Park to use the Shift Lock Release, it could mean your Honda dealer. Remove the key from the Shift Lock Release slot. SHIFT LOCK RELEASE SLOT 3. Depress the brake pedal and restart the engine. Have the car checked by your car is caused by a limiter in and out. If...
... the normal method of Park to use the Shift Lock Release, it could mean your Honda dealer. Remove the key from the Shift Lock Release slot. SHIFT LOCK RELEASE SLOT 3. Depress the brake pedal and restart the engine. Have the car checked by your car is caused by a limiter in and out. If...

Owner's Manual
Page 125
...models and the Canadian sixpassenger model have your car as soon as standard equipment. It does this by downshifting to a lower gear and removing your car repaired as soon as it much longer distance will need to press on the brake pedal very hard before you maintain steering ... you will immediately notice that means the ABS has activated. It requires no special effort or driving technique. On dry pavement, you start the engine. Under all conditions, the ABS is safe. indicator shown The ABS is the ABS working. It is always "On". The ABS is optional ...
...models and the Canadian sixpassenger model have your car as soon as standard equipment. It does this by downshifting to a lower gear and removing your car repaired as soon as it much longer distance will need to press on the brake pedal very hard before you maintain steering ... you will immediately notice that means the ABS has activated. It requires no special effort or driving technique. On dry pavement, you start the engine. Under all conditions, the ABS is safe. indicator shown The ABS is the ABS working. It is always "On". The ABS is optional ...

Owner's Manual
Page 145
... will allow the oil to drain down to the bottom of minutes after shutting off the engine. If it is between the upper and lower marks, the level is at the end of... level is correct. Maintenance 3. Tighten it with a cloth or paper towel. 2. To add oil, unscrew and remove the engine oil fill cap on level ground. 1. Insert it out again and look at the oil level at or below ...the lower mark. you could damage the engine. Pull out the dipstick (orange loop) and wipe it securely Wait a few minutes and recheck the oil level...
... will allow the oil to drain down to the bottom of minutes after shutting off the engine. If it is between the upper and lower marks, the level is at the end of... level is correct. Maintenance 3. Tighten it with a cloth or paper towel. 2. To add oil, unscrew and remove the engine oil fill cap on level ground. 1. Insert it out again and look at the oil level at or below ...the lower mark. you could damage the engine. Pull out the dipstick (orange loop) and wipe it securely Wait a few minutes and recheck the oil level...

Owner's Manual
Page 147
Synthetic Oil You may use a synthetic motor oil if it off. Additives Your Honda does not need any oil additives. It only increases the cost of operating your engine if they are not removed regularly. Oil and Filter Changes Always change intervals given in your car's performance or ... never goes below 20°F ( - 7°C). energy conserving, a service classification of 5W-30 is preferred for the engine or transmission will not increase your Honda. Unless you have the knowledge and proper equipment, you the oil's viscosity or weight. Maintenance Changing the oil and filter ...
Synthetic Oil You may use a synthetic motor oil if it off. Additives Your Honda does not need any oil additives. It only increases the cost of operating your engine if they are not removed regularly. Oil and Filter Changes Always change intervals given in your car's performance or ... never goes below 20°F ( - 7°C). energy conserving, a service classification of 5W-30 is preferred for the engine or transmission will not increase your Honda. Unless you have the knowledge and proper equipment, you the oil's viscosity or weight. Maintenance Changing the oil and filter ...

Owner's Manual
Page 148
...Open the hood and remove the engine oil fill cap. Remove the oil filter and let the remaining oil drain. Turn off the engine and reinspect your Honda dealer) is required to : 43 N.m (4.4 kgf.m , 32 Ibf.ft) 8. Replace the engine oil fill cap. Start the engine. Drain the oil into... an appropriate container. 3. Remove the oil drain bolt from your work. Put ...
...Open the hood and remove the engine oil fill cap. Remove the oil filter and let the remaining oil drain. Turn off the engine and reinspect your Honda dealer) is required to : 43 N.m (4.4 kgf.m , 32 Ibf.ft) 8. Replace the engine oil fill cap. Start the engine. Drain the oil into... an appropriate container. 3. Remove the oil drain bolt from your work. Put ...

Owner's Manual
Page 150
...RADIATOR CAP RESERVE TANK 2. Put the cap back on . This relieves any pressure remaining in the radiator. Tighten it stops. Removing the radiator cap while the engine is low. 5. Add coolant if it to the base of the filler neck. Pour coolant into the reserve tank. Turn the... radiator cap counterclockwise, without pressing down before removing the radiator cap. 1. The coolant level should also check the coolant level in the...
...RADIATOR CAP RESERVE TANK 2. Put the cap back on . This relieves any pressure remaining in the radiator. Tighten it stops. Removing the radiator cap while the engine is low. 5. Add coolant if it to the base of the filler neck. Pour coolant into the reserve tank. Turn the... radiator cap counterclockwise, without pressing down before removing the radiator cap. 1. The coolant level should also check the coolant level in the...

Owner's Manual
Page 151
...radiator. Loosen the drain plug on the bottom of the car. Remove the drain bolt from the engine block. Open the hood. DRAIN BOLT DRAIN PLUG 3. The coolant will drain through the splash guard. Replacing Engine Coolant The cooling system should have the tools and knowledge, you...rust inhibitors or other additives to the time and distance recommendations in the maintenance schedule. Remove the radiator cap. They may not be completely drained and refilled with the coolant or engine components. Unless you should be compatible with new coolant according to your car's cooling ...
...radiator. Loosen the drain plug on the bottom of the car. Remove the drain bolt from the engine block. Open the hood. DRAIN BOLT DRAIN PLUG 3. The coolant will drain through the splash guard. Replacing Engine Coolant The cooling system should have the tools and knowledge, you...rust inhibitors or other additives to the time and distance recommendations in the maintenance schedule. Remove the radiator cap. They may not be completely drained and refilled with the coolant or engine components. Unless you should be compatible with new coolant according to your car's cooling ...

Owner's Manual
Page 152
...39 Imp gal) 7. Tighten it again when coolant comes out in a steady stream with an equal amount of purified or distilled water in the engine block. CONTINUED Maintenance When the coolant stops draining, tighten the drain plug in its holder by pulling it securely. 6. Mix the recommended antifreeze ... in the bottom of the filler neck. Apply nonhardening sealant to the base of the radiator. Remove the reserve tank from its holder. 5. Tighten it straight up to the base of the engine. Put the cap on top of the filler neck. 8. Cooling System RESERVE TANK FILLER NECK...
...39 Imp gal) 7. Tighten it again when coolant comes out in a steady stream with an equal amount of purified or distilled water in the engine block. CONTINUED Maintenance When the coolant stops draining, tighten the drain plug in its holder by pulling it securely. 6. Mix the recommended antifreeze ... in the bottom of the filler neck. Apply nonhardening sealant to the base of the radiator. Remove the reserve tank from its holder. 5. Tighten it straight up to the base of the engine. Put the cap on top of the filler neck. 8. Cooling System RESERVE TANK FILLER NECK...

Owner's Manual
Page 153
... prevents freezing in the windshield washer reservoir at the level gauge attached to the MAX mark. Maintenance Check the reservoir's fluid level by removing the cap and looking at least monthly during normal usage. RESERVE TANK LEVEL GAUGE Antifreeze can damage your car's pain while a vinegar.../water solution can damage the windshield washer pump. Use only commercially-available windshield washer fluid. 10.Turn off the engine. NOTICE Do not use the washers often, check the level every time you stop for fuel. The windshield washer reservoir is located behind...
... prevents freezing in the windshield washer reservoir at the level gauge attached to the MAX mark. Maintenance Check the reservoir's fluid level by removing the cap and looking at least monthly during normal usage. RESERVE TANK LEVEL GAUGE Antifreeze can damage your car's pain while a vinegar.../water solution can damage the windshield washer pump. Use only commercially-available windshield washer fluid. 10.Turn off the engine. NOTICE Do not use the washers often, check the level every time you stop for fuel. The windshield washer reservoir is located behind...

Owner's Manual
Page 154
... to bring it with the engine at normal operating temperature. 1. Insert the dipstick all the way back in the maintenance schedule. It should be between the upper and lower marks. Remove the dipstick and check the fluid level. Use Honda Premium Formula Automatic Transmission Fluid ...or an equivalent DEXRON® II Automatic Transmission Fluid (ATF) only. 6. Automatic Transmission Fluid 5. Shut off the engine. 2. If the level is below the ...
... to bring it with the engine at normal operating temperature. 1. Insert the dipstick all the way back in the maintenance schedule. It should be between the upper and lower marks. Remove the dipstick and check the fluid level. Use Honda Premium Formula Automatic Transmission Fluid ...or an equivalent DEXRON® II Automatic Transmission Fluid (ATF) only. 6. Automatic Transmission Fluid 5. Shut off the engine. 2. If the level is below the ...

Owner's Manual
Page 157
... Conditions) Clean the air cleaner element by pulling the head on the passenger's side of the engine compartment. If you do not have access to compressed air (such as a service station), ask your Honda dealer to do this service. The air cleaner element is inside the box on each pin. ...To replace it in the opposite direction to the time and distance recommendations in the maintenance schedule. Remove the air duct from the air cleaner housing cover. Remove the two pins holding the air intake cover by blowing compressed air through it : 1. Maintenance
... Conditions) Clean the air cleaner element by pulling the head on the passenger's side of the engine compartment. If you do not have access to compressed air (such as a service station), ask your Honda dealer to do this service. The air cleaner element is inside the box on each pin. ...To replace it in the opposite direction to the time and distance recommendations in the maintenance schedule. Remove the air duct from the air cleaner housing cover. Remove the two pins holding the air intake cover by blowing compressed air through it : 1. Maintenance


