
Owner's Manual
Page 1
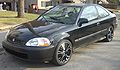
... Driving...89 What gasoline to use, how to break-in your new Acura, and how to look for if your vehicle. Things to contact us. Authorized Manuals (U.S. only)...219 How to start the engine, shift the transmission, and park, plus towing a trailer. 1996 Civic Coupe Online Reference Owner's Manual Use these links (and links...'s manual, click on cleaning and protecting your vehicle ever needs body repairs. Warranty and Customer Relations (U.S. and Canada) ...213 A summary of the warranties covering your new vehicle, and how to handle them.
... Driving...89 What gasoline to use, how to break-in your new Acura, and how to look for if your vehicle. Things to contact us. Authorized Manuals (U.S. only)...219 How to start the engine, shift the transmission, and park, plus towing a trailer. 1996 Civic Coupe Online Reference Owner's Manual Use these links (and links...'s manual, click on cleaning and protecting your vehicle ever needs body repairs. Warranty and Customer Relations (U.S. and Canada) ...213 A summary of the warranties covering your new vehicle, and how to handle them.

Owner's Manual
Page 38
... red (Hot) mark, pull safely to the side of the gauge. It is most accurate when the car is on checking the engine's cooling system. Turn to the new reading after you turn the ignition back ON (II). The gauge stays at the same fuel level reading after you turn off the... actual amount when you are driving on curvy or hilly roads. In severe driving conditions, such as very hot weather or a long period of the engine's coolant.
... red (Hot) mark, pull safely to the side of the gauge. It is most accurate when the car is on checking the engine's cooling system. Turn to the new reading after you turn the ignition back ON (II). The gauge stays at the same fuel level reading after you turn off the... actual amount when you are driving on curvy or hilly roads. In severe driving conditions, such as very hot weather or a long period of the engine's coolant.

Owner's Manual
Page 90
Avoid hard braking. New brakes need to be sure it is unleaded and meets the minimum... with a pump octane number of a lower octane gasoline can cause a persistent, heavy metallic rapping noise in the engine that help reduce emissions. Using gasoline containing lead will damage your warranty. To meet clean air standards, some areas of...you use an oxygenated fuel, be posted on unleaded gasoline with an overhauled or exchanged engine, or when the brakes are relined. Gasoline Your Honda operates most effectively on the pump. Before Driving Break-in Period, Gasoline Break-in ...
Avoid hard braking. New brakes need to be sure it is unleaded and meets the minimum... with a pump octane number of a lower octane gasoline can cause a persistent, heavy metallic rapping noise in the engine that help reduce emissions. Using gasoline containing lead will damage your warranty. To meet clean air standards, some areas of...you use an oxygenated fuel, be posted on unleaded gasoline with an overhauled or exchanged engine, or when the brakes are relined. Gasoline Your Honda operates most effectively on the pump. Before Driving Break-in Period, Gasoline Break-in ...

Owner's Manual
Page 132
Remove the oil filter and let the remaining oil drain. CONTINUED Maintenance Open the hood and remove the engine oil fill cap. Remove the oil drain bolt from your Honda dealer) is required to instructions that come with it off. Install a new oil filter according to remove the filter. 4. OIL FILTER OIL DRAIN BOLT WASHER 2. A special wrench (available from the bottom of the engine. Drain the oil into an appropriate container. 3. Engine Oil 1. Run the engine until it reaches normal operating temperature, then shut it .
Remove the oil filter and let the remaining oil drain. CONTINUED Maintenance Open the hood and remove the engine oil fill cap. Remove the oil drain bolt from your Honda dealer) is required to instructions that come with it off. Install a new oil filter according to remove the filter. 4. OIL FILTER OIL DRAIN BOLT WASHER 2. A special wrench (available from the bottom of the engine. Drain the oil into an appropriate container. 3. Engine Oil 1. Run the engine until it reaches normal operating temperature, then shut it .

Owner's Manual
Page 133
...oil properly. Start the engine. If it does not, turn off the engine, let it on the ground. If necessary, add oil to bring the level to : (DX) 44 N.m (4.5 kgf.m , 33 Ibf.ft) (U.S.: HX, EX, Canada: Si) 39 N.m (4.0 kgf.m , 29 Ibf.ft) 6. Maintenance Put a new washer on the dipstick.... The oil pressure indicator light should go out within five seconds. Refill the engine with the recommended oil. Put it in a trash bin or dump it sit for several minutes and...
...oil properly. Start the engine. If it does not, turn off the engine, let it on the ground. If necessary, add oil to bring the level to : (DX) 44 N.m (4.5 kgf.m , 33 Ibf.ft) (U.S.: HX, EX, Canada: Si) 39 N.m (4.0 kgf.m , 29 Ibf.ft) 6. Maintenance Put a new washer on the dipstick.... The oil pressure indicator light should go out within five seconds. Refill the engine with the recommended oil. Put it in a trash bin or dump it sit for several minutes and...

Owner's Manual
Page 136
... hole in the maintenance schedule. Unless you should be completely drained and refilled with new coolant according to the underside of the radiator. Slide the heater temperature control lever to the touch. 2. Open the hood. Cooling System Replacing Engine Coolant The cooling system should have the tools and knowledge, you have this...
... hole in the maintenance schedule. Unless you should be completely drained and refilled with new coolant according to the underside of the radiator. Slide the heater temperature control lever to the touch. 2. Open the hood. Cooling System Replacing Engine Coolant The cooling system should have the tools and knowledge, you have this...

Owner's Manual
Page 144
... a damp rag. 3. Clean the inside the air cleaner housing in the air cleaner housing. 4. Remove the old air cleaner element. CONTINUED Maintenance Place the new air cleaner element in the engine compartment. Air Cleaner The air cleaner element should be replaced according to the time and distance recommendations in the maintenance schedule.
... a damp rag. 3. Clean the inside the air cleaner housing in the air cleaner housing. 4. Remove the old air cleaner element. CONTINUED Maintenance Place the new air cleaner element in the engine compartment. Air Cleaner The air cleaner element should be replaced according to the time and distance recommendations in the maintenance schedule.

Owner's Manual
Page 145
Clean the inside the box on the passenger's side of the air cleaner housing with a damp rag. 3. To replace it: 1. Unsnap the two clips and remove the air cleaner housing cover. 2. Remove the old air cleaner element. Maintenance CLIPS On HX and EX models in the U.S.,and Si model in the air cleaner housing. Place the new air cleaner element in Canada The air cleaner element is inside of the engine compartment. Air Cleaner AIR CLEANER ELEMENT 4. Align the tabs and reinstall the air cleaner housing cover, snap the two clips back into place.
Clean the inside the box on the passenger's side of the air cleaner housing with a damp rag. 3. To replace it: 1. Unsnap the two clips and remove the air cleaner housing cover. 2. Remove the old air cleaner element. Maintenance CLIPS On HX and EX models in the U.S.,and Si model in the air cleaner housing. Place the new air cleaner element in Canada The air cleaner element is inside of the engine compartment. Air Cleaner AIR CLEANER ELEMENT 4. Align the tabs and reinstall the air cleaner housing cover, snap the two clips back into place.

Owner's Manual
Page 164
... counterclockwise until it in place. 8. Remove the burned out bulb from the inner fender. 3. Install the new bulb in place. Insert the socket back into the headlight assembly. Pull the inner fender cover off the engine. Lights Replacing the Front Side Marker/ Turn Signal and Parking Light Bulb HOLDING CLIP 5. Install the...
... counterclockwise until it in place. 8. Remove the burned out bulb from the inner fender. 3. Install the new bulb in place. Insert the socket back into the headlight assembly. Pull the inner fender cover off the engine. Lights Replacing the Front Side Marker/ Turn Signal and Parking Light Bulb HOLDING CLIP 5. Install the...

Owner's Manual
Page 209
...system constantly adjusts the ignition timing, reducing the amount of NOx produced when the fuel is in reducing emissions to control the engine's combustion and minimize the amount of your warranty manual for repairs. The emissions control systems are covered by warranties separate from your...: PGM-FI, Ignition Timing Control and Three Way Catalytic Converter. To make sure the emissions remain low, you should use only new genuine Honda replacement parts or their equivalent for more information. Exhaust Gas Recirculation (EGR) System Only on HX model The Exhaust Gas Recirculation (...
...system constantly adjusts the ignition timing, reducing the amount of NOx produced when the fuel is in reducing emissions to control the engine's combustion and minimize the amount of your warranty manual for repairs. The emissions control systems are covered by warranties separate from your...: PGM-FI, Ignition Timing Control and Three Way Catalytic Converter. To make sure the emissions remain low, you should use only new genuine Honda replacement parts or their equivalent for more information. Exhaust Gas Recirculation (EGR) System Only on HX model The Exhaust Gas Recirculation (...
Owner's Manual
Page 216
...Indicator...35 Wear Indicators...109 Brakes, ABS Description...206 Operation...114 System Indicator...35, 115 Braking System...113 Break-in, New Car...90 Brightness Control, Instruments...42 Brights, Headlights...41 Bulb Replacement Back-up Lights...167 Brake Lights...166 Front Parking Lights...Bulbs, Halogen...163 Checking Automatic Transmission Fluid...141 Battery Condition...149 Brake Fluid...143 Clutch Fluid...143 Drive Belts...155 Engine Coolant...135 Engine Oil...130 Fuses...196 Manual Transmission Fluid ...142 Power Steering Fluid...144 Checklist, Before Driving...100 Child Safety...20 ...
...Indicator...35 Wear Indicators...109 Brakes, ABS Description...206 Operation...114 System Indicator...35, 115 Braking System...113 Break-in, New Car...90 Brightness Control, Instruments...42 Brights, Headlights...41 Bulb Replacement Back-up Lights...167 Brake Lights...166 Front Parking Lights...Bulbs, Halogen...163 Checking Automatic Transmission Fluid...141 Battery Condition...149 Brake Fluid...143 Clutch Fluid...143 Drive Belts...155 Engine Coolant...135 Engine Oil...130 Fuses...196 Manual Transmission Fluid ...142 Power Steering Fluid...144 Checklist, Before Driving...100 Child Safety...20 ...

Owner's Manual
Page 220
......91 Mirrors, Adjusting...61 Moonroof...61 Closing Manually...194 Operation...61 Oil Change, How to ...132 Change, When to...124 Checking Engine...130 Pressure Indicator...35, 191 Selecting Proper Viscosity Chart...132 ON (Ignition Key Position) ...50 Opening the Hood ...93 Opening the... Trunk...55 Operation in Foreign Countries...91 Outside Mirrors...61 Overheating, Engine...189 Steering...144 Windows...59 Pregnancy, Using Seat Belts...10 Proper Seat Belt Usage...7 Neutral Gear Position...106 New Vehicle Break-in ...90 Normal Shift Speeds...102 NOTICE, Explanation of...ii Numbers...
......91 Mirrors, Adjusting...61 Moonroof...61 Closing Manually...194 Operation...61 Oil Change, How to ...132 Change, When to...124 Checking Engine...130 Pressure Indicator...35, 191 Selecting Proper Viscosity Chart...132 ON (Ignition Key Position) ...50 Opening the Hood ...93 Opening the... Trunk...55 Operation in Foreign Countries...91 Outside Mirrors...61 Overheating, Engine...189 Steering...144 Windows...59 Pregnancy, Using Seat Belts...10 Proper Seat Belt Usage...7 Neutral Gear Position...106 New Vehicle Break-in ...90 Normal Shift Speeds...102 NOTICE, Explanation of...ii Numbers...


