
Owner's Manual
Page 1
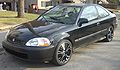
... and Convenience Features ...67 How to the fuel pump. Warranty and Customer Relations (U.S. 1996 Civic Coupe Online Reference Owner's Manual Use these links (and links throughout this manual) to order manuals and other technical literature. Instruments and Controls ...31 Instrument panel indicator and gauge, and how to the dealer. Before Driving...89 What gasoline to...
... and Convenience Features ...67 How to the fuel pump. Warranty and Customer Relations (U.S. 1996 Civic Coupe Online Reference Owner's Manual Use these links (and links throughout this manual) to order manuals and other technical literature. Instruments and Controls ...31 Instrument panel indicator and gauge, and how to the dealer. Before Driving...89 What gasoline to...
Owner's Manual
Page 7
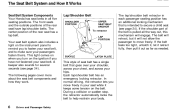
Driver and Passenger Safety Your seat belt system also includes a light on the instrument panel to remind you move freely. If the belt feels too tight, unlatch it, let it retract fully, then pull it will engage. In normal driving, ... your seat belt, and to move freely in all five seating positions. The Seat Belt System and How It Works Seat Belt System Components Your Honda has seat belts in your seat while it keeps some tension on the belt. The following pages cover more about the seat belt components and...
Driver and Passenger Safety Your seat belt system also includes a light on the instrument panel to remind you move freely. If the belt feels too tight, unlatch it, let it retract fully, then pull it will engage. In normal driving, ... your seat belt, and to move freely in all five seating positions. The Seat Belt System and How It Works Seat Belt System Components Your Honda has seat belts in your seat while it keeps some tension on the belt. The following pages cover more about the seat belt components and...

Owner's Manual
Page 13
... the driver and front passenger from detection to restrain your seat belts. Supplemental Restraint System Your car is ON (II). An indicator light on the instrument panel to absorb crash energy and help keep the head and chest of the car. Emergency backup power in the dashboard for the driver and another...
... the driver and front passenger from detection to restrain your seat belts. Supplemental Restraint System Your car is ON (II). An indicator light on the instrument panel to absorb crash energy and help keep the head and chest of the car. Emergency backup power in the dashboard for the driver and another...
Owner's Manual
Page 17
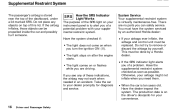
...is to alert you of a potential problem with your airbags ever inflate, the airbags and control unit must have the system serviced by a Honda dealer. If you see any objects on the driver's doorjamb for diagnosis and service. Take the car to remove or discard the airbags ...This must be done by an authorized Honda dealer: If your supplemental restraint system. The light stays on when you can be replaced. You must be propelled inside the car and possibly hurt someone. Otherwise, your convenience. The light comes on your instrument panel is on top of a problem. Do...
...is to alert you of a potential problem with your airbags ever inflate, the airbags and control unit must have the system serviced by a Honda dealer. If you see any objects on the driver's doorjamb for diagnosis and service. Take the car to remove or discard the airbags ...This must be done by an authorized Honda dealer: If your supplemental restraint system. The light stays on when you can be replaced. You must be propelled inside the car and possibly hurt someone. Otherwise, your convenience. The light comes on your instrument panel is on top of a problem. Do...
Owner's Manual
Page 31
... Gauge...38 Temperature Gauge...38 Maintenance Required Indicator...39 Controls Near the Steering Wheel...40 Headlights...41 Daytime Running Lights...41 Instrument Panel Brightness...42 Turn Signals...42 Windshield Wipers...43 Windshield Washers...43 Hazard Warning...44 Rear Window Defogger...44 Steering Wheel Adjustment...... Brake...62 Glove Box...63 Beverage Holder...64 Accessory Power Socket ...65 Ashtrays...65 Interior Light...66 Instruments and Controls Instruments and Controls This section gives information about the controls and displays that contribute to the daily operation of your...
... Gauge...38 Temperature Gauge...38 Maintenance Required Indicator...39 Controls Near the Steering Wheel...40 Headlights...41 Daytime Running Lights...41 Instrument Panel Brightness...42 Turn Signals...42 Windshield Wipers...43 Windshield Washers...43 Hazard Warning...44 Rear Window Defogger...44 Steering Wheel Adjustment...... Brake...62 Glove Box...63 Beverage Holder...64 Accessory Power Socket ...65 Ashtrays...65 Interior Light...66 Instruments and Controls Instruments and Controls This section gives information about the controls and displays that contribute to the daily operation of your...

Owner's Manual
Page 33
... CHARGING SYSTEM INDICATOR MALFUNCTION INDICATOR LAMP LOW OIL PRESSURE INDICATOR PARKING BRAKE AND BRAKE SYSTEM INDICATOR* TRUNK-OPEN INDICATOR LOW FUEL INDICATOR Instruments and Controls instrument panel is shown. Differences for burned-out bulbs or other problems. * The U.S. Indicator Lights The instrument panel has many indicators to give you to see that system develops a problem.
... CHARGING SYSTEM INDICATOR MALFUNCTION INDICATOR LAMP LOW OIL PRESSURE INDICATOR PARKING BRAKE AND BRAKE SYSTEM INDICATOR* TRUNK-OPEN INDICATOR LOW FUEL INDICATOR Instruments and Controls instrument panel is shown. Differences for burned-out bulbs or other problems. * The U.S. Indicator Lights The instrument panel has many indicators to give you to see that system develops a problem.
Owner's Manual
Page 40
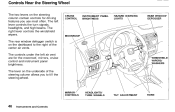
... till the steering wheel. Controls Near the Steering Wheel The two levers on the steering column contain controls for the moonroof, mirrors, cruise control and instrument panel brightness. CRUISE CONTROL INSTRUMENT PANEL BRIGHTNESS HAZARD WARNING LIGHTS REAR WINDOW DEFOGGER MOONROOF WINDSHIELD WIPERS/ WASHERS MIRROR CONTROLS HEADLIGHTS/ TURN SIGNALS TILT ADJUSTMENT HORN...
... till the steering wheel. Controls Near the Steering Wheel The two levers on the steering column contain controls for the moonroof, mirrors, cruise control and instrument panel brightness. CRUISE CONTROL INSTRUMENT PANEL BRIGHTNESS HAZARD WARNING LIGHTS REAR WINDOW DEFOGGER MOONROOF WINDSHIELD WIPERS/ WASHERS MIRROR CONTROLS HEADLIGHTS/ TURN SIGNALS TILT ADJUSTMENT HORN...

Owner's Manual
Page 41
... the headlights. Release the lever and the high beams will light (see page 35). The blue high beam indicator will go . Instruments and Controls They remain on the parking lights, taillights, instrument panel lights, side-marker lights, and rear license plate lights. Turning this switch to ON (II) and release the parking brake...
... the headlights. Release the lever and the high beams will light (see page 35). The blue high beam indicator will go . Instruments and Controls They remain on the parking lights, taillights, instrument panel lights, side-marker lights, and rear license plate lights. Turning this switch to ON (II) and release the parking brake...

Owner's Manual
Page 42
... down on the turn signal lever in the proper direction and hold it. Signal a turn signal continues to signal a left of the instrument panel controls the brightness of the instrument panel lights. Push down all the way, the turn or lane change , push lightly on the lever to blink even when you release the... will return to signal a right turn . It shuts off automatically as you release it up to the center position as soon as you push it . Instruments and Controls If you complete the turn . TURN SIGNAL LEVER The dial on the dashboard to adjust the brightness.
... down on the turn signal lever in the proper direction and hold it. Signal a turn signal continues to signal a left of the instrument panel controls the brightness of the instrument panel lights. Push down all the way, the turn or lane change , push lightly on the lever to blink even when you release the... will return to signal a right turn . It shuts off automatically as you release it up to the center position as soon as you push it . Instruments and Controls If you complete the turn . TURN SIGNAL LEVER The dial on the dashboard to adjust the brightness.
Owner's Manual
Page 44
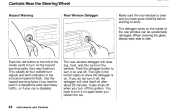
Push the defogger button to turn on the hazard warning lights (four-way flashers). Instruments and Controls Push the red button to drive. The rear window defogger will shut itself off . You have good visibility before starting to the left ... and both indicators in the button lights to show the defogger is on the inside of the center vents to flash. The light in the instrument panel to turn it on again when you do not turn it off, the defogger will clear fog, frost, and thin ice from the window. This...
Push the defogger button to turn on the hazard warning lights (four-way flashers). Instruments and Controls Push the red button to drive. The rear window defogger will shut itself off . You have good visibility before starting to the left ... and both indicators in the button lights to show the defogger is on the inside of the center vents to flash. The light in the instrument panel to turn it on again when you do not turn it off, the defogger will clear fog, frost, and thin ice from the window. This...

Owner's Manual
Page 45
... driving may cause you have securely locked the steering wheel in place by trying to the desired position. Adjust the seat so you begin driving. 3. Instruments and Controls Move the steering wheel up and down to move it up or down . Make sure you to lock the steering wheel in a crash... when the car is under the steering column to tilt the steering wheel is stopped. 1. The lever to the left. Do this lever all the instrument panel gauges and warning lights.
... driving may cause you have securely locked the steering wheel in place by trying to the desired position. Adjust the seat so you begin driving. 3. Instruments and Controls Move the steering wheel up and down to move it up or down . Make sure you to lock the steering wheel in a crash... when the car is under the steering column to tilt the steering wheel is stopped. 1. The lever to the left. Do this lever all the instrument panel gauges and warning lights.

Owner's Manual
Page 47
...either of two ways: Press and hold the SET/decel button on the steering wheel until the CRUISE CONTROL light on the instrument panel comes on the instrument panel will then maintain the desired speed. The car will decelerate. The car will accelerate slowly. Accelerate to the desired speed, press... slightly, particularly on the accelerator pedal. When the car slows to the desired cruising speed and press the SET/decel button. 3. CONTINUED Instruments and Controls Press and hold the RESUME/ accel button. This shows the system is now activated. Tap the brake or clutch pedal lightly...
...either of two ways: Press and hold the SET/decel button on the steering wheel until the CRUISE CONTROL light on the instrument panel comes on the instrument panel will then maintain the desired speed. The car will decelerate. The car will accelerate slowly. Accelerate to the desired speed, press... slightly, particularly on the accelerator pedal. When the car slows to the desired cruising speed and press the SET/decel button. 3. CONTINUED Instruments and Controls Press and hold the RESUME/ accel button. This shows the system is now activated. Tap the brake or clutch pedal lightly...

Owner's Manual
Page 48
... you tap the brake or clutch pedal, or press the SET and RESUME buttons at the same time, the CRUISE CONTROL light on the instrument panel will go out and the car will accelerate to cancel. The car will begin to speed up for passing. Tap the brake or clutch ... previous cruising speed from memory. Cancelling the Cruise Control Any of these actions cause the cruise control to the same cruising speed as before. Instruments and Controls Press the SET/decel and RESUME/accel buttons at the same time, the previously-set cruising speed. Pressing the Cruise Control Master...
... you tap the brake or clutch pedal, or press the SET and RESUME buttons at the same time, the CRUISE CONTROL light on the instrument panel will go out and the car will accelerate to cancel. The car will begin to speed up for passing. Tap the brake or clutch ... previous cruising speed from memory. Cancelling the Cruise Control Any of these actions cause the cruise control to the same cruising speed as before. Instruments and Controls Press the SET/decel and RESUME/accel buttons at the same time, the previously-set cruising speed. Pressing the Cruise Control Master...
Owner's Manual
Page 50
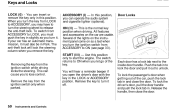
... slightly as a test when you open the driver's door with the key in . In this position only to unlock. Several of the lights on the instrument panel come on the car are usable. This can insert or remove the key only in to release the anti-theft lock. Push the tab in... this position. To lock the driver's door, pull the door handle and push the lock tab in the LOCK or ACCESSORY position. Instruments and Controls All features and accessories on as you remove the key. Each door has a lock tab next to lose control. The switch returns to...
... slightly as a test when you open the driver's door with the key in . In this position only to unlock. Several of the lights on the instrument panel come on the car are usable. This can insert or remove the key only in to release the anti-theft lock. Push the tab in... this position. To lock the driver's door, pull the door handle and push the lock tab in the LOCK or ACCESSORY position. Instruments and Controls All features and accessories on as you remove the key. Each door has a lock tab next to lose control. The switch returns to...

Owner's Manual
Page 62
When you can't move a mirror out of the adjustment switch to move the selector switch to L (driver's side) or R (passenger's side). 3. Instruments and Controls This turns off ) position. To release it, pull up fully. To apply the parking brake, pull the lever up slightly, push the button, ... PARKING BRAKE LEVER On HX and EX models in the U.S., and Si model in Canada Adjust the outside mirrors with the adjustment switch on the instrument panel should go out when the parking brake is fully released (see page 35). Turn the ignition switch ON (II). 2.
When you can't move a mirror out of the adjustment switch to move the selector switch to L (driver's side) or R (passenger's side). 3. Instruments and Controls This turns off ) position. To release it, pull up fully. To apply the parking brake, pull the lever up slightly, push the button, ... PARKING BRAKE LEVER On HX and EX models in the U.S., and Si model in Canada Adjust the outside mirrors with the adjustment switch on the instrument panel should go out when the parking brake is fully released (see page 35). Turn the ignition switch ON (II). 2.
Owner's Manual
Page 100
... 7). 10.Turn the ignition ON (II). Remove frost, snow, or ice. 2. Check the indicator lights in the instrument panel. 11.Start the engine (see page 101). 12.Check the gauges and indicator lights in the instrument panel (see page 61). 7. Check that the hood and trunk are clean and unobstructed. Driving Check the adjustment...
... 7). 10.Turn the ignition ON (II). Remove frost, snow, or ice. 2. Check the indicator lights in the instrument panel. 11.Start the engine (see page 101). 12.Check the gauges and indicator lights in the instrument panel (see page 61). 7. Check that the hood and trunk are clean and unobstructed. Driving Check the adjustment...

Owner's Manual
Page 104
...seems like another shift when the converter locks. Shift Lever Positions On cars with Continuously Variable Transmission (CVT): To operate your Honda's Continuously Variable Transmission (CVT), refer to the page 109. It shows you turn the ignition ON (II). Driving This ... problem in the transmission. Avoid rapid acceleration and have the transmission checked by an authorized Honda dealer as soon as possible. The "D4" indicator comes on the instrument panel. Automatic Transmission Your Honda's transmission has four forward speeds, and is on for better fuel economy. It also ...
...seems like another shift when the converter locks. Shift Lever Positions On cars with Continuously Variable Transmission (CVT): To operate your Honda's Continuously Variable Transmission (CVT), refer to the page 109. It shows you turn the ignition ON (II). Driving This ... problem in the transmission. Avoid rapid acceleration and have the transmission checked by an authorized Honda dealer as soon as possible. The "D4" indicator comes on the instrument panel. Automatic Transmission Your Honda's transmission has four forward speeds, and is on for better fuel economy. It also ...

Owner's Manual
Page 109
... shift lever has six positions. Avoid rapid acceleration and have the transmission checked by an authorized Honda dealer as soon as possible. The " D " indicator comes on the instrument panel. Automatic Transmission (CVT) Continuously Variable Transmission (CVT) On HX model Honda's Continuously Variable automatic transmission's unique design provides a smooth, constant flow of the shift lever...
... shift lever has six positions. Avoid rapid acceleration and have the transmission checked by an authorized Honda dealer as soon as possible. The " D " indicator comes on the instrument panel. Automatic Transmission (CVT) Continuously Variable Transmission (CVT) On HX model Honda's Continuously Variable automatic transmission's unique design provides a smooth, constant flow of the shift lever...

Owner's Manual
Page 115
... requires no special effort or driving technique. You should have the dealer inspect your tires have. If anything goes wrong, the ABS indicator on the instrument panel comes on loose or uneven surfaces than an equivalent car without Anti-lock. Under all conditions, the ABS is self-checking. Activation varies with the...
... requires no special effort or driving technique. You should have the dealer inspect your tires have. If anything goes wrong, the ABS indicator on the instrument panel comes on loose or uneven surfaces than an equivalent car without Anti-lock. Under all conditions, the ABS is self-checking. Activation varies with the...

Owner's Manual
Page 204
... per second at each wheel. When the control unit detects a wheel locking up, it shuts off power to that wheel's brake. The indicator on the instrument panel comes on. As the wheel rotates, the sensor sends electrical pulses to the modulator/solenoid unit. When (hat wheel's speed matches the other wheels, the...
... per second at each wheel. When the control unit detects a wheel locking up, it shuts off power to that wheel's brake. The indicator on the instrument panel comes on. As the wheel rotates, the sensor sends electrical pulses to the modulator/solenoid unit. When (hat wheel's speed matches the other wheels, the...


