
Owner's Manual
Page 6
.... Two people should never use the same seat belt. Do not put shoulder belt pads or other occupants, or out of the car, against other accessories on seat belts. Not wearing a seat belt increases the chance of being thrown against the inside of the car. All infants and small children must...
.... Two people should never use the same seat belt. Do not put shoulder belt pads or other occupants, or out of the car, against other accessories on seat belts. Not wearing a seat belt increases the chance of being thrown against the inside of the car. All infants and small children must...
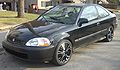
Owner's Manual
Page 31
... Folding Rear Seat...58 Power Windows...59 Moonroof...61 Mirrors...61 Adjusting the Power Mirrors...62 Parking Brake...62 Glove Box...63 Beverage Holder...64 Accessory Power Socket ...65 Ashtrays...65 Interior Light...66 Instruments and Controls All the essential controls are within easy reach. Instruments and Controls This section gives...
... Folding Rear Seat...58 Power Windows...59 Moonroof...61 Mirrors...61 Adjusting the Power Mirrors...62 Parking Brake...62 Glove Box...63 Beverage Holder...64 Accessory Power Socket ...65 Ashtrays...65 Interior Light...66 Instruments and Controls All the essential controls are within easy reach. Instruments and Controls This section gives...

Owner's Manual
Page 41
... you open the driver's door. To flash the high beams, pull back and hold the lever, no matter what position the headlight switch is in ACCESSORY (I) or LOCK (0), you will hear a reminder beeper when you hold the turn them on the headlights.
... you open the driver's door. To flash the high beams, pull back and hold the lever, no matter what position the headlight switch is in ACCESSORY (I) or LOCK (0), you will hear a reminder beeper when you hold the turn them on the headlights.
Owner's Manual
Page 49
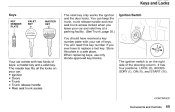
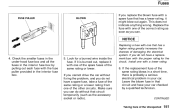
...handle Rear seat trunk access The ignition switch is on the right side of keys: a master key and a valet key. When replacing keys, use only Honda-approved key blanks. Ignition Switch Your car comes with your car and valet key at a parking facility. (See Trunk, page 55.) You should have to... Controls You will need this plate in a safe place. Store this key number if you leave your set of keys. It has four positions: LOCK (0), ACCESSORY (I), ON (II), and START (III). You can keep the trunk, trunk release handle and rear seat trunk access locked when you ever have received a ...
...handle Rear seat trunk access The ignition switch is on the right side of keys: a master key and a valet key. When replacing keys, use only Honda-approved key blanks. Ignition Switch Your car comes with your car and valet key at a parking facility. (See Trunk, page 55.) You should have to... Controls You will need this plate in a safe place. Store this key number if you leave your set of keys. It has four positions: LOCK (0), ACCESSORY (I), ON (II), and START (III). You can keep the trunk, trunk release handle and rear seat trunk access locked when you ever have received a ...
Owner's Manual
Page 50
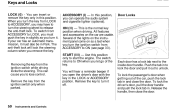
...audio system and cigarette lighter (optional). You will lock the steering column when you open the driver's door with the key in the LOCK or ACCESSORY position. The anti-theft lock will hear a reminder beeper if you remove the key. This is the normal key position when driving. This can... then close the door. ON (II) - Several of the lights on the instrument panel come on the car are usable. Remove the key from ACCESSORY to ON when you turn the ignition switch from the ignition switch only when parked. If your car has an automatic transmission, it . The switch...
...audio system and cigarette lighter (optional). You will lock the steering column when you open the driver's door with the key in the LOCK or ACCESSORY position. The anti-theft lock will hear a reminder beeper if you remove the key. This is the normal key position when driving. This can... then close the door. ON (II) - Several of the lights on the instrument panel come on the car are usable. Remove the key from ACCESSORY to ON when you turn the ignition switch from the ignition switch only when parked. If your car has an automatic transmission, it . The switch...
Owner's Manual
Page 53
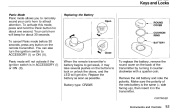
... the battery as soon as possible. Panic mode will not activate if the ignition switch is the same (+ side facing up), then insert it in ACCESSORY (I ) or ON (II). To activate this mode, press and hold the Panic button for about one second. CONTINUED Instruments and Controls Replacing the ...Battery Open ROUND COVER CUSHION RING BATTERY Close When the remote transmitter's battery begins to get dim. You can also turn the ignition switch to ACCESSORY (I ) or ON (II). Keys and Locks Panic Mode Panic mode allows you to remotely sound your car's horn to lock or unlock the doors...
... the battery as soon as possible. Panic mode will not activate if the ignition switch is the same (+ side facing up), then insert it in ACCESSORY (I ) or ON (II). To activate this mode, press and hold the Panic button for about one second. CONTINUED Instruments and Controls Replacing the ...Battery Open ROUND COVER CUSHION RING BATTERY Close When the remote transmitter's battery begins to get dim. You can also turn the ignition switch to ACCESSORY (I ) or ON (II). Keys and Locks Panic Mode Panic mode allows you to remotely sound your car's horn to lock or unlock the doors...

Owner's Manual
Page 65
The front ashtray fits in ACCESSORY (I) or ON (II). ACCESSORY SOCKET To use the accessory power socket, pull down . The ignition switch must be in the beverage holder. NOTICE Use the ashtray only for cigarettes, cigars and other things that ... for emptying, open the ashtray and then lift it up and out. To prevent a possible fire and damage to supply power for 12 volt DC accessories that can burn in the ashtray. Instruments and Controls Open the rear ashtray by swinging the upper edge down the cover...
The front ashtray fits in ACCESSORY (I) or ON (II). ACCESSORY SOCKET To use the accessory power socket, pull down . The ignition switch must be in the beverage holder. NOTICE Use the ashtray only for cigarettes, cigars and other things that ... for emptying, open the ashtray and then lift it up and out. To prevent a possible fire and damage to supply power for 12 volt DC accessories that can burn in the ashtray. Instruments and Controls Open the rear ashtray by swinging the upper edge down the cover...
Owner's Manual
Page 76
.... On the FM band, ST will store one frequency on the AM band, and two on the FM band. Audio System A M / F M Stereo Audio System Your Honda's audio system provides clear reception on both AM and FM bands, while the preset buttons allow you to is displayed. SEEK - Press the right side... ( ) to tune to a higher frequency, or the left side ( ) to tune to a desired frequency. Preset - The cassette player is broadcasting in ACCESSORY (I) or ON (II). Use the TUNE/SEEK bar to tune the radio to a lower Comfort and Convenience Features frequency.
.... On the FM band, ST will store one frequency on the AM band, and two on the FM band. Audio System A M / F M Stereo Audio System Your Honda's audio system provides clear reception on both AM and FM bands, while the preset buttons allow you to is displayed. SEEK - Press the right side... ( ) to tune to a higher frequency, or the left side ( ) to tune to a desired frequency. Preset - The cassette player is broadcasting in ACCESSORY (I) or ON (II). Use the TUNE/SEEK bar to tune the radio to a lower Comfort and Convenience Features frequency.

Owner's Manual
Page 81
... up. After you stop pressing the Preset buttons. Audio System Digital Clock The audio system also displays the time. The ignition switch must be in ACCESSORY (I) or ON (II). The hour numbers will automatically return to the correct value. Press the CLOCK button again, and the minutes numbers will begin blinking...
... up. After you stop pressing the Preset buttons. Audio System Digital Clock The audio system also displays the time. The ignition switch must be in ACCESSORY (I) or ON (II). The hour numbers will automatically return to the correct value. Press the CLOCK button again, and the minutes numbers will begin blinking...

Owner's Manual
Page 85
... to the beginning and play that is available through your dealer. When the system reaches the end of the way. Your dealer also has an accessory indash single CD player available that disc again. To operate this unit, use the instructions (except for the radio. You will start to six discs... CD Player Insert the disc into the CD slot. Push the CD/TAPE button and the disc will see the track number being played in ACCESSORY (I) or ON (II). You can also play .
... to the beginning and play that is available through your dealer. When the system reaches the end of the way. Your dealer also has an accessory indash single CD player available that disc again. To operate this unit, use the instructions (except for the radio. You will start to six discs... CD Player Insert the disc into the CD slot. Push the CD/TAPE button and the disc will see the track number being played in ACCESSORY (I) or ON (II). You can also play .

Owner's Manual
Page 89
This section will help you. Break-in Period...Gasoline...Oxygenated Fuels...Driving in this section first. If you plan to add any accessories to check the levels of important fluids. Before Driving Before you begin driving your car, please read the information in Foreign Countries......Service Station Procedures ...Filling the Fuel Tank...Opening the Hood...Fuel Economy...Vehicle Condition...Driving Habits...Accessories...Loading Cargo...90 90 90 91 92 92 93 96 96 96 97 98 Before Driving You also need to know what gasoline to...
This section will help you. Break-in Period...Gasoline...Oxygenated Fuels...Driving in this section first. If you plan to add any accessories to check the levels of important fluids. Before Driving Before you begin driving your car, please read the information in Foreign Countries......Service Station Procedures ...Filling the Fuel Tank...Opening the Hood...Fuel Economy...Vehicle Condition...Driving Habits...Accessories...Loading Cargo...90 90 90 91 92 92 93 96 96 96 97 98 Before Driving You also need to know what gasoline to...

Owner's Manual
Page 97
...for installation and use may fit your Honda dealer inspect the final installation. Some non-Honda accessories you want to personalize your car. Accessories Your Honda dealer has many cases, improper installation is the real cause of these accessories installed by your warranty. If you can... car's systems. Improper installation, or using electrical equipment not intended for width and offset. All Genuine Honda Accessories have your Honda, they may not meet Honda's specifications for mobile use on stereo amplifiers, please discuss it first with your car, and are covered...
...for installation and use may fit your Honda dealer inspect the final installation. Some non-Honda accessories you want to personalize your car. Accessories Your Honda dealer has many cases, improper installation is the real cause of these accessories installed by your warranty. If you can... car's systems. Improper installation, or using electrical equipment not intended for width and offset. All Genuine Honda Accessories have your Honda, they may not meet Honda's specifications for mobile use on stereo amplifiers, please discuss it first with your car, and are covered...

Owner's Manual
Page 98
... the front seats. Before Driving Those items can fly forward and injure you or your Honda is 45 kg (100 Ibs). It includes the total weight of people (driver and all passengers, their belongings and any accessories. Make sure you load cargo so it weighs. Loading Cargo The maximum load you can...
... the front seats. Before Driving Those items can fly forward and injure you or your Honda is 45 kg (100 Ibs). It includes the total weight of people (driver and all passengers, their belongings and any accessories. Make sure you load cargo so it weighs. Loading Cargo The maximum load you can...

Owner's Manual
Page 101
... 15 seconds. If the engine still does not start, press the accelerator pedal all the way. Use the following procedure: 1. Turn off all electrical accessories to the problem. Do not hold it there while starting the engine. Driving The thinner air found at least 10 seconds before , keep the ignition...) for no more than 15 seconds. Push the accelerator pedal halfway to the floor and hold it starts, lift your foot off all electrical accessories to the floor and hold the ignition key in step 2, push the accelerator pedal to reduce the drain on the accelerator pedal so the engine...
... 15 seconds. If the engine still does not start, press the accelerator pedal all the way. Use the following procedure: 1. Turn off all electrical accessories to the problem. Do not hold it there while starting the engine. Driving The thinner air found at least 10 seconds before , keep the ignition...) for no more than 15 seconds. Push the accelerator pedal halfway to the floor and hold it starts, lift your foot off all electrical accessories to the floor and hold the ignition key in step 2, push the accelerator pedal to reduce the drain on the accelerator pedal so the engine...

Owner's Manual
Page 185
... Unexpected Attempting to jump start the engine by pushing or pulling it. CONTINUED Taking Care of the battery (see page 195). Check all the electrical accessories: heater, A/C, stereo system, lights, etc. Although this case, the starter motor sounds normal when you turn the ignition switch to fill the tank. In ... be able to ON (II) for a minute and watch the fuel gauge. If you find nothing wrong, you using a booster battery. To jump start a Honda with a frozen battery can cause it thaws. Keep all sparks, open flames, and smoking materials away from the battery.
... Unexpected Attempting to jump start the engine by pushing or pulling it. CONTINUED Taking Care of the battery (see page 195). Check all the electrical accessories: heater, A/C, stereo system, lights, etc. Although this case, the starter motor sounds normal when you turn the ignition switch to fill the tank. In ... be able to ON (II) for a minute and watch the fuel gauge. If you find nothing wrong, you using a booster battery. To jump start a Honda with a frozen battery can cause it thaws. Keep all sparks, open flames, and smoking materials away from the battery.

Owner's Manual
Page 187
Put the transmission in the midrange under the hood, turn off the heating and cooling system and all other accessories. If you do not see steam or spray, leave the engine running , for several reasons, such as lack of coolant or a mechanical problem. Steam and ...
Put the transmission in the midrange under the hood, turn off the heating and cooling system and all other accessories. If you do not see steam or spray, leave the engine running , for several reasons, such as lack of coolant or a mechanical problem. Steam and ...

Owner's Manual
Page 190
..., it indicates that the charging system has stopped charging the battery. If it . Keep the engine running . Charging System Indication Immediately turn off all electrical accessories: radio, heater, A/C, rear defogger, cruise control, etc. Try not to keep the engine running and take extra care not to a service station or garage where...
..., it indicates that the charging system has stopped charging the battery. If it . Keep the engine running . Charging System Indication Immediately turn off all electrical accessories: radio, heater, A/C, rear defogger, cruise control, etc. Try not to keep the engine running and take extra care not to a service station or garage where...

Owner's Manual
Page 194
... on pages 198 and 199, or the diagram on the passenger's side. 3. Check each of the Unexpected Check those fuses first, but check all other accessories are off. 2. Removing these fuses requires a Phillips-head screwdriver. Fuses Checking and Replacing Fuses If something electrical in your car stops working, the first thing...
... on pages 198 and 199, or the diagram on the passenger's side. 3. Check each of the Unexpected Check those fuses first, but check all other accessories are off. 2. Removing these fuses requires a Phillips-head screwdriver. Fuses Checking and Replacing Fuses If something electrical in your car stops working, the first thing...
Owner's Manual
Page 195
... with the fuse puller provided in that has a lower rating, it with one of the spare fuses of the correct rating as soon as the accessory socket or radio). 6. If you do not have your car. Check the smaller fuses in the under-hood fuse box and all the fuses in...
... with the fuse puller provided in that has a lower rating, it with one of the spare fuses of the correct rating as soon as the accessory socket or radio). 6. If you do not have your car. Check the smaller fuses in the under-hood fuse box and all the fuses in...

Owner's Manual
Page 212
... coverage for a replacement battery purchased from the inside for the battery, emissions control systems and accessories, against defects in materials and workmanship. Restrictions and exclusions apply to function properly is covered for details. Please read the 1996 Honda Warranties booklet that came with no mileage limit. Tire warranty information is covered by their...
... coverage for a replacement battery purchased from the inside for the battery, emissions control systems and accessories, against defects in materials and workmanship. Restrictions and exclusions apply to function properly is covered for details. Please read the 1996 Honda Warranties booklet that came with no mileage limit. Tire warranty information is covered by their...


