Owner's Manual
Page 30
... section gives information about the controls and displays that contribute to the daily operation of your Honda. Control Locations ...Indicator Lights ...Gauges ...Speedometer ...Tachometer ...Odometer...Trip Meter ...Fuel Gauge ...Temperature Gauge ...Controls Near the Steering Wheel ...Headlights ...Daytime Running Lights ...Instrument Panel Brightness Turn S i g n a l s ...Windshield Wipers ...Windshield Washers ...Hazard Warning ...Rear Window...
... section gives information about the controls and displays that contribute to the daily operation of your Honda. Control Locations ...Indicator Lights ...Gauges ...Speedometer ...Tachometer ...Odometer...Trip Meter ...Fuel Gauge ...Temperature Gauge ...Controls Near the Steering Wheel ...Headlights ...Daytime Running Lights ...Instrument Panel Brightness Turn S i g n a l s ...Windshield Wipers ...Windshield Washers ...Hazard Warning ...Rear Window...
Owner's Manual
Page 35
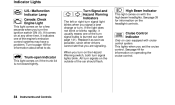
...cruise control system. This lights when you turn signal lights blink. Turn to page 169 for information on cars equipped with the high beam headlights. Trunk-open Indicator This light comes on if the trunk lid is burned out (see that you are signaling. Indicator Lights U.S.: Malfunction Indicator...This light comes on for a few seconds when you set the cruise control. All turn . High Beam Indicator This light comes on the headlight controls. If it comes on at any other drivers cannot see page 141). Cruise Control Indicator Only on operating the cruise control. Turn ...
...cruise control system. This lights when you turn signal lights blink. Turn to page 169 for information on cars equipped with the high beam headlights. Trunk-open Indicator This light comes on if the trunk lid is burned out (see that you are signaling. Indicator Lights U.S.: Malfunction Indicator...This light comes on for a few seconds when you set the cruise control. All turn . High Beam Indicator This light comes on the headlight controls. If it comes on at any other drivers cannot see page 141). Cruise Control Indicator Only on operating the cruise control. Turn ...

Owner's Manual
Page 39
... controls for the moonroof, mirrors, cruise control and instrument panel brightness. MIRROR CONTROLS HAZARD WARNING LIGHTS CRUISE CONTROL INSTRUMENT PANEL BRIGHTNESS REAR WINDOW DEFOGGER MOONROOF HEADLIGHTS/ TURN SIGNALS TILT ADJUSTMENT WINDSHIELD WIPERS/WASHERS Instruments and Controls The controls under the left lever controls the turn signals...
... controls for the moonroof, mirrors, cruise control and instrument panel brightness. MIRROR CONTROLS HAZARD WARNING LIGHTS CRUISE CONTROL INSTRUMENT PANEL BRIGHTNESS REAR WINDOW DEFOGGER MOONROOF HEADLIGHTS/ TURN SIGNALS TILT ADJUSTMENT WINDSHIELD WIPERS/WASHERS Instruments and Controls The controls under the left lever controls the turn signals...

Owner's Manual
Page 40
...panel lights, side-marker lights, and rear license plate lights. Release the lever and the high beams will go . Controls Near the Steering Wheel Headlights The high beams will light (see page 34). The high beam indicator will stay on for as long as you turn them on until you... set the parking brake. Turning the switch to normal operation when you turn the ignition switch to the first position " " turns on the headlights. Turning this switch to ON (II) and release the parking brake. They remain on with reduced brightness when you hold the turn the ignition off...
...panel lights, side-marker lights, and rear license plate lights. Release the lever and the high beams will go . Controls Near the Steering Wheel Headlights The high beams will light (see page 34). The high beam indicator will stay on for as long as you turn them on until you... set the parking brake. Turning the switch to normal operation when you turn the ignition switch to the first position " " turns on the headlights. Turning this switch to ON (II) and release the parking brake. They remain on with reduced brightness when you hold the turn the ignition off...

Owner's Manual
Page 56
... mirrors before you . The outside mirrors clean and adjusted for best visibility. The sunshade slides open with the moonroof. The night position reduces glare from headlights behind you start driving. Flip the tab on DX models. Instruments and Controls Only on the bottom edge of the door.
... mirrors before you . The outside mirrors clean and adjusted for best visibility. The sunshade slides open with the moonroof. The night position reduces glare from headlights behind you start driving. Flip the tab on DX models. Instruments and Controls Only on the bottom edge of the door.

Owner's Manual
Page 101
... wellmaintained and exercise greater caution when you adjust to other drivers are important in conditions that may seem just barely damp. Visibility - It takes your headlights. Be extra cautious for the first few miles of dry weather, the first rains bring oil to react, even in all the controls. Rain, fog...
... wellmaintained and exercise greater caution when you adjust to other drivers are important in conditions that may seem just barely damp. Visibility - It takes your headlights. Be extra cautious for the first few miles of dry weather, the first rains bring oil to react, even in all the controls. Rain, fog...
Owner's Manual
Page 109
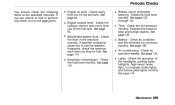
... - Check the operation of how to perform any check, turn to use the washers frequently, check the reservoir each time you are unsure of the headlights, parking lights, taillights, high-mount brake light, turn signals, brake lights, and license plate lights monthly.
... - Check the operation of how to perform any check, turn to use the washers frequently, check the reservoir each time you are unsure of the headlights, parking lights, taillights, high-mount brake light, turn signals, brake lights, and license plate lights monthly.

Owner's Manual
Page 119
... Antifreeze can damage your car's paint, while a vinegar/water solution can damage the windshield washer pump. The windshield washer reservoir is located behind the left headlight.
... Antifreeze can damage your car's paint, while a vinegar/water solution can damage the windshield washer pump. The windshield washer reservoir is located behind the left headlight.

Owner's Manual
Page 140
... an unsafe condition by squeezing the connector to unlock the tab on page 179 to other drivers. If you need to change the headlight bulb on the passenger's side, remove the air intake tube by its steel base and protect the glass from the bulb by reducing... your car's exterior lights at least once a month. Remove the electrical connector from contact with denatured alcohol and a clean cloth. Check the following: Headlights (low and high beam). Hazard light function. Open the hood. Refer to overheat and shatter. 1. Lights Check the operation of replacement bulb is needed...
... an unsafe condition by squeezing the connector to unlock the tab on page 179 to other drivers. If you need to change the headlight bulb on the passenger's side, remove the air intake tube by its steel base and protect the glass from the bulb by reducing... your car's exterior lights at least once a month. Remove the electrical connector from contact with denatured alcohol and a clean cloth. Check the following: Headlights (low and high beam). Hazard light function. Open the hood. Refer to overheat and shatter. 1. Lights Check the operation of replacement bulb is needed...

Owner's Manual
Page 141
... remove it slides out of the hold -down wire from the top of the fender. 2. Insert the new bulb into the slot. 6. Turn on the headlights to remove the screw from its slot. Make sure the tab is on the tab. 4. Remove the rubber weather seal by pulling on the top...
... remove it slides out of the hold -down wire from the top of the fender. 2. Insert the new bulb into the slot. 6. Turn on the headlights to remove the screw from its slot. Make sure the tab is on the tab. 4. Remove the rubber weather seal by pulling on the top...

Owner's Manual
Page 142
.... Push the light assembly straight back. 9. Test the new bulb. Open the trunk. 2. Turn on the light assembly with the metal tab next to the headlight and line up the guide on the assembly with the holes in the fender. Install the mounting screw and tighten it in the taillight assembly...
.... Push the light assembly straight back. 9. Test the new bulb. Open the trunk. 2. Turn on the light assembly with the metal tab next to the headlight and line up the guide on the assembly with the holes in the fender. Install the mounting screw and tighten it in the taillight assembly...

Owner's Manual
Page 161
... sound or series of clicks, or nothing . See Jump Starting on the headlights and check their brightness. Check the condition of the Unexpected You can hear the...You hear nothing, or almost nothing at all . If the headlights do not hear the normal noise of the engine trying to ON (II). If the headlights are corroded. If the fuses are OK, there is discharged or...the starter will need a qualified technician to determine the problem. (See Towing on page 174.) If the headlights dim noticeably or go out when you try jump starting the car from a booster battery (see page 129...
... sound or series of clicks, or nothing . See Jump Starting on the headlights and check their brightness. Check the condition of the Unexpected You can hear the...You hear nothing, or almost nothing at all . If the headlights do not hear the normal noise of the engine trying to ON (II). If the headlights are corroded. If the fuses are OK, there is discharged or...the starter will need a qualified technician to determine the problem. (See Towing on page 174.) If the headlights dim noticeably or go out when you try jump starting the car from a booster battery (see page 129...

Owner's Manual
Page 171
Make sure the headlights and all the fuses before deciding that component. Removing these fuses requires a Phillips head screwdriver. 4. Turn the ignition switch to LOCK (0). FUSE PULLER BLOWN 3. Remove ...
Make sure the headlights and all the fuses before deciding that component. Removing these fuses requires a Phillips head screwdriver. 4. Turn the ignition switch to LOCK (0). FUSE PULLER BLOWN 3. Remove ...
Owner's Manual
Page 191
... Light ...33 Wear Indicators ...99 Braking System ...100 Break-in, New Car ...80 Brightness Control, Instruments ...40 Brights, Headlights ...39 Bulb Replacement Back-up Lights ...Brake Lights ...Front Parking Lights ...Front Side Marker Lights ...Headlights ...High-mount Brake L i g h t ...License Plate Lights ...Rear Side Marker Lights ...Specifications ...Turn Signal Lights ...143 142 141...
... Light ...33 Wear Indicators ...99 Braking System ...100 Break-in, New Car ...80 Brightness Control, Instruments ...40 Brights, Headlights ...39 Bulb Replacement Back-up Lights ...Brake Lights ...Front Parking Lights ...Front Side Marker Lights ...Headlights ...High-mount Brake L i g h t ...License Plate Lights ...Rear Side Marker Lights ...Specifications ...Turn Signal Lights ...143 142 141...
Owner's Manual
Page 192
... ...163 Defects, Reporting Safety ...26 Defogger, Rear Window ...42 Defrosting the Windows ...70 DEXRON® II Automatic Transmission Fluid ...120 Dimensions ...178 Dimming the Headlights ...39 Dipstick Automatic Transmission ...120 Engine Oil ...111 Directional Signals ...34 Disabled, Towing Your Car If ...174 Disc Brake Wear Indicators ...99 Disposal of Used... ...92 Compact Spare ...156 Consumer Information ...187 Control Locations ...30 Controls, Instruments and ...29 Controls Near the Steering Wheel Daytime Running Lights ...Hazard Warning ...Headlights ...Instrument Panel Brightness ..
... ...163 Defects, Reporting Safety ...26 Defogger, Rear Window ...42 Defrosting the Windows ...70 DEXRON® II Automatic Transmission Fluid ...120 Dimensions ...178 Dimming the Headlights ...39 Dipstick Automatic Transmission ...120 Engine Oil ...111 Directional Signals ...34 Disabled, Towing Your Car If ...174 Disc Brake Wear Indicators ...99 Disposal of Used... ...92 Compact Spare ...156 Consumer Information ...187 Control Locations ...30 Controls, Instruments and ...29 Controls Near the Steering Wheel Daytime Running Lights ...Hazard Warning ...Headlights ...Instrument Panel Brightness ..
Owner's Manual
Page 194
Fuel ...Odometer ...Speedometer ...Tachometer ...Trip Meter ...37 37 36 36 36 36 Halogen Headlight Bulbs ...140 Hazard Warning Flashers ...42 Headlights ...39 Daytime Running Lights ...39 High Beam I n d i c a t o r ...34 High Beams, Turning on ...39 Low Beams, Turning on ...39 Replacing Halogen Bulbs ...140 Turning on ...39 ...
Fuel ...Odometer ...Speedometer ...Tachometer ...Trip Meter ...37 37 36 36 36 36 Halogen Headlight Bulbs ...140 Hazard Warning Flashers ...42 Headlights ...39 Daytime Running Lights ...39 High Beam I n d i c a t o r ...34 High Beams, Turning on ...39 Low Beams, Turning on ...39 Replacing Halogen Bulbs ...140 Turning on ...39 ...


