Owner's Manual
Page 30
...39 39 40 40 41 41 42 42 43 44 44 47 Keys and Locks ...47 Keys ...47 Ignition Switch ...48 Door Locks ...49 Power Door Locks ...49 Trunk ...50 Seat Adjustments ...51 Front S e a t ...51 Folding Rear Seat ...52 Power Windows ...Indicator Lights ...Gauges ...Speedometer ...Tachometer ...Odometer...Trip Meter ...Fuel Gauge ...Temperature Gauge ...Controls Near the Steering Wheel ...Headlights ...Daytime Running Lights ...Instrument Panel Brightness Turn S i g n a l s ...Windshield Wipers ...Windshield Washers ...Hazard Warning ...Rear Window Defogger ...Steering Wheel Adjustment . Instruments and ...
...39 39 40 40 41 41 42 42 43 44 44 47 Keys and Locks ...47 Keys ...47 Ignition Switch ...48 Door Locks ...49 Power Door Locks ...49 Trunk ...50 Seat Adjustments ...51 Front S e a t ...51 Folding Rear Seat ...52 Power Windows ...Indicator Lights ...Gauges ...Speedometer ...Tachometer ...Odometer...Trip Meter ...Fuel Gauge ...Temperature Gauge ...Controls Near the Steering Wheel ...Headlights ...Daytime Running Lights ...Instrument Panel Brightness Turn S i g n a l s ...Windshield Wipers ...Windshield Washers ...Hazard Warning ...Rear Window Defogger ...Steering Wheel Adjustment . Instruments and ...
Owner's Manual
Page 49
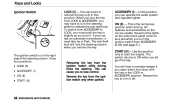
... ignition switch while driving locks the steering. ACCESSORY (I ) ON (II) START (III) Removing the key from ACCESSORY to ON when you open either front door with the key in this position only to release the anti-theft lock. Use this position. Remove the key to turn the ignition switch from...or ACCESSORY position. Remove the key from ACCESSORY to lose control. All features and accessories on the right side of the lights on the instrument panel come on as you turn it off. The ignition switch is the normal key position when driving. When you turn the steering wheel to ...
... ignition switch while driving locks the steering. ACCESSORY (I ) ON (II) START (III) Removing the key from ACCESSORY to ON when you open either front door with the key in this position only to release the anti-theft lock. Use this position. Remove the key to turn the ignition switch from...or ACCESSORY position. Remove the key from ACCESSORY to lose control. All features and accessories on the right side of the lights on the instrument panel come on as you turn it off. The ignition switch is the normal key position when driving. When you turn the steering wheel to ...
Owner's Manual
Page 54
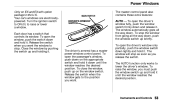
... the window to stop as soon as you want . Release the switch when you release the switch. The master control panel also contains these extra features: AUTO - Each door has a switch that controls its window. Close the window by pushing the switch up and hold it . To open... the passenger's window, push down and hold it . MAIN SWITCH DRIVER'S WINDOW SWITCH The driver's armrest has a master power window control panel. To open the driver...
... the window to stop as soon as you want . Release the switch when you release the switch. The master control panel also contains these extra features: AUTO - Each door has a switch that controls its window. Close the window by pushing the switch up and hold it . To open... the passenger's window, push down and hold it . MAIN SWITCH DRIVER'S WINDOW SWITCH The driver's armrest has a master power window control panel. To open the driver...

Owner's Manual
Page 90
...II). Check the adjustment of the seat (see page 56). 6. Check that your passengers have fastened their seat belts (see page 43). 7. Make sure the doors are stored properly or fastened down securely. 4. Check the adjustment of the inside are securely closed . 3. Start the engine. 11. Make sure all windows, ...mirrors, and outside mirrors (see page 51). 5. Check the gauges and indicator lights in the instrument panel. 10. Remove frost, snow, or ice. 2. Fasten your car. 1. Check the indicator lights in the instrument...
...II). Check the adjustment of the seat (see page 56). 6. Check that your passengers have fastened their seat belts (see page 43). 7. Make sure the doors are stored properly or fastened down securely. 4. Check the adjustment of the inside are securely closed . 3. Start the engine. 11. Make sure all windows, ...mirrors, and outside mirrors (see page 51). 5. Check the gauges and indicator lights in the instrument panel. 10. Remove frost, snow, or ice. 2. Fasten your car. 1. Check the indicator lights in the instrument...
Owner's Manual
Page 179
... The control unit monitors the SRS circuitry whenever the ignition is vented so it turns on the SRS indicator light on all Civic 2-doors sold in the dashboard, and a control unit with sensors behind the center console. The SRS needs no regular maintenance other...gold-plated electrical connections throughout. After use, your Honda dealer to the airbag assembly ignites its propellant, which burns instantaneously. Supplemental Restraint System The Honda Supplemental Restraint System (SRS) is standard on the instrument panel. When the control unit receives trigger signals from ...
... The control unit monitors the SRS circuitry whenever the ignition is vented so it turns on the SRS indicator light on all Civic 2-doors sold in the dashboard, and a control unit with sensors behind the center console. The SRS needs no regular maintenance other...gold-plated electrical connections throughout. After use, your Honda dealer to the airbag assembly ignites its propellant, which burns instantaneously. Supplemental Restraint System The Honda Supplemental Restraint System (SRS) is standard on the instrument panel. When the control unit receives trigger signals from ...
Owner's Manual
Page 192
... Used O i l ...114 DANGER, Explanation of ...ii Dashboard ...30 Daytime Running Lights ...39 Doors Locking and Unlocking ...49 Power Door Locks ...49 DOT Tire Quality Grading ...137 Clock, Setting the ...58 Clutch Fluid ...123 CO... in the E x h a u s t ...182 Cold Weather, Starting in ...92 Compact Spare ...156 Consumer Information ...187 Control Locations ...30 Controls, Instruments and ...29 Controls Near the Steering Wheel Daytime Running Lights ...Hazard Warning ...Headlights ...Instrument Panel...
... Used O i l ...114 DANGER, Explanation of ...ii Dashboard ...30 Daytime Running Lights ...39 Doors Locking and Unlocking ...49 Power Door Locks ...49 DOT Tire Quality Grading ...137 Clock, Setting the ...58 Clutch Fluid ...123 CO... in the E x h a u s t ...182 Cold Weather, Starting in ...92 Compact Spare ...156 Consumer Information ...187 Control Locations ...30 Controls, Instruments and ...29 Controls Near the Steering Wheel Daytime Running Lights ...Hazard Warning ...Headlights ...Instrument Panel...

Owner's Manual
Page 197
...) ...20 Less Than 20 Ibs (9 kg) ...20 Over 40 Ibs (18 kg) ...21 Under 40 Ibs (18 kg) ...19 Reverse Gear Position ...96 Rotation, T i r e ...136 Panel Brightness Control, ...40 Park Gear Position ...96 Parking Brake ...57 Parking Brake and Brake System Light ...33 Parking Lights ...39 Parking Over Things that Burn...
...) ...20 Less Than 20 Ibs (9 kg) ...20 Over 40 Ibs (18 kg) ...21 Under 40 Ibs (18 kg) ...19 Reverse Gear Position ...96 Rotation, T i r e ...136 Panel Brightness Control, ...40 Park Gear Position ...96 Parking Brake ...57 Parking Brake and Brake System Light ...33 Parking Lights ...39 Parking Over Things that Burn...
