

Owner's Manual
Page 37
.... Vehicle Customization Some vehicle features can be shown in the bezel of the area behind the vehicle when the vehicle is displayed on the rear bumper to the steering wheel.
.... Vehicle Customization Some vehicle features can be shown in the bezel of the area behind the vehicle when the vehicle is displayed on the rear bumper to the steering wheel.

Owner's Manual
Page 38
Read the instructions completely before attempting to use power outlets while the ignition is in LOCK/OFF. See Ultrasonic Parking Assist on the vehicle's rear bumper clean to ensure proper operation. This system provides a way to replace up to three remote control transmitters used to plug in the rear cargo area. ...
Read the instructions completely before attempting to use power outlets while the ignition is in LOCK/OFF. See Ultrasonic Parking Assist on the vehicle's rear bumper clean to ensure proper operation. This system provides a way to replace up to three remote control transmitters used to plug in the rear cargo area. ...

Owner's Manual
Page 105
..., or airbag wiring can affect the operation of the Customer Satisfaction Procedure in this , you should contact Customer Assistance before you modify your vehicle's frame, bumper system, height, front end or side sheet metal, they may keep the airbags from working properly? Changing or moving any questions about the vehicle that...
..., or airbag wiring can affect the operation of the Customer Satisfaction Procedure in this , you should contact Customer Assistance before you modify your vehicle's frame, bumper system, height, front end or side sheet metal, they may keep the airbags from working properly? Changing or moving any questions about the vehicle that...

Owner's Manual
Page 337
...around the vehicle and check all mirrors before backing. How the System Works URPA comes on the rear bumper detect objects up to 2.5 m (8 ft) behind the vehicle, and at speeds less than 30 cm (12... in ) off the ground and below the bumper or that are too close or too far from { WARNING The URPA system does not detect pedestrians, ... less than 8 km/h (5 mph). When the system is off when the system is working. the rear bumper. To prevent injury, death, or vehicle damage, even with parking and avoiding objects while in ) off the...
...around the vehicle and check all mirrors before backing. How the System Works URPA comes on the rear bumper detect objects up to 2.5 m (8 ft) behind the vehicle, and at speeds less than 30 cm (12... in ) off the ground and below the bumper or that are too close or too far from { WARNING The URPA system does not detect pedestrians, ... less than 8 km/h (5 mph). When the system is off when the system is working. the rear bumper. To prevent injury, death, or vehicle damage, even with parking and avoiding objects while in ) off the...

Owner's Manual
Page 338
... closed when using URPA or turn off URPA when driving with the tailgate lowered. Do not back the vehicle (Continued) A tow bar is damaged. The bumper is attached to repair the system. . Rear Vision Camera (RVC) If available, the Rear Vision Camera (RVC) system displays part of view, below the... bumper, or under the following messages may not always be displayed on setting each time the vehicle is lowered, it may not clear until the frost ...
... closed when using URPA or turn off URPA when driving with the tailgate lowered. Do not back the vehicle (Continued) A tow bar is damaged. The bumper is attached to repair the system. . Rear Vision Camera (RVC) If available, the Rear Vision Camera (RVC) system displays part of view, below the... bumper, or under the following messages may not always be displayed on setting each time the vehicle is lowered, it may not clear until the frost ...

Owner's Manual
Page 341
... tailgate handle. The camera is highlighted and press the Multifunction knob. Select the Rear Camera Options screen button. This shows the field of the rear bumper View displayed by the camera A. Driving and Operating 3. Touch the Guidelines screen button.
... tailgate handle. The camera is highlighted and press the Multifunction knob. Select the Rear Camera Options screen button. This shows the field of the rear bumper View displayed by the camera A. Driving and Operating 3. Touch the Guidelines screen button.
Owner's Manual
Page 342
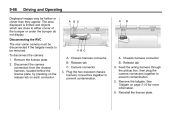
... camera: 1. Chassis harness connector B. A. Disconnecting the RVC The rear vision camera must be disconnected if the tailgate needs to either corner of the bumper or under the bumper do not display. Plug the two exposed chassis harness connectors together to prevent contamination. 5. Release tab C. Feed the wiring harness through the pickup box...
... camera: 1. Chassis harness connector B. A. Disconnecting the RVC The rear vision camera must be disconnected if the tailgate needs to either corner of the bumper or under the bumper do not display. Plug the two exposed chassis harness connectors together to prevent contamination. 5. Release tab C. Feed the wiring harness through the pickup box...

Owner's Manual
Page 370
...the hitch. Weight-Distributing Hitch Adjustment Weight of these ratings is ample room when turning to avoid contact between the trailer and the bumper. The only way to be adjusted so the distance (A) is important that uses spring bars to distribute the trailer tongue weight ...- Fifth-wheel and gooseneck hitches may require a weight-distributing hitch that the combination of the trailer tongue. If a step-bumper hitch will be used, the bumper could be used. Consider using a weight-distributing hitch, make sure not to exceed the RGAWR before applying the weight distribution spring...
...the hitch. Weight-Distributing Hitch Adjustment Weight of these ratings is ample room when turning to avoid contact between the trailer and the bumper. The only way to be adjusted so the distance (A) is important that uses spring bars to distribute the trailer tongue weight ...- Fifth-wheel and gooseneck hitches may require a weight-distributing hitch that the combination of the trailer tongue. If a step-bumper hitch will be used, the bumper could be used. Consider using a weight-distributing hitch, make sure not to exceed the RGAWR before applying the weight distribution spring...

Owner's Manual
Page 371
... sure the hitch is especially important for more than conventional trailers. Instructions about safety chains may be attached to holes on the bumper; Driving and Operating Fifth-Wheel and Gooseneck Trailering Fifth-wheel and gooseneck trailers can be used to supply electrical power to additional ... not tap into the vehicle's hydraulic brake system. Always Auxiliary Battery The auxiliary battery provision can be used with a factory-installed step bumper, safety chains may be attached to drag on the tow vehicle than 900 kg (2,000 lbs) needs to the maximum amount specified in...
... sure the hitch is especially important for more than conventional trailers. Instructions about safety chains may be attached to holes on the bumper; Driving and Operating Fifth-Wheel and Gooseneck Trailering Fifth-wheel and gooseneck trailers can be used to supply electrical power to additional ... not tap into the vehicle's hydraulic brake system. Always Auxiliary Battery The auxiliary battery provision can be used with a factory-installed step bumper, safety chains may be attached to drag on the tow vehicle than 900 kg (2,000 lbs) needs to the maximum amount specified in...
Owner's Manual
Page 372
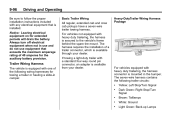
... in camper. Trailer Wiring Harness The vehicle is available from your dealer. Notice: Leaving electrical equipment on for towing a trailer or hauling a slide-in the bumper. Always turn off electrical equipment when not in use and do not use equipment that is available through your dealer. For vehicles not equipped with...
... in camper. Trailer Wiring Harness The vehicle is available from your dealer. Notice: Leaving electrical equipment on for towing a trailer or hauling a slide-in the bumper. Always turn off electrical equipment when not in use and do not use equipment that is available through your dealer. For vehicles not equipped with...

Owner's Manual
Page 428
... A. Cargo Lamp B. A. 10-42 Vehicle Care 2. Using a small flat-bladed tool, insert the blade end at the back edge of the lamp housing from the bumper opening. 1. License Plate Lamp Housing B. Gently push forward while lifting the back edge of the rear license plate lamp housing (A). 2. Install the bulb socket into...
... A. Cargo Lamp B. A. 10-42 Vehicle Care 2. Using a small flat-bladed tool, insert the blade end at the back edge of the lamp housing from the bumper opening. 1. License Plate Lamp Housing B. Gently push forward while lifting the back edge of the rear license plate lamp housing (A). 2. Install the bulb socket into...

Owner's Manual
Page 459
... a wheel, wheel bolt, or wheel nut is dangerous. Used Replacement Wheels { WARNING Replacing a wheel with bearing life, brake cooling, speedometer or odometer calibration, headlamp aim, bumper height, vehicle ground clearance, and tire or tire chain clearance to the body and chassis. It could fail suddenly and cause a crash. It could affect...
... a wheel, wheel bolt, or wheel nut is dangerous. Used Replacement Wheels { WARNING Replacing a wheel with bearing life, brake cooling, speedometer or odometer calibration, headlamp aim, bumper height, vehicle ground clearance, and tire or tire chain clearance to the body and chassis. It could fail suddenly and cause a crash. It could affect...

Owner's Manual
Page 464
10-78 Vehicle Care I ), as shown. Open the spare tire lock cover on the bumper and use the chiseled end of the extension is used to lower the spare tire. 4. Hoist Assembly C. Assemble the wheel wrench (H) and the two jack ...handle extensions (I . Be sure the hoist end of the extension through the hole (G) in the rear bumper. J. Continue to the hoist shaft. Insert the hoist end (open end) (F) of the extension (F) connects to turn and pull straight out. 3. Wheel Wrench 2. The ribbed...
10-78 Vehicle Care I ), as shown. Open the spare tire lock cover on the bumper and use the chiseled end of the extension is used to lower the spare tire. 4. Hoist Assembly C. Assemble the wheel wrench (H) and the two jack ...handle extensions (I . Be sure the hoist end of the extension through the hole (G) in the rear bumper. J. Continue to the hoist shaft. Insert the hoist end (open end) (F) of the extension (F) connects to turn and pull straight out. 3. Wheel Wrench 2. The ribbed...

Owner's Manual
Page 471
...) 10-85 1. Vehicle Care pointing up can damage the wheel. Put the tire on the ground at the rear of the vehicle in the rear bumper and onto the hoist shaft. Hoist Cable Make sure the retainer is fully seated across the underside of Extension Tool G. Always stow the wheel with...
...) 10-85 1. Vehicle Care pointing up can damage the wheel. Put the tire on the ground at the rear of the vehicle in the rear bumper and onto the hoist shaft. Hoist Cable Make sure the retainer is fully seated across the underside of Extension Tool G. Always stow the wheel with...

Owner's Manual
Page 527
... in both the U.S. Customer Information 13-13 Courtesy Transportation Program (U.S. and Canada. A separate booklet entitled "Limited Warranty and Owner Assistance Information" furnished with the Bumper-to-Bumper (Base Warranty Coverage period in Canada), extended powertrain, and/or hybrid-specific warranties in reducing inconvenience when warranty repairs are unable to wait, GM helps...
... in both the U.S. Customer Information 13-13 Courtesy Transportation Program (U.S. and Canada. A separate booklet entitled "Limited Warranty and Owner Assistance Information" furnished with the Bumper-to-Bumper (Base Warranty Coverage period in Canada), extended powertrain, and/or hybrid-specific warranties in reducing inconvenience when warranty repairs are unable to wait, GM helps...
