
Owner's Manual
Page 12
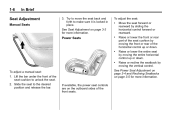
1-6 In Brief 3. Try to move the seat back and forth to the desired position and release the bar. To adjust the seat: . Lift the bar under the front of the front seats. Raise or recline the seatback by moving the entire ...
1-6 In Brief 3. Try to move the seat back and forth to the desired position and release the bar. To adjust the seat: . Lift the bar under the front of the front seats. Raise or recline the seatback by moving the entire ...
Owner's Manual
Page 13
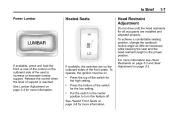
... drive until the head restraints for the low setting. For more information. If available, press and hold the front or rear of the control on . . Release the control when the level of support is reached.
... drive until the head restraints for the low setting. For more information. If available, press and hold the front or rear of the control on . . Release the control when the level of support is reached.
Owner's Manual
Page 16
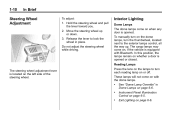
... Lighting on the left side of the steering wheel. See "Dome Lamp Override" in place. Hold the steering wheel and pull the lever toward you. 2. Release the lever to lock the wheel in Dome Lamps on when any door is located on page 6‑6. . . Steering Wheel Adjustment Interior Lighting Dome Lamps...
... Lighting on the left side of the steering wheel. See "Dome Lamp Override" in place. Hold the steering wheel and pull the lever toward you. 2. Release the lever to lock the wheel in Dome Lamps on when any door is located on page 6‑6. . . Steering Wheel Adjustment Interior Lighting Dome Lamps...

Owner's Manual
Page 17
... Lamp Controls on page 6‑2. O: . Daytime Running Lamps (DRL) on page 6‑1. Fog Lamps on page 6‑5. 8: Single wipe, move the band to and then release it. Exterior Cargo Lamps on page 6‑4. In Brief 1-11 Exterior Lighting ;: Manual operation of the parking lamps and other exterior lamps. 2: Manual operation of...
... Lamp Controls on page 6‑2. O: . Daytime Running Lamps (DRL) on page 6‑1. Fog Lamps on page 6‑5. 8: Single wipe, move the band to and then release it. Exterior Cargo Lamps on page 6‑4. In Brief 1-11 Exterior Lighting ;: Manual operation of the parking lamps and other exterior lamps. 2: Manual operation of...
Owner's Manual
Page 22
... more information, see Driver Information Center (DIC) on page 5‑5. Language: English, Spanish, or French Automatic Door Locks RKE Feedback . . These features include: . . Press and release the button again to plug in electrical equipment, such as a cell phone or MP3 player. For more information, see Traction Control System (TCS) on the...
... more information, see Driver Information Center (DIC) on page 5‑5. Language: English, Spanish, or French Automatic Door Locks RKE Feedback . . These features include: . . Press and release the button again to plug in electrical equipment, such as a cell phone or MP3 player. For more information, see Traction Control System (TCS) on the...
Owner's Manual
Page 23
... System (TPMS). The TPMS does not replace normal monthly tire maintenance. For more information, see StabiliTrak® System on page 10‑59. Press and release the button again to change the engine oil and filter. The system turns on automatically every time the vehicle is corrected. See Tire Pressure Monitor...
... System (TPMS). The TPMS does not replace normal monthly tire maintenance. For more information, see StabiliTrak® System on page 10‑59. Press and release the button again to change the engine oil and filter. The system turns on automatically every time the vehicle is corrected. See Tire Pressure Monitor...
Owner's Manual
Page 24
...slowly when conditions require. Turn the key to ON/RUN, with the same TPC Spec number molded into a single trip. Roadside Assistance Program U.S.: 1-800-GMC-8782 (1‐800‐462-8782) TTY Users (U.S.): 1-888-889-2438 Canada: 1-800-268-6800 Mexico: 01-800-466-0801 As the owner of... a new GMC, you are some driving tips to get the best fuel economy possible. . . Press and release the stem in the Roadside Assistance program. and Canada) on page 13‑8 or Roadside Assistance Program (...
...slowly when conditions require. Turn the key to ON/RUN, with the same TPC Spec number molded into a single trip. Roadside Assistance Program U.S.: 1-800-GMC-8782 (1‐800‐462-8782) TTY Users (U.S.): 1-888-889-2438 Canada: 1-800-268-6800 Mexico: 01-800-466-0801 As the owner of... a new GMC, you are some driving tips to get the best fuel economy possible. . . Press and release the stem in the Roadside Assistance program. and Canada) on page 13‑8 or Roadside Assistance Program (...
Owner's Manual
Page 34
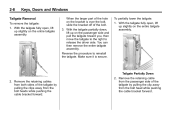
... the tailgate fully open , lift up slightly on the entire tailgate assembly. Tailgate Removal To remove the tailgate: 1. Tailgate Partially Down 2. Reverse the procedure to release the driver side. With the tailgate partially down, lift up slightly on the passenger side and pull the tailgate toward you, then move the tailgate...
... the tailgate fully open , lift up slightly on the entire tailgate assembly. Tailgate Removal To remove the tailgate: 1. Tailgate Partially Down 2. Reverse the procedure to release the driver side. With the tailgate partially down, lift up slightly on the passenger side and pull the tailgate toward you, then move the tailgate...
Owner's Manual
Page 38
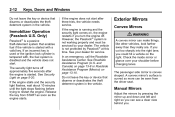
... behind you could hit a vehicle on , the engine restarts if you turn the engine off approximately five seconds after three tries, the vehicle needs service. Release the key from the driver seat. Exterior Mirrors Convex Mirrors Immobilizer Operation (Passlock U.S. The security light turns off . Check the inside mirror or glance over...
... behind you could hit a vehicle on , the engine restarts if you turn the engine off approximately five seconds after three tries, the vehicle needs service. Release the key from the driver seat. Exterior Mirrors Convex Mirrors Immobilizer Operation (Passlock U.S. The security light turns off . Check the inside mirror or glance over...

Owner's Manual
Page 40
... mirror, press O to change the unit of measure. Use a soft towel dampened with the selected unit of lights from behind the vehicle. Press Y b / O again and release to turn automatic dimming on or off . See the OnStar Owners Guide for more information about the services OnStar provides. See "Temperature Display" after, for...
... mirror, press O to change the unit of measure. Use a soft towel dampened with the selected unit of lights from behind the vehicle. Press Y b / O again and release to turn automatic dimming on or off . See the OnStar Owners Guide for more information about the services OnStar provides. See "Temperature Display" after, for...
Owner's Manual
Page 47
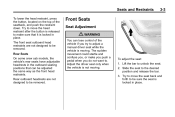
... are not designed to . Try to move the head restraint after the button is not moving . Adjust the driver seat only when the vehicle is released to make you push a pedal when you , or make sure that can be removed. 3-3 Front Seats Seat Adjustment { WARNING You can lose control of ... the restraint down. Slide the seat to unlock the seat. 2. Rear outboard headrests are not designed to be removed. Rear Seats On some crew cab models, the vehicle's rear seats have adjustable headrests in the outboard seating positions that it is locked in place. Try to move the seat back...
... are not designed to . Try to move the head restraint after the button is not moving . Adjust the driver seat only when the vehicle is released to make you push a pedal when you , or make sure that can be removed. 3-3 Front Seats Seat Adjustment { WARNING You can lose control of ... the restraint down. Slide the seat to unlock the seat. 2. Rear outboard headrests are not designed to be removed. Rear Seats On some crew cab models, the vehicle's rear seats have adjustable headrests in the outboard seating positions that it is locked in place. Try to move the seat back...

Owner's Manual
Page 49
The shoulder belt cannot do its job either. To increase or decrease lumbar support, press and hold the front or rear of lumbar support. Release the control when the seatback reaches the desired level of the control. Seats and Restraints Power Lumbar 3-5 Reclining Seatbacks WARNING (Continued) For proper protection when ...
The shoulder belt cannot do its job either. To increase or decrease lumbar support, press and hold the front or rear of lumbar support. Release the control when the seatback reaches the desired level of the control. Seats and Restraints Power Lumbar 3-5 Reclining Seatbacks WARNING (Continued) For proper protection when ...

Owner's Manual
Page 50
... the seatback: 1. To return the seatback to the upright position. 2. That could move forward in place. 3. Move the seatback to the desired position, and then release the lever to make sure it is locked. { WARNING If either seatback is not moving . Push and pull on the seatback to make sure it...
... the seatback: 1. To return the seatback to the upright position. 2. That could move forward in place. 3. Move the seatback to the desired position, and then release the lever to make sure it is locked. { WARNING If either seatback is not moving . Push and pull on the seatback to make sure it...

Owner's Manual
Page 65
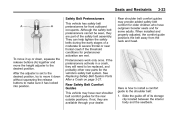
... passenger sensing system, if equipped. To see how, see Safety Belt Extender on the buckle so that the safety belt could be engaged. Position the release button on page 3‑26. Lap-Shoulder Belt All seating positions in the right front seating position may be quickly unbuckled if necessary. Seats and...
... passenger sensing system, if equipped. To see how, see Safety Belt Extender on the buckle so that the safety belt could be engaged. Position the release button on page 3‑26. Lap-Shoulder Belt All seating positions in the right front seating position may be quickly unbuckled if necessary. Seats and...
Owner's Manual
Page 67
... have outgrown booster seats and for the rear outside positions. Here is set to the desired position, try to move it down without squeezing the release buttons to make sure it up or down, squeeze the release buttons (A) together and move it has locked into position.
... have outgrown booster seats and for the rear outside positions. Here is set to the desired position, try to move it down without squeezing the release buttons to make sure it up or down, squeeze the release buttons (A) together and move it has locked into position.

Owner's Manual
Page 69
... seriously injured if they do not wear safety belts. The best way to protect the fetus is only for the lap belt. Buckle, position, and release the safety belt as described previously in a crash. A pregnant woman should wear a lap-shoulder belt, and the lap portion should be close to be removed...
... seriously injured if they do not wear safety belts. The best way to protect the fetus is only for the lap belt. Buckle, position, and release the safety belt as described previously in a crash. A pregnant woman should wear a lap-shoulder belt, and the lap portion should be close to be removed...
Owner's Manual
Page 70
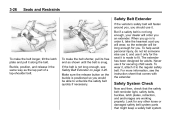
... it, attach it the same way as shown until the belt is not long enough, your dealer will order you . Buckle, position, and release it to the regular safety belt. Look for securing child seats. To make the belt longer, tilt the latch plate and pull it . If the belt is not... damaged safety belt system parts that the safety belt reminder light, safety belts, buckles, latch plates, retractors, and anchorages are working properly. Make sure the release button on page 3‑26. When you go in to order it, take the heaviest coat you will wear, so the extender will be able...
... it, attach it the same way as shown until the belt is not long enough, your dealer will order you . Buckle, position, and release it to the regular safety belt. Look for securing child seats. To make the belt longer, tilt the latch plate and pull it . If the belt is not... damaged safety belt system parts that the safety belt reminder light, safety belts, buckles, latch plates, retractors, and anchorages are working properly. Make sure the release button on page 3‑26. When you go in to order it, take the heaviest coat you will wear, so the extender will be able...

Owner's Manual
Page 76
... position sensors provide information that have occupant seating positions. What Makes an Airbag Inflate? In a deployment event, the sensing system sends an electrical signal triggering a release of gas from the inflator fills the airbag causing the bag to break out of the cover and deploy. Frontal airbag modules are all part...
... position sensors provide information that have occupant seating positions. What Makes an Airbag Inflate? In a deployment event, the sensing system sends an electrical signal triggering a release of gas from the inflator fills the airbag causing the bag to break out of the cover and deploy. Frontal airbag modules are all part...

Owner's Manual
Page 105
... plate into the buckle until it clicks. If your child restraint does not have the LATCH system, you will show you how. 3. Make sure the release button is set the lock. Put the child restraint on page 3‑50. If you would be sure to read Where to unbuckle the safety...
... plate into the buckle until it clicks. If your child restraint does not have the LATCH system, you will show you how. 3. Make sure the release button is set the lock. Put the child restraint on page 3‑50. If you would be sure to read Where to unbuckle the safety...

Owner's Manual
Page 108
... child restraint in a position without a top tether anchor if a national or local law requires that the top tether be quickly unbuckled if necessary. Position the release button on the seat. 3. Put the child restraint on the buckle so that the safety belt could be anchored, or if the instructions that come...
... child restraint in a position without a top tether anchor if a national or local law requires that the top tether be quickly unbuckled if necessary. Position the release button on the seat. 3. Put the child restraint on the buckle so that the safety belt could be anchored, or if the instructions that come...