
Owner's Manual
Page 1
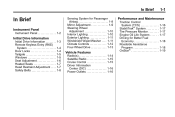
2011 GMC Canyon Owner Manual M In Brief ...1-1 Instrument Panel ...1-2 Initial Drive Information ...1-3 Vehicle Features ...1-14 Performance and Maintenance ...1-16..., Gauges, and Indicators ...5-6 Information Displays ...5-21 Vehicle Messages ...5-24 Lighting ...6-1 Exterior Lighting ...6-1 Interior Lighting ...6-5 Lighting Features ...6-6 Infotainment System ...7-1 Introduction ...7-1 Radio ...7-7 Audio Players ...7-14 Phone ...7-21 Climate Controls ...8-1 Climate Control Systems ...8-1 Air Vents ...8-3 Driving and Operating ...9-1 Driving Information ...9-2 Starting and Operating ...9-28...
2011 GMC Canyon Owner Manual M In Brief ...1-1 Instrument Panel ...1-2 Initial Drive Information ...1-3 Vehicle Features ...1-14 Performance and Maintenance ...1-16..., Gauges, and Indicators ...5-6 Information Displays ...5-21 Vehicle Messages ...5-24 Lighting ...6-1 Exterior Lighting ...6-1 Interior Lighting ...6-5 Lighting Features ...6-6 Infotainment System ...7-1 Introduction ...7-1 Radio ...7-7 Audio Players ...7-14 Phone ...7-21 Climate Controls ...8-1 Climate Control Systems ...8-1 Air Vents ...8-3 Driving and Operating ...9-1 Driving Information ...9-2 Starting and Operating ...9-28...
Owner's Manual
Page 7
... ...1-17 Tire Pressure Monitor ...1-17 Engine Oil Life System ...1-17 Driving for Better Fuel Economy ...1-18 Roadside Assistance Program ...1-18 OnStar® ...1-19 Vehicle Features Radio(s) ...Satellite Radio ...Cruise Control ...Driver Information Center (DIC) ...Power Outlets ...1-14 1-15 1-15 1-16 1-16
... ...1-17 Tire Pressure Monitor ...1-17 Engine Oil Life System ...1-17 Driving for Better Fuel Economy ...1-18 Roadside Assistance Program ...1-18 OnStar® ...1-19 Vehicle Features Radio(s) ...Satellite Radio ...Cruise Control ...Driver Information Center (DIC) ...Power Outlets ...1-14 1-15 1-15 1-16 1-16
Owner's Manual
Page 9
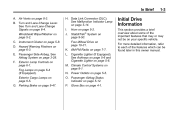
... 6‑5. Four-Wheel Drive on page 3‑28. P. See Airbag System on page 10‑31. Fog Lamps on page 7‑7. G. O. In Brief A. N. C. AM-FM Radio on page 6‑4 (If Equipped). See Malfunction Indicator Lamp on page 5‑8. J. For more detailed information, refer to each of the important features that may...
... 6‑5. Four-Wheel Drive on page 3‑28. P. See Airbag System on page 10‑31. Fog Lamps on page 7‑7. G. O. In Brief A. N. C. AM-FM Radio on page 6‑4 (If Equipped). See Malfunction Indicator Lamp on page 5‑8. J. For more detailed information, refer to each of the important features that may...

Owner's Manual
Page 20
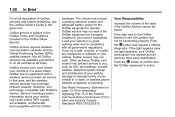
...the six numbered buttons. See "Setting Preset Stations" under Operation on page 7‑1. For more information about these and other radio features, see Introduction on page 7‑3. Turn to select radio q SEEK r : Press to go to the previous or to switch between FM1, FM2, AM, or XM1 or XM2... (if equipped). 1-14 In Brief Vehicle Features Radio(s) q TUNE r : stations. q VOL r : Turn to 18 stations (six FM1, six FM2, and six AM), can be programmed on and off. If the radio does not have XM, up to increase or decrease the volume. The selection ...
...the six numbered buttons. See "Setting Preset Stations" under Operation on page 7‑1. For more information about these and other radio features, see Introduction on page 7‑3. Turn to select radio q SEEK r : Press to go to the previous or to switch between FM1, FM2, AM, or XM1 or XM2... (if equipped). 1-14 In Brief Vehicle Features Radio(s) q TUNE r : stations. q VOL r : Turn to 18 stations (six FM1, six FM2, and six AM), can be programmed on and off. If the radio does not have XM, up to increase or decrease the volume. The selection ...

Owner's Manual
Page 21
...MP3/WMA): Press and hold the HR and MIN buttons at the end of the multifunction lever. 9: Turns the system off . XM satellite radio has a wide variety of programming and commercial-free music, coast to coast, and in the 48 contiguous United States and 10 Canadian provinces. ... until RDS TIME displays. If the time is based in digital-quality sound. For detailed instructions on page 9‑52. See "XM Satellite Radio Service" under Satellite Radio on . . + (Resume/Accelerate): Use to make the vehicle accelerate or resume a previously set speed. After tuning to an RDS broadcast ...
...MP3/WMA): Press and hold the HR and MIN buttons at the end of the multifunction lever. 9: Turns the system off . XM satellite radio has a wide variety of programming and commercial-free music, coast to coast, and in the 48 contiguous United States and 10 Canadian provinces. ... until RDS TIME displays. If the time is based in digital-quality sound. For detailed instructions on page 9‑52. See "XM Satellite Radio Service" under Satellite Radio on . . + (Resume/Accelerate): Use to make the vehicle accelerate or resume a previously set speed. After tuning to an RDS broadcast ...
Owner's Manual
Page 26
... the volume of your vehicle in your vehicle, OnStar service may not be heard. If you try to important parts of the radio if the OnStar Advisor cannot be functioning properly. Service involving location information about your vehicle can 't control may not work unless GPS...your vehicle, damage to add, connect, or modify any equipment or software in a crash, or wireless phone network congestion or jamming. See Radio Frequency Statement on all vehicles at all OnStar services are available, unobstructed, and compatible with OnStar's service. For a full description of the ...
... the volume of your vehicle in your vehicle, OnStar service may not be heard. If you try to important parts of the radio if the OnStar Advisor cannot be functioning properly. Service involving location information about your vehicle can 't control may not work unless GPS...your vehicle, damage to add, connect, or modify any equipment or software in a crash, or wireless phone network congestion or jamming. See Radio Frequency Statement on all vehicles at all OnStar services are available, unobstructed, and compatible with OnStar's service. For a full description of the ...
Owner's Manual
Page 28
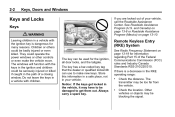
.... and Canada) on page 13‑8 or Roadside Assistance Program (Mexico) on page 13‑19 for many reasons. Remote Keyless Entry (RKE) System See Radio Frequency Statement on page 13‑10. They could be too far from the vehicle. The key has a bar-coded key tag that the dealer...
.... and Canada) on page 13‑8 or Roadside Assistance Program (Mexico) on page 13‑19 for many reasons. Remote Keyless Entry (RKE) System See Radio Frequency Statement on page 13‑10. They could be too far from the vehicle. The key has a bar-coded key tag that the dealer...
Owner's Manual
Page 36
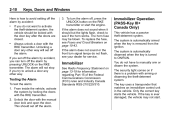
... 13‑19 for service. Unlocking a door any other way will not stop if you try to manually arm or disarm the system. Immobilizer See Radio Frequency Statement on page 10‑43. 2-10 Keys, Doors and Windows 3. If the alarm does not sound when it should set off the alarm...
... 13‑19 for service. Unlocking a door any other way will not stop if you try to manually arm or disarm the system. Immobilizer See Radio Frequency Statement on page 10‑43. 2-10 Keys, Doors and Windows 3. If the alarm does not sound when it should set off the alarm...
Owner's Manual
Page 77
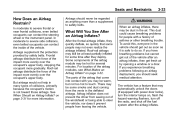
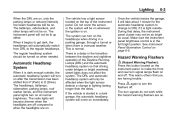
... and dust coming from seeing out of the airbag that some time after the airbag inflates. on , flash the hazard warning flashers, turn off the radio, and shut off the fuel system after they quickly deflate, so quickly that come into contact with you have breathing problems but not too hot...
... and dust coming from seeing out of the airbag that some time after the airbag inflates. on , flash the hazard warning flashers, turn off the radio, and shut off the fuel system after they quickly deflate, so quickly that come into contact with you have breathing problems but not too hot...

Owner's Manual
Page 118
... hold the HR button until the correct hour displays. Find the current location and variance zone number on or off , press RCL, HR, or MIN. Radio with CD (MP3/WMA) Press and hold Y b / O for compass variance: 1. The time can be calibrated by driving the vehicle in zone eight or drive ... variance needs to be changed to zone eight. If you stop pressing the button, the display shows a compass direction within a few seconds. Clock AM-FM Radio Press and hold the MIN button until the display reads a direction. There is set mode. After you do not live in circles at 8 km/h (5 ...
... hold the HR button until the correct hour displays. Find the current location and variance zone number on or off , press RCL, HR, or MIN. Radio with CD (MP3/WMA) Press and hold Y b / O for compass variance: 1. The time can be calibrated by driving the vehicle in zone eight or drive ... variance needs to be changed to zone eight. If you stop pressing the button, the display shows a compass direction within a few seconds. Clock AM-FM Radio Press and hold the MIN button until the display reads a direction. There is set mode. After you do not live in circles at 8 km/h (5 ...
Owner's Manual
Page 119
... buttons at the same time, for an extended period of the center console. Instruments and Controls To synchronize the time with an FM station broadcasting Radio Data System (RDS) information, press and hold the HR and MIN buttons, at the same time until RDS TIME displays.
... buttons at the same time, for an extended period of the center console. Instruments and Controls To synchronize the time with an FM station broadcasting Radio Data System (RDS) information, press and hold the HR and MIN buttons, at the same time until RDS TIME displays.

Owner's Manual
Page 121
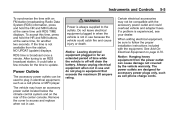
...to adjust the vehicle's chime level. Waiting to loud, and LOUD will disable vehicle chimes. To change from the normal level to do . Removing the radio and not replacing it with a vehicle function. Often gauges and warning lights work together to do repairs can indicate when there could be costly and..., or when one of the chime, press and hold pushbutton 6 again. When one of the warning lights comes on and stays on and the radio power off. The volume level will change back to indicate the new volume selected. To change from the loud level to normal, and NORMAL will...
...to adjust the vehicle's chime level. Waiting to loud, and LOUD will disable vehicle chimes. To change from the normal level to do . Removing the radio and not replacing it with a vehicle function. Often gauges and warning lights work together to do repairs can indicate when there could be costly and..., or when one of the chime, press and hold pushbutton 6 again. When one of the warning lights comes on and stays on and the radio power off. The volume level will change back to indicate the new volume selected. To change from the loud level to normal, and NORMAL will...

Owner's Manual
Page 128
.... The light should come on when the ignition is on, but the engine is not running , this indicates that there is not running, as the radio and air conditioner. A charging system message in correctly diagnosing any problem is working . This light should go out once the engine starts.
.... The light should come on when the ignition is on, but the engine is not running , this indicates that there is not running, as the radio and air conditioner. A charging system message in correctly diagnosing any problem is working . This light should go out once the engine starts.
Owner's Manual
Page 145
...) and the automatic headlamp system so that driving under bridges or bright overhead street lights does not affect the system. The radio lights will turn signal lamps flash on and off compared to when the headlights are on. The turn on at normal brightness. The...nighttime operation of the instrument panel. The DRL and automatic headlamp system will only be affected when the light sensor detects a change to the regular headlamps. See Instrument Panel Illumination Control on when needed. Hazard Warning Flashers | (Hazard Warning Flasher): Press this button located on the instrument ...
...) and the automatic headlamp system so that driving under bridges or bright overhead street lights does not affect the system. The radio lights will turn signal lamps flash on and off compared to when the headlights are on. The turn on at normal brightness. The...nighttime operation of the instrument panel. The DRL and automatic headlamp system will only be affected when the light sensor detects a change to the regular headlamps. See Instrument Panel Illumination Control on when needed. Hazard Warning Flashers | (Hazard Warning Flasher): Press this button located on the instrument ...
Owner's Manual
Page 147
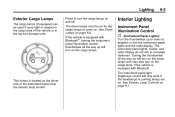
... cargo lamp, if the vehicle is equipped with Bluetooth. This button is needed in the top-box storage units. The instrument panel lights, cluster, and radio display do not dim to turn on the cargo lamps. See Exterior Lamp Controls on page 6‑6. See Dome Lamps on page 6‑1. The instrument... Bluetooth®, turning the instrument panel illumination control thumbwheel all the way up or down to brighten or dim the instrument panel lights and the radio display. The dome lamps must be used if more light is located on . Press to complete darkness.
... cargo lamp, if the vehicle is equipped with Bluetooth. This button is needed in the top-box storage units. The instrument panel lights, cluster, and radio display do not dim to turn on the cargo lamps. See Exterior Lamp Controls on page 6‑6. See Dome Lamps on page 6‑1. The instrument... Bluetooth®, turning the instrument panel illumination control thumbwheel all the way up or down to brighten or dim the instrument panel lights and the radio display. The dome lamps must be used if more light is located on . Press to complete darkness.
Owner's Manual
Page 151
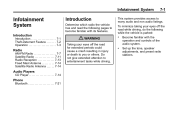
... could cause a crash resulting in injury or death to you or others. Infotainment System 7-1 Infotainment System Introduction Introduction ...7-1 Theft-Deterrent Feature ...7-2 Operation ...7-3 Introduction Determine which radio the vehicle has and read the following while the vehicle is parked: . { WARNING Taking your eyes off the road while driving, do the following pages...
... could cause a crash resulting in injury or death to you or others. Infotainment System 7-1 Infotainment System Introduction Introduction ...7-1 Theft-Deterrent Feature ...7-2 Operation ...7-3 Introduction Determine which radio the vehicle has and read the following while the vehicle is parked: . { WARNING Taking your eyes off the road while driving, do the following pages...

Owner's Manual
Page 152
...The chime signals related to safety belts, parking brake, and other systems, and could interfere with your vehicle operate through the radio/entertainment system. If the radio is turned off. The vehicle has Retained Accessory Power (RAP). See Retained Accessory Power (RAP) on page 10‑3. ...VIN). For more information. 7-2 Infotainment System If that replacement or additional equipment is compatible with the operation of the vehicle's engine, radio, or other functions of your vehicle before adding any equipment. With RAP, the audio system can be played even after the ignition...
...The chime signals related to safety belts, parking brake, and other systems, and could interfere with your vehicle operate through the radio/entertainment system. If the radio is turned off. The vehicle has Retained Accessory Power (RAP). See Retained Accessory Power (RAP) on page 10‑3. ...VIN). For more information. 7-2 Infotainment System If that replacement or additional equipment is compatible with the operation of the vehicle's engine, radio, or other functions of your vehicle before adding any equipment. With RAP, the audio system can be played even after the ignition...

Owner's Manual
Page 153
If the radio is armed. When the radio and vehicle are turned off, the blinking red light indicates that TheftLock is moved to discourage theft of the Vehicle Identification Number (VIN). With TheftLock activated, the radio does not operate if stolen. 7-3 Operation AM-FM Radio Infotainment System RDS Radios TheftLock is designed to a different vehicle, it does not operate and LOCKED displays. The feature works automatically by learning a portion of your vehicle's radio.
If the radio is armed. When the radio and vehicle are turned off, the blinking red light indicates that TheftLock is moved to discourage theft of the Vehicle Identification Number (VIN). With TheftLock activated, the radio does not operate if stolen. 7-3 Operation AM-FM Radio Infotainment System RDS Radios TheftLock is designed to a different vehicle, it does not operate and LOCKED displays. The feature works automatically by learning a portion of your vehicle's radio.
Owner's Manual
Page 154
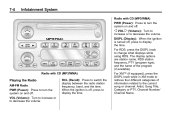
...time. VOL (Volume): Turn to increase or to change what displays while using RDS. RCL (Recall): Press to decrease the volume. 7-4 Infotainment System Radio with CD (MP3/WMA) For XM™ (if equipped), press the DISPL knob while in XM mode to retrieve four different categories of the program...if available). o VOL p (Volume): Turn to increase or to switch the display between the radio station frequency, band, and the time. Playing the Radio AM-FM Radio PWR (Power): Press to turn the system on and off . Radio with CD (MP3/WMA) PWR (Power): Press to turn the system on and off ....
...time. VOL (Volume): Turn to increase or to change what displays while using RDS. RCL (Recall): Press to decrease the volume. 7-4 Infotainment System Radio with CD (MP3/WMA) For XM™ (if equipped), press the DISPL knob while in XM mode to retrieve four different categories of the program...if available). o VOL p (Volume): Turn to increase or to switch the display between the radio station frequency, band, and the time. Playing the Radio AM-FM Radio PWR (Power): Press to turn the system on and off . Radio with CD (MP3/WMA) PWR (Power): Press to turn the system on and off ....

Owner's Manual
Page 155
...vehicle speed. Press and hold the AUDIO knob. Press and release the AUDIO knob until OFF displays. 7-5 Setting the Tone (Bass/Treble) AM-FM Radio To adjust the bass or treble: 1. To adjust the bass or treble to the middle position. CEN (center) displays. Set the volume at ... button until BAS (bass) or TRE (treble) displays. 2. Press and release the AUDIO button until BAS (bass) or TRE (treble) displays. 2. The radio produces one beep and adjusts the display level to the center position: 1. Press and hold the AUDIO button for more than two seconds until you...
...vehicle speed. Press and hold the AUDIO knob. Press and release the AUDIO knob until OFF displays. 7-5 Setting the Tone (Bass/Treble) AM-FM Radio To adjust the bass or treble: 1. To adjust the bass or treble to the middle position. CEN (center) displays. Set the volume at ... button until BAS (bass) or TRE (treble) displays. 2. Press and release the AUDIO button until BAS (bass) or TRE (treble) displays. 2. The radio produces one beep and adjusts the display level to the center position: 1. Press and hold the AUDIO button for more than two seconds until you...

