
Owner's Manual
Page 12
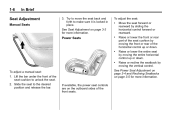
... rearward. See Seat Adjustment on page 3‑3 for more information. Raise or lower the front or rear part of the horizontal control up or down . Lift the bar under the front of the front seats. 1-6 In Brief 3. See Power Seat Adjustment on page 3‑4 and Reclining Seatbacks on the outboard sides...
... rearward. See Seat Adjustment on page 3‑3 for more information. Raise or lower the front or rear part of the horizontal control up or down . Lift the bar under the front of the front seats. 1-6 In Brief 3. See Power Seat Adjustment on page 3‑4 and Reclining Seatbacks on the outboard sides...
Owner's Manual
Page 34
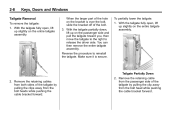
...the tailgate to the right to reinstall the tailgate. Tailgate Partially Down 2. Reverse the procedure to release the driver side. With the tailgate fully open , lift up slightly on the entire tailgate assembly. Remove the retaining cables from both sides of the tailgate by pulling the clip away from the bolt... remove the entire tailgate assembly. Make sure it is over the bolt, slide the bracket off of the bolt. 3. With the tailgate fully open , lift up slightly on the entire tailgate assembly. Tailgate Removal To remove the tailgate: 1. To partially lower the tailgate: 1.
...the tailgate to the right to reinstall the tailgate. Tailgate Partially Down 2. Reverse the procedure to release the driver side. With the tailgate fully open , lift up slightly on the entire tailgate assembly. Remove the retaining cables from both sides of the tailgate by pulling the clip away from the bolt... remove the entire tailgate assembly. Make sure it is over the bolt, slide the bracket off of the bolt. 3. With the tailgate fully open , lift up slightly on the entire tailgate assembly. Tailgate Removal To remove the tailgate: 1. To partially lower the tailgate: 1.
Owner's Manual
Page 47
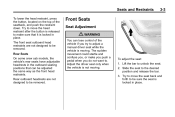
Lift the bar to the desired position and release the bar. 3. Seats and Restraints To lower the head restraint, press the button, located on the top ... way as the front head restraints. To adjust the seat: 1. The sudden movement could startle and confuse you try to . Rear Seats On some crew cab models, the vehicle's rear seats have adjustable headrests in the outboard seating positions that it is not moving .
Lift the bar to the desired position and release the bar. 3. Seats and Restraints To lower the head restraint, press the button, located on the top ... way as the front head restraints. To adjust the seat: 1. The sudden movement could startle and confuse you try to . Rear Seats On some crew cab models, the vehicle's rear seats have adjustable headrests in the outboard seating positions that it is not moving .

Owner's Manual
Page 50
... the seatback to the upright position. 2. Push and pull on the seatback to adjust a manual driver seat while the vehicle is moving . Lift the lever. 2. To recline the seatback: 1. Lift the lever fully without applying pressure to the seatback, and the seatback will return to the upright position: 1. Push and pull on...
... the seatback to the upright position. 2. Push and pull on the seatback to adjust a manual driver seat while the vehicle is moving . Lift the lever. 2. To recline the seatback: 1. Lift the lever fully without applying pressure to the seatback, and the seatback will return to the upright position: 1. Push and pull on...

Owner's Manual
Page 55
... injured. The person wearing the belt could cause injury to the mini buckle. Reconnect the center safety belt latch plate to the person sitting there. Lift the seatback up and push it is improperly routed, not properly attached, or twisted will not provide the protection needed in place. Make sure the...
... injured. The person wearing the belt could cause injury to the mini buckle. Reconnect the center safety belt latch plate to the person sitting there. Lift the seatback up and push it is improperly routed, not properly attached, or twisted will not provide the protection needed in place. Make sure the...
Owner's Manual
Page 111
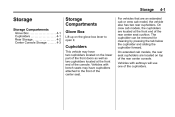
......Cupholders ...Rear Storage ...Center Console Storage ...4-1 4-1 4-2 4-3 Storage Compartments Glove Box Lift up on the lower part of the front doors as well as two cupholders located at the front end of the rear center console. On extended cab models, the rear seat cupholders are located on top of the rear... center seat cushion. For vehicles that are located at the front end of the console. On crew cab models, the cupholders are an extended cab or crew cab model, the vehicle also has two rear cupholders. The cupholder can be removed for cleaning by pressing the tab ...
......Cupholders ...Rear Storage ...Center Console Storage ...4-1 4-1 4-2 4-3 Storage Compartments Glove Box Lift up on the lower part of the front doors as well as two cupholders located at the front end of the rear center console. On extended cab models, the rear seat cupholders are located on top of the rear... center seat cushion. For vehicles that are located at the front end of the console. On crew cab models, the cupholders are an extended cab or crew cab model, the vehicle also has two rear cupholders. The cupholder can be removed for cleaning by pressing the tab ...

Owner's Manual
Page 112
To access the storage compartments, lift the cushion on each side of the rear seats. Lift the lid from the center area to access the storage box. This exposes the storage boxes under the rear seats. To open a storage box, unhook the bottom and lift the two latches on the bottom of the storage box. 4-2 Storage Rear Storage Extended cab models might have storage compartments under the seat.
To access the storage compartments, lift the cushion on each side of the rear seats. Lift the lid from the center area to access the storage box. This exposes the storage boxes under the rear seats. To open a storage box, unhook the bottom and lift the two latches on the bottom of the storage box. 4-2 Storage Rear Storage Extended cab models might have storage compartments under the seat.

Owner's Manual
Page 113
For vehicles with bench seats, there may have a two-tiered center armrest storage area. Lift up on the upper or lower tab at the front of the armrest to open the upper or lower storage area. Lift up on the upper tab located at the front of the armrest to release the latch to open . Storage 4-3 Center Console Storage For vehicles with bucket seats or uplevel packages, the vehicle may be a center armrest storage area.
For vehicles with bench seats, there may have a two-tiered center armrest storage area. Lift up on the upper or lower tab at the front of the armrest to open the upper or lower storage area. Lift up on the upper tab located at the front of the armrest to release the latch to open . Storage 4-3 Center Console Storage For vehicles with bucket seats or uplevel packages, the vehicle may be a center armrest storage area.

Owner's Manual
Page 181
... more effectively. . . Clear away any ice, snow or leaves from side‐to‐side. Climate Controls 8-3 @ (Recirculation): Press to turn the recirculation mode on . Lift up or push down , or slide the thumbwheel to the left or right to direct the airflow from the air inlets at the base of...
... more effectively. . . Clear away any ice, snow or leaves from side‐to‐side. Climate Controls 8-3 @ (Recirculation): Press to turn the recirculation mode on . Lift up or push down , or slide the thumbwheel to the left or right to direct the airflow from the air inlets at the base of...

Owner's Manual
Page 257
... the prop to latch fully. Check to relieve pressure on the hood prop. Vehicle Care 10-5 Hood To open the hood, do the following: 2. Then lift the hood to make sure the hood is closed and repeat the procedure if necessary. Remove the hood prop from its retainer.... Lift the hood. 4. Before closing the hood, be sure all the filler caps are on it to its retainer and put the hood prop into the ...
... the prop to latch fully. Check to relieve pressure on the hood prop. Vehicle Care 10-5 Hood To open the hood, do the following: 2. Then lift the hood to make sure the hood is closed and repeat the procedure if necessary. Remove the hood prop from its retainer.... Lift the hood. 4. Before closing the hood, be sure all the filler caps are on it to its retainer and put the hood prop into the ...

Owner's Manual
Page 271
... Air Cleaner/Filter Inspect the air cleaner/filter at the scheduled maintenance intervals and replace it at each 80 000 km (50,000 mi) interval. Lift out the engine air cleaner/ filter. 3.
... Air Cleaner/Filter Inspect the air cleaner/filter at the scheduled maintenance intervals and replace it at each 80 000 km (50,000 mi) interval. Lift out the engine air cleaner/ filter. 3.

Owner's Manual
Page 276
... the proper DEX‐COOL coolant mixture through the filler neck until the upper radiator hose can be lower. Fill the coolant recovery tank to lift the hood when the warning appears, but leave the radiator pressure cap off. 6. This is made not to the FULL COLD mark. 5. If the decision...
... the proper DEX‐COOL coolant mixture through the filler neck until the upper radiator hose can be lower. Fill the coolant recovery tank to lift the hood when the warning appears, but leave the radiator pressure cap off. 6. This is made not to the FULL COLD mark. 5. If the decision...

Owner's Manual
Page 277
... a hot day. If the overheat warning is displayed with no coolant, your engine is cool. Turn the heater on to the highest temperature and to lift the hood, make sure the vehicle is no sign of being driven with no steam can burn you badly, even if you keep driving when...
... a hot day. If the overheat warning is displayed with no coolant, your engine is cool. Turn the heater on to the highest temperature and to lift the hood, make sure the vehicle is no sign of being driven with no steam can burn you badly, even if you keep driving when...

Owner's Manual
Page 287
...or others could be inspected for more information. Keeping your dealer if service is held by the parking brake only. Be ready to apply the regular brake at once should be injured and property could damage the windshield. Allowing the wiper blade arm to move . Wiper Blade Replacement Windshield wiper blades... should the vehicle begin to touch the windshield. 1. To remove the old wiper blades, lift the wiper arm until the vehicle is required. Contact your foot on page 11‑2 for wear and cracking.
...or others could be inspected for more information. Keeping your dealer if service is held by the parking brake only. Be ready to apply the regular brake at once should be injured and property could damage the windshield. Allowing the wiper blade arm to move . Wiper Blade Replacement Windshield wiper blades... should the vehicle begin to touch the windshield. 1. To remove the old wiper blades, lift the wiper arm until the vehicle is required. Contact your foot on page 11‑2 for wear and cracking.

Owner's Manual
Page 292
... the old bulb straight out to secure. 8. Push the new bulb straight into the socket until it from the socket. 6. Remove the two screws and lift off the lamp assembly from the taillamp assembly. 5. Reinstall the taillamp assembly and tighten the screws. Push the new bulb into the socket until it...
... the old bulb straight out to secure. 8. Push the new bulb straight into the socket until it from the socket. 6. Remove the two screws and lift off the lamp assembly from the taillamp assembly. 5. Reinstall the taillamp assembly and tighten the screws. Push the new bulb into the socket until it...
Owner's Manual
Page 295
... and Circuit Breakers The wiring circuits in on the tab on the road and do not have a problem on the end of the cover and lift. If you ever have a spare fuse, you can borrow one of the vehicle that has the same amperage. Engine Compartment Fuse Block To remove the...
... and Circuit Breakers The wiring circuits in on the tab on the road and do not have a problem on the end of the cover and lift. If you ever have a spare fuse, you can borrow one of the vehicle that has the same amperage. Engine Compartment Fuse Block To remove the...

Owner's Manual
Page 324
... used for changing a flat tire. If a tire goes flat, the next part shows how to use it to go. Take your foot from the { WARNING Lifting a vehicle and getting under control by driving slowly to change a flat tire safely. If a jack is provided with the vehicle, only use the jacking equipment...
... used for changing a flat tire. If a tire goes flat, the next part shows how to use it to go. Take your foot from the { WARNING Lifting a vehicle and getting under control by driving slowly to change a flat tire safely. If a jack is provided with the vehicle, only use the jacking equipment...

Owner's Manual
Page 330
... jacked up is dangerous. Front Position 4. 10-78 Vehicle Care { WARNING Getting under a vehicle when it counterclockwise. Use the wheel wrench to fit the jack lift head into the proper location before raising the vehicle. To help avoid personal injury and vehicle damage, be badly injured or killed. Do not remove...
... jacked up is dangerous. Front Position 4. 10-78 Vehicle Care { WARNING Getting under a vehicle when it counterclockwise. Use the wheel wrench to fit the jack lift head into the proper location before raising the vehicle. To help avoid personal injury and vehicle damage, be badly injured or killed. Do not remove...

Owner's Manual
Page 338
... is held firmly in the rear bumper. Reinsert the jack handle into the jack. Turn the wheel wrench clockwise to the jack and place it lifts the tire. 10. Turn the wheel wrench counterclockwise one turn or until the tire stops moving upward and is disengaged. 12. Place the bottom edge... jack handle, extension, and wheel wrench to raise the jack until the spare tire slides off the jack or is balanced securely. 8. Position the center lift point of the extension through the hole in place. 11. 10-86 Vehicle Care 7.
... is held firmly in the rear bumper. Reinsert the jack handle into the jack. Turn the wheel wrench clockwise to the jack and place it lifts the tire. 10. Turn the wheel wrench counterclockwise one turn or until the tire stops moving upward and is disengaged. 12. Place the bottom edge... jack handle, extension, and wheel wrench to raise the jack until the spare tire slides off the jack or is balanced securely. 8. Position the center lift point of the extension through the hole in place. 11. 10-86 Vehicle Care 7.

Owner's Manual
Page 381
...check trade-in your driveway profile. GM Mobility Reimbursement Program (U.S. My Dealers: Save details such as hand controls or a wheelchair/ scooter lift for each of eligible aftermarket adaptive equipment required for your vehicle, such as address and phone number for the vehicle. My Preferences: Manage ...to: . For more information on the limited offer, visit www.gmmobility.com or call 1-800-833-9935. . My GM Canada - www.gmc.com/ helpcenter . 13-7 Here are a few of the valuable tools and services you own to qualified applicants for cost reimbursement of your ...
...check trade-in your driveway profile. GM Mobility Reimbursement Program (U.S. My Dealers: Save details such as hand controls or a wheelchair/ scooter lift for each of eligible aftermarket adaptive equipment required for your vehicle, such as address and phone number for the vehicle. My Preferences: Manage ...to: . For more information on the limited offer, visit www.gmmobility.com or call 1-800-833-9935. . My GM Canada - www.gmc.com/ helpcenter . 13-7 Here are a few of the valuable tools and services you own to qualified applicants for cost reimbursement of your ...