

Owner's Manual
Page 14
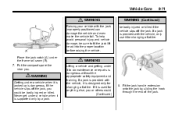
.... { WARNING Exhaust gases can cause unconsciousness and even death. Once activated, the LED light, changes to make sure the area above the license plate, and lift up to the highest setting. It can enter the vehicle if it . Always check to amber. Fully open the liftgate without checking for overhead obstructions...
.... { WARNING Exhaust gases can cause unconsciousness and even death. Once activated, the LED light, changes to make sure the area above the license plate, and lift up to the highest setting. It can enter the vehicle if it . Always check to amber. Fully open the liftgate without checking for overhead obstructions...
Owner's Manual
Page 18
... the 3/4 mode selected, the liftgate stops at the desired height by pressing any switch. 3. With the power liftgate disabled and all of the liftgate, and lift the gate open for the system to lower the liftgate and close. Turn the liftgate switch to the OFF position. When power opened and closed.
... the 3/4 mode selected, the liftgate stops at the desired height by pressing any switch. 3. With the power liftgate disabled and all of the liftgate, and lift the gate open for the system to lower the liftgate and close. Turn the liftgate switch to the OFF position. When power opened and closed.

Owner's Manual
Page 31
... move forward in the Driver Information Center (DIC), automatic adjustment occurs when the ignition is turned to LOCK/OFF and the driver door is opened. Lift the lever and move when pushed or pulled. See Power Seat Adjustment on page 2‑3 for service. 2-5 Lumbar Adjustment Power Lumbar Seats with manual reclining...
... move forward in the Driver Information Center (DIC), automatic adjustment occurs when the ignition is turned to LOCK/OFF and the driver door is opened. Lift the lever and move when pushed or pulled. See Power Seat Adjustment on page 2‑3 for service. 2-5 Lumbar Adjustment Power Lumbar Seats with manual reclining...

Owner's Manual
Page 34
.... To fold the seatback down for more cargo space. { WARNING A safety belt that the safety belts are properly routed and attached, and are not twisted. Lift the lever located on top of the seatback. 3. Fold the seatback forward. After raising the rear seatback, always check to be sure they are not... sure that is in use. Notice: Folding a rear seat with the safety belts still fastened may cause damage to the seat or the safety belts. Lift and hold the lever located on the top of the seatback. 2.
.... To fold the seatback down for more cargo space. { WARNING A safety belt that the safety belts are properly routed and attached, and are not twisted. Lift the lever located on top of the seatback. 3. Fold the seatback forward. After raising the rear seatback, always check to be sure they are not... sure that is in use. Notice: Folding a rear seat with the safety belts still fastened may cause damage to the seat or the safety belts. Lift and hold the lever located on the top of the seatback. 2.

Owner's Manual
Page 89
... a storage compartment on the instrument panel. For vehicles with a center console storage, use the lever (A) on the lever. Glove Box Open the glove box by lifting up on the front to open . Storage 3-1 Storage Storage Compartments Instrument Panel Storage ...Glove Box ...Cupholders ...Center Console Storage ...3-1 3-1 3-1 3-1 Storage Compartments Instrument Panel Storage Cupholders...
... a storage compartment on the instrument panel. For vehicles with a center console storage, use the lever (A) on the lever. Glove Box Open the glove box by lifting up on the front to open . Storage 3-1 Storage Storage Compartments Instrument Panel Storage ...Glove Box ...Cupholders ...Center Console Storage ...3-1 3-1 3-1 3-1 Storage Compartments Instrument Panel Storage Cupholders...

Owner's Manual
Page 92
... on both sides of the vehicle at the furthest rearward position to the cross rails. Push the lever down to release and move the crossrail. Lift the lever to completely engage into the side rail holes. 3-4 Storage Try sliding the crossrails forward and backward to ensure that they are correctly secured...
... on both sides of the vehicle at the furthest rearward position to the cross rails. Push the lever down to release and move the crossrail. Lift the lever to completely engage into the side rail holes. 3-4 Storage Try sliding the crossrails forward and backward to ensure that they are correctly secured...

Owner's Manual
Page 279
The lever is near the middle of the steering wheel. 3. Vehicle Care 9-5 Hood To open the hood: 2. Pull up on the secondary hood release. Pull the release handle located below the instrument panel to the left of the hood. 1. Lift the hood. Before closing the hood, check all filler caps are properly installed.
The lever is near the middle of the steering wheel. 3. Vehicle Care 9-5 Hood To open the hood: 2. Pull up on the secondary hood release. Pull the release handle located below the instrument panel to the left of the hood. 1. Lift the hood. Before closing the hood, check all filler caps are properly installed.
Owner's Manual
Page 283
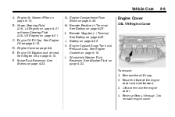
.... Remote Negative (−) Terminal. Engine Coolant Surge Tank and Pressure Cap. Battery on page 9‑16. Windshield Washer Fluid Reservoir. Remove the oil fill cap. 2. Lift and remove the engine cover. 4. G. See Washer Fluid on page 9‑21. Power Steering Fluid (2.4L L4 Engine) on page 9‑21 or Power Steering...
.... Remote Negative (−) Terminal. Engine Coolant Surge Tank and Pressure Cap. Battery on page 9‑16. Windshield Washer Fluid Reservoir. Remove the oil fill cap. 2. Lift and remove the engine cover. 4. G. See Washer Fluid on page 9‑21. Power Steering Fluid (2.4L L4 Engine) on page 9‑21 or Power Steering...

Owner's Manual
Page 294
... from it is an engine coolant temperature warning light on to the highest temperature and to warn of steam: 1. If it . If the decision to lift the hood is made not to see or hear steam coming from the vehicle until the engine is cool. If the engine is overheating, both... warning is displayed but instead get service help right away. Engine Overheating The vehicle has an indicator to the highest fan speed. Then check to lift the hood when this warning appears, but no steam can get a little too hot when the vehicle: ... You or others could be made , make sure...
... from it is an engine coolant temperature warning light on to the highest temperature and to warn of steam: 1. If it . If the decision to lift the hood is made not to see or hear steam coming from the vehicle until the engine is cool. If the engine is overheating, both... warning is displayed but instead get service help right away. Engine Overheating The vehicle has an indicator to the highest fan speed. Then check to lift the hood when this warning appears, but no steam can get a little too hot when the vehicle: ... You or others could be made , make sure...
Owner's Manual
Page 303
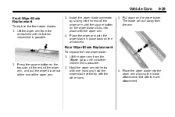
... rear wiper blade: 1. Press the square button on the wiper blade clicks into the wiper arm aligning the blade attachment rivet with the other hand. 4. Lift the wiper arm from the arm. Place the wiper arm with the wiper arm. 4. Hold the wiper arm at the tip with one hand and... end of the wiper arm. Pull down on the windshield. 9-29 3. The blade will pull away from the windshield until no further movement is possible. 2. Lift the wiper arm from the liftgate glass until no further movement is possible. 3. Place the wiper blade into place with the wiper blade in place...
... rear wiper blade: 1. Press the square button on the wiper blade clicks into the wiper arm aligning the blade attachment rivet with the other hand. 4. Lift the wiper arm from the arm. Place the wiper arm with the wiper arm. 4. Hold the wiper arm at the tip with one hand and... end of the wiper arm. Pull down on the windshield. 9-29 3. The blade will pull away from the windshield until no further movement is possible. 2. Lift the wiper arm from the liftgate glass until no further movement is possible. 3. Place the wiper blade into place with the wiper blade in place...
Owner's Manual
Page 313
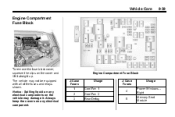
Vehicle Care 9-39 Engine Compartment Fuse Block To remove the fuse block cover, squeeze the clips on the vehicle may not be equipped with all of the fuses and relays shown. Notice: Spilling liquid on any electrical component. J-Case Fuses 1 2 3 Engine Compartment Fuse Block Usage Cool Fan 1 Cool Fan 2 Rear Defog 5 J-Case Fuses 4 Usage Power Windows - Right Memory Seat Module Always keep the covers on any electrical components on the cover and lift it . The vehicle may damage it straight up.
Vehicle Care 9-39 Engine Compartment Fuse Block To remove the fuse block cover, squeeze the clips on the vehicle may not be equipped with all of the fuses and relays shown. Notice: Spilling liquid on any electrical component. J-Case Fuses 1 2 3 Engine Compartment Fuse Block Usage Cool Fan 1 Cool Fan 2 Rear Defog 5 J-Case Fuses 4 Usage Power Windows - Right Memory Seat Module Always keep the covers on any electrical components on the cover and lift it . The vehicle may damage it straight up.
Owner's Manual
Page 314
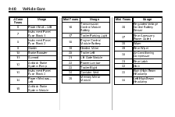
... 17 18 19 20 21 22 23 24 25 Usage Transmission Control Module Battery Trailer Parking Light Engine Control Module Battery Heated Mirror Trailer Left Lift Gate Module Power Lumbar Trailer Right Canister Vent Memory Mirror Module 31 32 33 34 Mini Fuses 26 27 28 29 30 Usage Regulated Voltage...
... 17 18 19 20 21 22 23 24 25 Usage Transmission Control Module Battery Trailer Parking Light Engine Control Module Battery Heated Mirror Trailer Left Lift Gate Module Power Lumbar Trailer Right Canister Vent Memory Mirror Module 31 32 33 34 Mini Fuses 26 27 28 29 30 Usage Regulated Voltage...

Owner's Manual
Page 315
... Sensor Transmission Control Module 45 46 47 48 49 50 51 52 Mini Fuses 43 44 Mirror Chassis Control Module Ignition Spare Rear Drive Module Lift Gate Module Logic Instrument Panel Fuse Block Ignition Heated Seat - Front Chassis Control Module Engine Control Module Rear Vision Camera Micro Relays 54 55 56...
... Sensor Transmission Control Module 45 46 47 48 49 50 51 52 Mini Fuses 43 44 Mirror Chassis Control Module Ignition Spare Rear Drive Module Lift Gate Module Logic Instrument Panel Fuse Block Ignition Heated Seat - Front Chassis Control Module Engine Control Module Rear Vision Camera Micro Relays 54 55 56...

Owner's Manual
Page 341
Steer to maintain lane position, and then gently brake to a stop , well off the road if possible. { WARNING Lifting a vehicle and getting under control by steering the way you or others could be very bumpy and noisy, but you maintain your vehicle's tires properly. ...
Steer to maintain lane position, and then gently brake to a stop , well off the road if possible. { WARNING Lifting a vehicle and getting under control by steering the way you or others could be very bumpy and noisy, but you maintain your vehicle's tires properly. ...

Owner's Manual
Page 343
Lift the load floor up. 4. Place the spare tire next to remove plastic caps from the wheel to the tire being changed . Do a safety check before ...
Lift the load floor up. 4. Place the spare tire next to remove plastic caps from the wheel to the tire being changed . Do a safety check before ...

Owner's Manual
Page 344
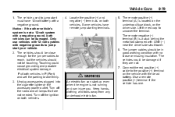
Front Rear 6. The jack must not be covered by a mark on the bottom edge of the front and rear door plastic molding. Turn the wheel wrench counterclockwise to loosen all the wheel nuts, but do not remove them yet. 5. Position the jack lift head at the jack location nearest the flat tire. 9-70 Vehicle Care Notice: Make sure that the jack lift head is indicated by your vehicle. The location is in any other position. Place the jack near the flat tire. The repairs would not be used in the correct position or you may damage your warranty. 4.
Front Rear 6. The jack must not be covered by a mark on the bottom edge of the front and rear door plastic molding. Turn the wheel wrench counterclockwise to loosen all the wheel nuts, but do not remove them yet. 5. Position the jack lift head at the jack location nearest the flat tire. 9-70 Vehicle Care Notice: Make sure that the jack lift head is indicated by your vehicle. The location is in any other position. Place the jack near the flat tire. The repairs would not be used in the correct position or you may damage your warranty. 4.
Owner's Manual
Page 345
... into the proper location before raising the vehicle. If a jack is provided with the vehicle, only use it for changing a flat tire. { WARNING Lifting a vehicle and getting under a vehicle when it is designed only for anything else, you . Fit the jack handle extension onto the jack by a jack. 8. WARNING (...
... into the proper location before raising the vehicle. If a jack is provided with the vehicle, only use it for changing a flat tire. { WARNING Lifting a vehicle and getting under a vehicle when it is designed only for anything else, you . Fit the jack handle extension onto the jack by a jack. 8. WARNING (...
Owner's Manual
Page 353
... the terminal. Use a remote positive (+) terminal if the vehicle has one. { WARNING An electric fan can be in P (Park) and set the parking brake firmly. 3. Lift the red cap to jump start up even when the engine is a stud behind the metal tab stamped with a negative ground, both vehicles. 4. The jumper...
... the terminal. Use a remote positive (+) terminal if the vehicle has one. { WARNING An electric fan can be in P (Park) and set the parking brake firmly. 3. Lift the red cap to jump start up even when the engine is a stud behind the metal tab stamped with a negative ground, both vehicles. 4. The jumper...
Owner's Manual
Page 387
My Dealers/Retailers: Save details such as address and phone number for each of your vehicle, such as hand controls or a wheelchair/ scooter lift. FAQ Contact Us . This program, available to $1,000 of the cost of www.gm.ca where you can reimburse you up , visit the...My GM Canada (Canada) - www.gm.ca My GM Canada is available for your preferred GM dealers/retailers. Customer Information Other Helpful Links: GMC - www.gmc.com GMC Merchandise - www.gmccollection.com Help Center - www.gmc.com/ helpcenter . . 12-5 Here are a few of vehicle purchase/lease. For more details, or to : .
My Dealers/Retailers: Save details such as address and phone number for each of your vehicle, such as hand controls or a wheelchair/ scooter lift. FAQ Contact Us . This program, available to $1,000 of the cost of www.gm.ca where you can reimburse you up , visit the...My GM Canada (Canada) - www.gm.ca My GM Canada is available for your preferred GM dealers/retailers. Customer Information Other Helpful Links: GMC - www.gmc.com GMC Merchandise - www.gmccollection.com Help Center - www.gmc.com/ helpcenter . . 12-5 Here are a few of vehicle purchase/lease. For more details, or to : .
