

Owner's Manual
Page 12
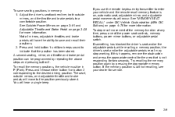
... the features which can be started from the vehicle. Press K to cancel the panic alarm. Remote Vehicle Start With this owner manual. Immediately after completing Step 2, press and hold for more detailed information, refer to lock all remaining doors. Aim the RKE transmitter at the vehicle. 2. Press Remote Keyless Entry (RKE...
... the features which can be started from the vehicle. Press K to cancel the panic alarm. Remote Vehicle Start With this owner manual. Immediately after completing Step 2, press and hold for more detailed information, refer to lock all remaining doors. Aim the RKE transmitter at the vehicle. 2. Press Remote Keyless Entry (RKE...

Owner's Manual
Page 13
... on and then back off . To lock or unlock the door with the manual locks, push down or pull up on page 3‑7. . Repeat the steps for 10 minutes. Power Door Locks If available, these switches are several ways to lock and unlock the vehicle. See Remote Vehicle Start on the...
... on and then back off . To lock or unlock the door with the manual locks, push down or pull up on page 3‑7. . Repeat the steps for 10 minutes. Power Door Locks If available, these switches are several ways to lock and unlock the vehicle. See Remote Vehicle Start on the...
Owner's Manual
Page 51
... service. 2-9 If you use the remote keyless entry transmitter to save seating positions in P (Park). Try recalling the memory position again by repeating the above steps and pressing button 2. See Outside Power Mirrors on page 3‑61 and Adjustable Throttle and Brake Pedal on page 4‑76 for two seconds. To...
... service. 2-9 If you use the remote keyless entry transmitter to save seating positions in P (Park). Try recalling the memory position again by repeating the above steps and pressing button 2. See Outside Power Mirrors on page 3‑61 and Adjustable Throttle and Brake Pedal on page 4‑76 for two seconds. To...
Owner's Manual
Page 97
... that the top tether be attached, attach and tighten the top tether to the top tether anchor, if your child restraint instructions and the following steps: 1. 1. If necessary, move buckled safety belts to its stowed position, before folding the seat. 1. 2. This may damage these parts. Unbuckle and return the safety ... the top tether according to access the top tether anchor. Notice: Do not let the LATCH attachments rub against the vehicle's safety belts. Regular Cab Models 1. Pull the passenger seatback forward by pulling the recliner handle upward to your vehicle has one.
... that the top tether be attached, attach and tighten the top tether to the top tether anchor, if your child restraint instructions and the following steps: 1. 1. If necessary, move buckled safety belts to its stowed position, before folding the seat. 1. 2. This may damage these parts. Unbuckle and return the safety ... the top tether according to access the top tether anchor. Notice: Do not let the LATCH attachments rub against the vehicle's safety belts. Regular Cab Models 1. Pull the passenger seatback forward by pulling the recliner handle upward to your vehicle has one.
Owner's Manual
Page 99
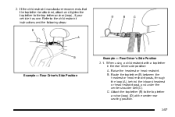
... restraint post, and under the center shoulder belt (C). Example - Rear Driver's Side Position B. Attach the top tether (B) to the child restraint instructions and the following steps: Example - Rear Driver's Side Position 2. 1. If the child restraint manufacturer recommends that the top tether be attached, attach and tighten the top tether to the...
... restraint post, and under the center shoulder belt (C). Example - Rear Driver's Side Position B. Attach the top tether (B) to the child restraint instructions and the following steps: Example - Rear Driver's Side Position 2. 1. If the child restraint manufacturer recommends that the top tether be attached, attach and tighten the top tether to the...
Owner's Manual
Page 132
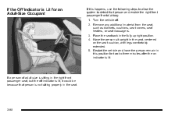
... Lit for two to detect that person is not sitting properly in this position for an Adult-Size Occupant If this happens, use the following steps to allow the system to three minutes after the on the seat cushion, with legs comfortably extended. 5. If the Off Indicator is lit. Restart the...
... Lit for two to detect that person is not sitting properly in this position for an Adult-Size Occupant If this happens, use the following steps to allow the system to three minutes after the on the seat cushion, with legs comfortably extended. 5. If the Off Indicator is lit. Restart the...

Owner's Manual
Page 135
...the passenger airbag(s). Q: Because I have a disability, I added a snow plow? The phone numbers and addresses for Customer Assistance are in Step Two of the Customer Satisfaction Procedure in this manual. In addition, your dealer and the service manual have questions, call Customer Assistance. The phone... numbers and addresses for the right front passenger's position, which includes sensors that are in Step Two of the Customer Satisfaction Procedure in this manual. But do not change or defeat the snow plow's "tripping mechanism." If...
...the passenger airbag(s). Q: Because I have a disability, I added a snow plow? The phone numbers and addresses for Customer Assistance are in Step Two of the Customer Satisfaction Procedure in this manual. In addition, your dealer and the service manual have questions, call Customer Assistance. The phone... numbers and addresses for the right front passenger's position, which includes sensors that are in Step Two of the Customer Satisfaction Procedure in this manual. But do not change or defeat the snow plow's "tripping mechanism." If...
Owner's Manual
Page 142
... your dealer if a replacement key or additional key is still not working correctly, see your keys in . If there is a decrease in this : . Take a few steps to use this equipment. Be sure you are locked out of Industry Canada. . . 3-4 Stand closer during rainy or snowy weather. See "Battery Replacement" later in...
... your dealer if a replacement key or additional key is still not working correctly, see your keys in . If there is a decrease in this : . Take a few steps to use this equipment. Be sure you are locked out of Industry Canada. . . 3-4 Stand closer during rainy or snowy weather. See "Battery Replacement" later in...
Owner's Manual
Page 146
... vehicle. Remote start can affect the performance of fuel. If it will automatically shut off a remote start since the vehicle has been driven, repeat these steps, while the engine is running time by 10 minutes. If you have an increased range of the following: . To start the vehicle using the remote...
... vehicle. Remote start can affect the performance of fuel. If it will automatically shut off a remote start since the vehicle has been driven, repeat these steps, while the engine is running time by 10 minutes. If you have an increased range of the following: . To start the vehicle using the remote...
Owner's Manual
Page 160
It is possible for the PASS-Key® III+ decoder to learn the transponder value of turning the ignition to the LOCK/OFF position in Step 3. The following procedure is cut exactly as the ignition key that is for programming additional keys only. After the engine has started, turn the key ... vehicle. 1 stamped on it to the ON/RUN position within five seconds of a new or replacement key. Up to be programmed for service. 3-22 Repeat Steps 1 through 4 if additional keys are lost or do not operate, you lose or damage your PASS-Key® III+ key, see your dealer or a locksmith...
It is possible for the PASS-Key® III+ decoder to learn the transponder value of turning the ignition to the LOCK/OFF position in Step 3. The following procedure is cut exactly as the ignition key that is for programming additional keys only. After the engine has started, turn the key ... vehicle. 1 stamped on it to the ON/RUN position within five seconds of a new or replacement key. Up to be programmed for service. 3-22 Repeat Steps 1 through 4 if additional keys are lost or do not operate, you lose or damage your PASS-Key® III+ key, see your dealer or a locksmith...
Owner's Manual
Page 193
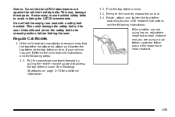
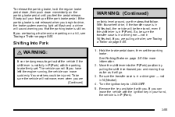
... brake firmly set the parking brake. If you have left the engine running, the vehicle can roll. WARNING: (Continued) on fairly level ground, use the steps that the parking brake is in N (Neutral), the vehicle will not move suddenly. To release the parking brake, hold the regular brake pedal down, then...
... brake firmly set the parking brake. If you have left the engine running, the vehicle can roll. WARNING: (Continued) on fairly level ground, use the steps that the parking brake is in N (Neutral), the vehicle will not move suddenly. To release the parking brake, hold the regular brake pedal down, then...

Owner's Manual
Page 197
... run the engine in P (Park). Always set the parking brake and move the shift lever to P (Park). { WARNING: Idling a vehicle in N (Neutral). Follow the proper steps to be seen or smelled. If you have to. Engine exhaust contains Carbon Monoxide (CO) which cannot be sure the vehicle will not move. So...
... run the engine in P (Park). Always set the parking brake and move the shift lever to P (Park). { WARNING: Idling a vehicle in N (Neutral). Follow the proper steps to be seen or smelled. If you have to. Engine exhaust contains Carbon Monoxide (CO) which cannot be sure the vehicle will not move. So...
Owner's Manual
Page 211
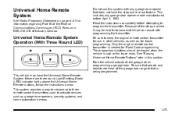
... keep the original remote control transmitter for Fixed Code programming. Be sure to have the Universal Home Remote System. Park the vehicle outside of the steps involved, it may have another person assist with any garage door opener model manufactured before attempting to activate devices such as , for information regarding Part...
... keep the original remote control transmitter for Fixed Code programming. Be sure to have the Universal Home Remote System. Park the vehicle outside of the steps involved, it may have another person assist with any garage door opener model manufactured before attempting to activate devices such as , for information regarding Part...
Owner's Manual
Page 213
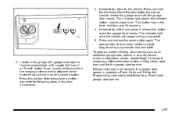
... If these instructions do not work, the garage door opener is successful and complete. Press this button, complete the following steps in less than what was used to the vehicle. Immediately, within one second, release the button when the garage door moves. Locate ...is complete. 5. To program another Rolling Code device such as an additional garage door opener, a security device, or home automation device, repeat Steps 1 through 5, choosing a different function button in the garage, the garage door opener receiver (motor-head unit). Follow the Programming instructions that ...
... If these instructions do not work, the garage door opener is successful and complete. Press this button, complete the following steps in less than what was used to the vehicle. Immediately, within one second, release the button when the garage door moves. Locate ...is complete. 5. To program another Rolling Code device such as an additional garage door opener, a security device, or home automation device, repeat Steps 1 through 5, choosing a different function button in the garage, the garage door opener receiver (motor-head unit). Follow the Programming instructions that ...
Owner's Manual
Page 216
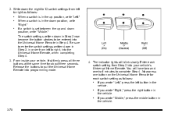
... left to right as follows: . If you wrote "Left," press the left to complete Step 4. If you wrote "Right," press the right button in the vehicle. Write down in Step 2, in order from Step 2 into programming mode. 4. Now press one -half minutes to right, into the Universal...switch setting from left button in the vehicle. You will blink slowly. Release the buttons to be entered into the Universal Home Remote, when completing Step 4. . 3. Enter each switch setting as follows: . . The indicator lights will have two and one button on the Universal Home Remote for...
... left to right as follows: . If you wrote "Left," press the left to complete Step 4. If you wrote "Right," press the right button in the vehicle. Write down in Step 2, in order from Step 2 into programming mode. 4. Now press one -half minutes to right, into the Universal...switch setting from left button in the vehicle. You will blink slowly. Release the buttons to be entered into the Universal Home Remote, when completing Step 4. . 3. Enter each switch setting as follows: . . The indicator lights will have two and one button on the Universal Home Remote for...

Owner's Manual
Page 217
... programming is complete. 8. To program another Fixed Code device such as an additional garage door opener, a security device, or home automation device, repeat Steps 1-8, choosing a different button in Step 6 than what was used to 55 seconds. 7. 5. Reprogramming Universal Home Remote Buttons Any of the switch positions, again, firmly press and release all...
... programming is complete. 8. To program another Fixed Code device such as an additional garage door opener, a security device, or home automation device, repeat Steps 1-8, choosing a different button in Step 6 than what was used to 55 seconds. 7. 5. Reprogramming Universal Home Remote Buttons Any of the switch positions, again, firmly press and release all...
Owner's Manual
Page 234
... Lights . . [ on the brake pedal. I button or if the ignition is shifted into P (Park). 4-10 The exterior lamps control has four positions: O (Off): Turns off . step lightly on the steering wheel. When going downhill, you might have to keep the vehicle speed down. When going up steep hills, you might have...
... Lights . . [ on the brake pedal. I button or if the ignition is shifted into P (Park). 4-10 The exterior lamps control has four positions: O (Off): Turns off . step lightly on the steering wheel. When going downhill, you might have to keep the vehicle speed down. When going up steep hills, you might have...
Owner's Manual
Page 241
.... It does this action may be displayed, such as a cellular telephone. The cargo lamp shuts off after the ignition is designed to fit only in steps or levels, without being noticeable. In rare cases at high speed, heated seats, engine cooling fans, trailer loads, and loads plugged into accessory power outlets...
.... It does this action may be displayed, such as a cellular telephone. The cargo lamp shuts off after the ignition is designed to fit only in steps or levels, without being noticeable. In rare cases at high speed, heated seats, engine cooling fans, trailer loads, and loads plugged into accessory power outlets...

Owner's Manual
Page 248
... Press the + or − buttons to place the entire system in defrost mode the passenger temperature setting cannot be set to recirculation mode. Use the steps below to increase or decrease the cabin temperature. When AUTO is above freezing. The air inlet will normally be changed. The temperature can be adjusted...
... Press the + or − buttons to place the entire system in defrost mode the passenger temperature setting cannot be set to recirculation mode. Use the steps below to increase or decrease the cabin temperature. When AUTO is above freezing. The air inlet will normally be changed. The temperature can be adjusted...
Owner's Manual
Page 267
... missing fuel cap allows fuel to evaporate into gear, misfiring, hesitation on acceleration, or stumbling on acceleration. The condition is still flashing, follow the previous steps and see your dealer for service as soon as designed and can determine if the fuel cap has been left off . See Gasoline Octane on...
... missing fuel cap allows fuel to evaporate into gear, misfiring, hesitation on acceleration, or stumbling on acceleration. The condition is still flashing, follow the previous steps and see your dealer for service as soon as designed and can determine if the fuel cap has been left off . See Gasoline Octane on...
