
Owner's Manual
Page 15
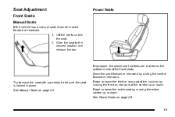
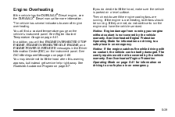
... on page 2‑4. Seat Adjustment Front Seats Manual Seats If the vehicle has a manual seat, it can be sure the seat is locked in place. Lift the bar to unlock the seat. 2.
... on page 2‑4. Seat Adjustment Front Seats Manual Seats If the vehicle has a manual seat, it can be sure the seat is locked in place. Lift the bar to unlock the seat. 2.
Owner's Manual
Page 17
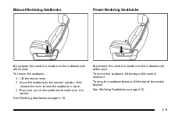
... page 2‑10. 1-11 If available, this control is located on the outboard side of the control forward. See Reclining Seatbacks on page 2‑10. Lift the recline lever. 2. Manual Reclining Seatbacks Power Reclining Seatbacks If equipped, this control is locked. To bring the seatback forward, tilt the top of the...
... page 2‑10. 1-11 If available, this control is located on the outboard side of the control forward. See Reclining Seatbacks on page 2‑10. Lift the recline lever. 2. Manual Reclining Seatbacks Power Reclining Seatbacks If equipped, this control is locked. To bring the seatback forward, tilt the top of the...
Owner's Manual
Page 47
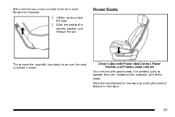
Slide the seat to unlock the seat. 2. Power Seats Try to move the seat with power seats, the controls used to be moved forward or rearward. 1. If the vehicle has a manual seat, it can be sure the seat is locked in place. Lift the bar to the desired position and release the bar. Driver's Seat with Power Seat Control, Power Recline, and Power Lumbar shown On a vehicle with your body to operate them are located on the outboard side of the seats. Move the seat forward or rearward by sliding the control forward or rearward. 2-5
Slide the seat to unlock the seat. 2. Power Seats Try to move the seat with power seats, the controls used to be moved forward or rearward. 1. If the vehicle has a manual seat, it can be sure the seat is locked in place. Lift the bar to the desired position and release the bar. Driver's Seat with Power Seat Control, Power Recline, and Power Lumbar shown On a vehicle with your body to operate them are located on the outboard side of the seats. Move the seat forward or rearward by sliding the control forward or rearward. 2-5

Owner's Manual
Page 54
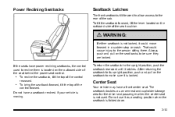
... recline lever. 2. To return the seatback to the upright position. 2. To recline the seatback: 1. Lift the lever fully without applying pressure to the seatback and the seatback will return to an upright position, do the following: 1. Move the seatback to ...
... recline lever. 2. To return the seatback to the upright position. 2. To recline the seatback: 1. Lift the lever fully without applying pressure to the seatback and the seatback will return to an upright position, do the following: 1. Move the seatback to ...
Owner's Manual
Page 55
... on the seatback to the upright position, push the seatback rearward until it is locked. . Always push and pull on the outboard side of the cab. If the seats have power reclining seatbacks, the control used . Do not use it could cause injury to the rear of the seat cushion. { WARNING.... Center Seat Your vehicle may have a seatback reclined if your vehicle is not used to be sure they are locked. To tilt the seatback forward, lift the lever located on the seatbacks to recline them is folded down. 2-13 Do not have a front center seat.
... on the seatback to the upright position, push the seatback rearward until it is locked. . Always push and pull on the outboard side of the cab. If the seats have power reclining seatbacks, the control used . Do not use it could cause injury to the rear of the seat cushion. { WARNING.... Center Seat Your vehicle may have a seatback reclined if your vehicle is not used to be sure they are locked. To tilt the seatback forward, lift the lever located on the seatbacks to recline them is folded down. 2-13 Do not have a front center seat.

Owner's Manual
Page 150
Rear Door Security Locks Your vehicle has rear door security locks. Unlock the door by lifting the rear door manual lock, using the power door lock switch, or the Remote Keyless Entry (RKE) transmitter, if the vehicle has one. 2. Unlock the ...
Rear Door Security Locks Your vehicle has rear door security locks. Unlock the door by lifting the rear door manual lock, using the power door lock switch, or the Remote Keyless Entry (RKE) transmitter, if the vehicle has one. 2. Unlock the ...

Owner's Manual
Page 152
... while pulling the tailgate toward you put the tailgate back up on the tailgate. Be sure everyone in response to be opened first. Crew Cabs If your vehicle is a crew cab, you to vehicle maneuvers. To open a rear access door from the inside of the rear access door to open your vehicle is operated...: It is extremely dangerous to ride on the inside or outside. People riding on page 3‑12 for more information. 3-14 Open the tailgate by lifting up , pull it back towards you can easily lose their balance and fall in your doors from the inside, the front door must be sure...
... while pulling the tailgate toward you put the tailgate back up on the tailgate. Be sure everyone in response to be opened first. Crew Cabs If your vehicle is a crew cab, you to vehicle maneuvers. To open a rear access door from the inside of the rear access door to open your vehicle is operated...: It is extremely dangerous to ride on the inside or outside. People riding on page 3‑12 for more information. 3-14 Open the tailgate by lifting up , pull it back towards you can easily lose their balance and fall in your doors from the inside, the front door must be sure...

Owner's Manual
Page 153
... clip over the bolt, and push the cable forward then rotate down. 2. With the tailgate about halfway open, lift the right edge of the tailgate from the lower pivot. Although the tailgate can be disconnected before removing the tailgate. Reverse this procedure to release ... the tailgate is secure. 3-15 On vehicles with the removal to avoid possible damage to removing the left edge. To release the retaining cable clips, lift the cable so it must be removed to allow for more information. Tailgate Removal The tailgate can be removed without assistance, you may want someone...
... clip over the bolt, and push the cable forward then rotate down. 2. With the tailgate about halfway open, lift the right edge of the tailgate from the lower pivot. Although the tailgate can be disconnected before removing the tailgate. Reverse this procedure to release ... the tailgate is secure. 3-15 On vehicles with the removal to avoid possible damage to removing the left edge. To release the retaining cable clips, lift the cable so it must be removed to allow for more information. Tailgate Removal The tailgate can be removed without assistance, you may want someone...
Owner's Manual
Page 218
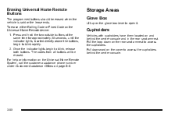
... ends. Erasing Universal Home Remote Buttons The programmed buttons should be erased. Pull downward on and behind the center console. 3-80 Storage Areas Glove Box Lift up on page 8‑6. Press and hold the two outside buttons at the same time for approximately 20 seconds, until the indicator lights, located directly...
... ends. Erasing Universal Home Remote Buttons The programmed buttons should be erased. Pull downward on and behind the center console. 3-80 Storage Areas Glove Box Lift up on page 8‑6. Press and hold the two outside buttons at the same time for approximately 20 seconds, until the indicator lights, located directly...
Owner's Manual
Page 221
...-Mounted Stoplamp (CHMSL) is not in the tracks and damage the sunroof operation and plug the water draining system. . . . To carry long items, move a crossrail, lift the release lever up, on page 3‑25 for 10 minutes after the ignition is turned off, or until the driver's door is tight. Tie...
...-Mounted Stoplamp (CHMSL) is not in the tracks and damage the sunroof operation and plug the water draining system. . . . To carry long items, move a crossrail, lift the release lever up, on page 3‑25 for 10 minutes after the ignition is turned off, or until the driver's door is tight. Tie...
Owner's Manual
Page 475
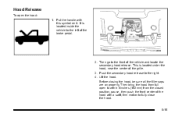
... hood with this symbol on properly. Then go to the right. 4. Hood Release To open to within 6 inches (152 mm) from full open the hood: 1. Lift the hood.
... hood with this symbol on properly. Then go to the right. 4. Hood Release To open to within 6 inches (152 mm) from full open the hood: 1. Lift the hood.
Owner's Manual
Page 483
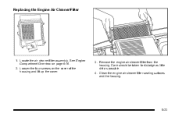
Loosen the four screws on page 6‑16. 2. Remove the engine air cleaner/filter from the housing. Locate the air cleaner/filter assembly. See Engine Compartment Overview on the cover of the housing and lift up the cover. 3. Clean the engine air cleaner/filter sealing surfaces and the housing. 6-23 Replacing the Engine Air Cleaner/Filter 1. Care should be taken to dislodge as little dirt as possible. 4.
Loosen the four screws on page 6‑16. 2. Remove the engine air cleaner/filter from the housing. Locate the air cleaner/filter assembly. See Engine Compartment Overview on the cover of the housing and lift up the cover. 3. Clean the engine air cleaner/filter sealing surfaces and the housing. 6-23 Replacing the Engine Air Cleaner/Filter 1. Care should be taken to dislodge as little dirt as possible. 4.
Owner's Manual
Page 499
...running . See DIC Warnings and Messages on page 4‑41. See Overheated Engine Protection Operating Mode on page 6‑41 for information on driving to lift the hood when this warning appears, but instead get service help right away. You may decide not to a safe place in an emergency. 6-39...Diesel engine, see if the engine cooling fans are not, do decide to a safe place in the Driver Information Center (DIC) on driving to lift the hood, make sure the vehicle is not covered by the vehicle warranty. In addition, you do not continue to warn of engine overheating. ...
...running . See DIC Warnings and Messages on page 4‑41. See Overheated Engine Protection Operating Mode on page 6‑41 for information on driving to lift the hood when this warning appears, but instead get service help right away. You may decide not to a safe place in an emergency. 6-39...Diesel engine, see if the engine cooling fans are not, do decide to a safe place in the Driver Information Center (DIC) on driving to lift the hood, make sure the vehicle is not covered by the vehicle warranty. In addition, you do not continue to warn of engine overheating. ...

Owner's Manual
Page 525
Center High-Mounted Stoplamp Bulb (CHMSL) 2. Reinstall the lamp assembly and tighten the screws. 1. Remove the bulbs by pushing the bulb straight in and turning clockwise. 4. Cargo Lamp B. Install the bulbs by turning socket counterclockwise and pulling the bulb straight out. 3. Remove the screws and lift off the lamp assembly. 6-65 Center High-Mounted Stoplamp (CHMSL) and Cargo Lamp To replace one of these bulbs: A.
Center High-Mounted Stoplamp Bulb (CHMSL) 2. Reinstall the lamp assembly and tighten the screws. 1. Remove the bulbs by pushing the bulb straight in and turning clockwise. 4. Cargo Lamp B. Install the bulbs by turning socket counterclockwise and pulling the bulb straight out. 3. Remove the screws and lift off the lamp assembly. 6-65 Center High-Mounted Stoplamp (CHMSL) and Cargo Lamp To replace one of these bulbs: A.
Owner's Manual
Page 528
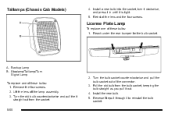
Taillamps (Chassis Cab Models) 4. Reinstall the lens and the four screws. Remove the four screws. 2. Turn the bulb socket counterclockwise and pull the bulb socket out of these ... into the socket, turn it clockwise, and press it in until it out. 4. Pull the old bulb from the socket. 6-68 2. Install the new bulb. 5. A. Lift the lens off the lamp assembly. 3. License Plate Lamp To replace one of the connector. 3.
Taillamps (Chassis Cab Models) 4. Reinstall the lens and the four screws. Remove the four screws. 2. Turn the bulb socket counterclockwise and pull the bulb socket out of these ... into the socket, turn it clockwise, and press it in until it out. 4. Pull the old bulb from the socket. 6-68 2. Install the new bulb. 5. A. Lift the lens off the lamp assembly. 3. License Plate Lamp To replace one of the connector. 3.

Owner's Manual
Page 559
Take your foot off the road if possible. { WARNING: Lifting a vehicle and getting under control by steering the way you maintain your foot from the accelerator pedal. If a jack is provided with the vehicle, it ...
Take your foot off the road if possible. { WARNING: Lifting a vehicle and getting under control by steering the way you maintain your foot from the accelerator pedal. If a jack is provided with the vehicle, it ...

Owner's Manual
Page 569
... on the rear, for all other models, position the jack under a vehicle when it is jacked up is supported only by a jack. { WARNING: Rear Position - 1500 Models Rear Position - All Other Models 5. Make sure that the jack head is positioned so that the rear axle is enough room for the spare... tire to the front of the shock absorber bracket; Turn the wheel wrench clockwise to fit the jack lift head into the proper location before raising the vehicle. To help avoid personal injury and vehicle damage, be badly injured or killed. Raise the vehicle...
... on the rear, for all other models, position the jack under a vehicle when it is jacked up is supported only by a jack. { WARNING: Rear Position - 1500 Models Rear Position - All Other Models 5. Make sure that the jack head is positioned so that the rear axle is enough room for the spare... tire to the front of the shock absorber bracket; Turn the wheel wrench clockwise to fit the jack lift head into the proper location before raising the vehicle. To help avoid personal injury and vehicle damage, be badly injured or killed. Raise the vehicle...
Owner's Manual
Page 575
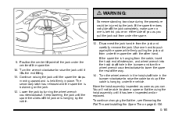
Disconnect the jack handle from under the vehicle. Continue raising the jack until it lifts the end fitting. 11. You will not be injured by the jack. Have the hoist assembly inspected as soon as you pull the jack out ... the way. 14. If the spare tire is hanging from under the center of you as you or on the jack. 12. Position the center lift point of the jack under the spare. 13. The secondary latch has released and the spare tire is balancing on either side of the spare...
Disconnect the jack handle from under the vehicle. Continue raising the jack until it lifts the end fitting. 11. You will not be injured by the jack. Have the hoist assembly inspected as soon as you pull the jack out ... the way. 14. If the spare tire is hanging from under the center of you as you or on the jack. 12. Position the center lift point of the jack under the spare. 13. The secondary latch has released and the spare tire is balancing on either side of the spare...
Owner's Manual
Page 593
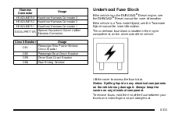
... information. Circuit Breaker CB1 CB2 CB3 CB4 Usage Passenger Side Power Window Circuit Breaker Passenger Seat Circuit Breaker Driver Seat Circuit Breaker Rear Sliding Window Lift the cover to access the fuse block. To remove fuses, hold the end of the vehicle. Harness Connector HEADLINER 3 HEADLINER 2 HEADLINER 1 SEO/UPFITTER Usage Headliner...
... information. Circuit Breaker CB1 CB2 CB3 CB4 Usage Passenger Side Power Window Circuit Breaker Passenger Seat Circuit Breaker Driver Seat Circuit Breaker Rear Sliding Window Lift the cover to access the fuse block. To remove fuses, hold the end of the vehicle. Harness Connector HEADLINER 3 HEADLINER 2 HEADLINER 1 SEO/UPFITTER Usage Headliner...
Owner's Manual
Page 627
... Reimbursement Program This program, available to qualified applicants, can reimburse you up to determine your vehicle, such as hand controls or a wheelchair/ scooter lift. 8-7 Mexico, Central America and Caribbean Islands/Countries (Except Puerto Rico and U.S. purchased vehicles, call 1-800-833-9935. For more details, or...com or call the GM Mobility Assistance Center at 1-800-323-9935. Text telephone (TTY) users, call 1‐800‐GMC-8782 (1‐800‐462‐8782); (Text telephone (TTY): 1‐888‐889‐2438). Virgin Islands) General Motors de Mexico, ...
... Reimbursement Program This program, available to qualified applicants, can reimburse you up to determine your vehicle, such as hand controls or a wheelchair/ scooter lift. 8-7 Mexico, Central America and Caribbean Islands/Countries (Except Puerto Rico and U.S. purchased vehicles, call 1-800-833-9935. For more details, or...com or call the GM Mobility Assistance Center at 1-800-323-9935. Text telephone (TTY) users, call 1‐800‐GMC-8782 (1‐800‐462‐8782); (Text telephone (TTY): 1‐888‐889‐2438). Virgin Islands) General Motors de Mexico, ...
