
Owner's Manual
Page 1
2010 GMC Sierra Owner Manual M In Brief ...1-1 Instrument Panel ...1-2 Initial Drive Information ...1-6 Vehicle Features ...1-23 Performance and Maintenance ...1-32 Seats and Restraint System ...2-1 Head Restraints ...2-3 Front Seats ...2-4 Rear ... Audio System(s) ...4-85 Driving Your Vehicle ...5-1 Your Driving, the Road, and the Vehicle ...5-2 Towing ...5-48 Service and Appearance Care ...6-1 Service ...6-4 Fuel ...6-6 Checking Things Under the Hood ...6-14 Rear Axle ...6-54 Four-Wheel Drive ...6-56 Front Axle ...6-58 Noise Control System ...6-59
2010 GMC Sierra Owner Manual M In Brief ...1-1 Instrument Panel ...1-2 Initial Drive Information ...1-6 Vehicle Features ...1-23 Performance and Maintenance ...1-32 Seats and Restraint System ...2-1 Head Restraints ...2-3 Front Seats ...2-4 Rear ... Audio System(s) ...4-85 Driving Your Vehicle ...5-1 Your Driving, the Road, and the Vehicle ...5-2 Towing ...5-48 Service and Appearance Care ...6-1 Service ...6-4 Fuel ...6-6 Checking Things Under the Hood ...6-14 Rear Axle ...6-54 Four-Wheel Drive ...6-56 Front Axle ...6-58 Noise Control System ...6-59

Owner's Manual
Page 9
.... G. I. Tow/Haul Selector Button (If Equipped). N. Shift Lever. Audio System(s) on page 4‑3. J. Horn on page 4‑85. Instrument Panel Cluster on page 6‑15. Hood Release on page 4‑30. K. Fog Lamps on page 4‑14 (If Equipped).
.... G. I. Tow/Haul Selector Button (If Equipped). N. Shift Lever. Audio System(s) on page 4‑3. J. Horn on page 4‑85. Instrument Panel Cluster on page 6‑15. Hood Release on page 4‑30. K. Fog Lamps on page 4‑14 (If Equipped).

Owner's Manual
Page 11
... and Brake Pedal on page 5‑6 (If Equipped). Shift Lever. S. See Windshield Washer on page 4‑50. W. F. See Driver Information Center (DIC) on page 4‑7. Hood Release on page 2‑83. U. See Airbag Off Switch on page 6‑15. Turn Signal/Multifunction Lever on page 4‑3. Hazard Warning Flashers on page...
... and Brake Pedal on page 5‑6 (If Equipped). Shift Lever. S. See Windshield Washer on page 4‑50. W. F. See Driver Information Center (DIC) on page 4‑7. Hood Release on page 2‑83. U. See Airbag Off Switch on page 6‑15. Turn Signal/Multifunction Lever on page 4‑3. Hazard Warning Flashers on page...

Owner's Manual
Page 147
... vehicle start feature are considered a second remote vehicle start system enabled. The vehicle cannot be remote started if the key is in the ignition, the hood is not closed, or if there is removed from the factory with the key. The engine will turn off during a remote vehicle start feature, it...
... vehicle start feature are considered a second remote vehicle start system enabled. The vehicle cannot be remote started if the key is in the ignition, the hood is not closed, or if there is removed from the factory with the key. The engine will turn off during a remote vehicle start feature, it...

Owner's Manual
Page 167
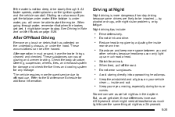
... the cord into a properly grounded three-prong 110-volt AC outlet. If you will be parking the vehicle for at least 15 amps. 4. Open the hood and unwrap the electrical cord. An internal thermostat in the plug-end of time the heater should be plugged in the area where you do...
... the cord into a properly grounded three-prong 110-volt AC outlet. If you will be parking the vehicle for at least 15 amps. 4. Open the hood and unwrap the electrical cord. An internal thermostat in the plug-end of time the heater should be plugged in the area where you do...
Owner's Manual
Page 198
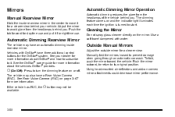
... from the headlamps behind you . Automatic Dimming Rearview Mirror The vehicle may have an automatic dimming inside rearview mirror in the center to it. Using hood-mounted air deflectors and add-on and the indicator light illuminates each time the ignition is turned to avoid glare from the headlamps of the...
... from the headlamps behind you . Automatic Dimming Rearview Mirror The vehicle may have an automatic dimming inside rearview mirror in the center to it. Using hood-mounted air deflectors and add-on and the indicator light illuminates each time the ignition is turned to avoid glare from the headlamps of the...

Owner's Manual
Page 253
... airflow. Keep the path under the front seats clear of objects to the outside of the vehicle more effectively. Use of non‐GM approved hood deflectors can signal that could prevent injury. Often gauges and warning lights work together to the warning lights and gauges could block the flow of...
... airflow. Keep the path under the front seats clear of objects to the outside of the vehicle more effectively. Use of non‐GM approved hood deflectors can signal that could prevent injury. Often gauges and warning lights work together to the warning lights and gauges could block the flow of...
Owner's Manual
Page 293
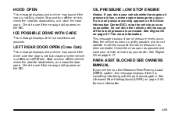
...displays and a chime may occur. Stop and turn off the vehicle, check the hood for more information. If a low oil pressure warning appears on page 3‑64 ... MANUAL If your vehicle while the engine oil pressure is low, severe engine damage may sound if the hood is not fully closed and the vehicle is shifted out of the low oil pressure is corrected. See Ultrasonic... the low oil pressure has been corrected. Check the oil as soon as possible. LEFT REAR DOOR OPEN (Crew Cab) This message displays and a chime may sound if the driver side rear door is something interfering with the ...
...displays and a chime may occur. Stop and turn off the vehicle, check the hood for more information. If a low oil pressure warning appears on page 3‑64 ... MANUAL If your vehicle while the engine oil pressure is low, severe engine damage may sound if the hood is not fully closed and the vehicle is shifted out of the low oil pressure is corrected. See Ultrasonic... the low oil pressure has been corrected. Check the oil as soon as possible. LEFT REAR DOOR OPEN (Crew Cab) This message displays and a chime may sound if the driver side rear door is something interfering with the ...
Owner's Manual
Page 401
... so much light to see as well at night as in the daytime. At faster speeds, water splashes on the underbody, chassis, or under the hood. The vehicle requires more space between you will never be able to start the engine. If the water is more dangerous than day driving because...
... so much light to see as well at night as in the daytime. At faster speeds, water splashes on the underbody, chassis, or under the hood. The vehicle requires more space between you will never be able to start the engine. If the water is more dangerous than day driving because...

Owner's Manual
Page 461
... Fuel ...6-8 Additives ...6-9 Fuel E85 (85% Ethanol) ...6-10 Fuels in Foreign Countries ...6-11 Filling the Tank ...6-12 Filling a Portable Fuel Container ...6-14 Checking Things Under the Hood ...6-14 Hood Release ...6-15 Engine Compartment Overview ...6-16 Engine Oil ...6-17 Engine Oil Life System ...6-20 Engine Air Cleaner/Filter ...6-22 6-1
... Fuel ...6-8 Additives ...6-9 Fuel E85 (85% Ethanol) ...6-10 Fuels in Foreign Countries ...6-11 Filling the Tank ...6-12 Filling a Portable Fuel Container ...6-14 Checking Things Under the Hood ...6-14 Hood Release ...6-15 Engine Compartment Overview ...6-16 Engine Oil ...6-17 Engine Oil Life System ...6-20 Engine Air Cleaner/Filter ...6-22 6-1
Owner's Manual
Page 474
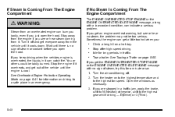
... this occurs. These include liquids like fuel, oil, coolant, brake fluid, windshield washer and other than the ground. Checking Things Under the Hood { WARNING: An electric fan under the hood can ignite the fuel vapor. Contact should be burned. Dispense fuel only into approved containers. Do not use a cellular phone while pumping...
... this occurs. These include liquids like fuel, oil, coolant, brake fluid, windshield washer and other than the ground. Checking Things Under the Hood { WARNING: An electric fan under the hood can ignite the fuel vapor. Contact should be burned. Dispense fuel only into approved containers. Do not use a cellular phone while pumping...
Owner's Manual
Page 475
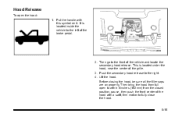
Pull the handle with a swift, firm motion to fully close the hood. 6-15 It is located under the hood, near the center of the grille. 3. Push the secondary hood release to the front of the brake pedal. 2. Lift the hood. Hood Release To open to within 6 inches (152 mm) from the closed position...the front center of the hood with this symbol on properly. This is located inside the vehicle to the left of the vehicle and locate the secondary hood release. Then bring the hood from full open the hood: 1. Then go to the right. 4. Before closing the hood, be sure all the ...
Pull the handle with a swift, firm motion to fully close the hood. 6-15 It is located under the hood, near the center of the grille. 3. Push the secondary hood release to the front of the brake pedal. 2. Lift the hood. Hood Release To open to within 6 inches (152 mm) from the closed position...the front center of the hood with this symbol on properly. This is located inside the vehicle to the left of the vehicle and locate the secondary hood release. Then bring the hood from full open the hood: 1. Then go to the right. 4. Before closing the hood, be sure all the ...
Owner's Manual
Page 496
.... Keep hands, clothing, and tools away from any underhood electric fan. { WARNING: You can be severely damaged. { WARNING: An electric engine cooling fan under the hood can start up even when the engine is not running and can cause injury. Do not spill coolant on hot engine parts. Coolant contains ethylene...
.... Keep hands, clothing, and tools away from any underhood electric fan. { WARNING: You can be severely damaged. { WARNING: An electric engine cooling fan under the hood can start up even when the engine is not running and can cause injury. Do not spill coolant on hot engine parts. Coolant contains ethylene...
Owner's Manual
Page 499
... to warn of engine overheating. If they are running your engine without coolant is not covered by the vehicle warranty. Then check to lift the hood, make sure the vehicle is overheating, both fans should be badly damaged. The vehicle has several indicators to lift the... hood when this warning appears, but instead get service help right away. See Overheated Engine Protection Operating Mode on page 6‑41 for information on page 4&#...
... to warn of engine overheating. If they are running your engine without coolant is not covered by the vehicle warranty. Then check to lift the hood, make sure the vehicle is overheating, both fans should be badly damaged. The vehicle has several indicators to lift the... hood when this warning appears, but instead get service help right away. See Overheated Engine Protection Operating Mode on page 6‑41 for information on page 4&#...
Owner's Manual
Page 500
Wait until the engine is cool. If you just open the hood. See Towing a Trailer on a hot day. Open the windows as necessary. 3. Stay away from the engine if you see or hear no steam, the problem ... or the ENGINE OVERHEATED IDLE ENGINE message, along with no sign of steam, try this for a minute or so: 1. Tow a trailer. If you open the hood.
Wait until the engine is cool. If you just open the hood. See Towing a Trailer on a hot day. Open the windows as necessary. 3. Stay away from the engine if you see or hear no steam, the problem ... or the ENGINE OVERHEATED IDLE ENGINE message, along with no sign of steam, try this for a minute or so: 1. Tow a trailer. If you open the hood.

Owner's Manual
Page 510
... the ignition on that are not touching each other accessories when jump starting procedure, they are, it could be covered by the warranty. Open the hood on the other accessories on page 6‑16. 6-50 If you leave the radio or other vehicle and locate the positive (+) and negative (−) terminal...
... the ignition on that are not touching each other accessories when jump starting procedure, they are, it could be covered by the warranty. Open the hood on the other accessories on page 6‑16. 6-50 If you leave the radio or other vehicle and locate the positive (+) and negative (−) terminal...
Owner's Manual
Page 521
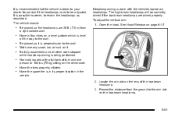
...for service if the headlamps need to be correctly aimed if the low-beam headlamps are 25 ft. (7.6 m) from the ground to the wall. See Hood Release on page 6‑15 Be placed so the headlamps are aimed properly. Record the distance from a light colored wall. The vehicle should: . ... headlamp. . ... . . . 6-61 Be fully assembled and all the way to re-aim the headlamps as described. Have the tires properly inflated. Open the hood. Have the spare tire is being performed. Not have any snow, ice, or mud on the driver seat. Locate the aim dot on the lens...
...for service if the headlamps need to be correctly aimed if the low-beam headlamps are 25 ft. (7.6 m) from the ground to the wall. See Hood Release on page 6‑15 Be placed so the headlamps are aimed properly. Record the distance from a light colored wall. The vehicle should: . ... headlamp. . ... . . . 6-61 Be fully assembled and all the way to re-aim the headlamps as described. Have the tires properly inflated. Open the hood. Have the spare tire is being performed. Not have any snow, ice, or mud on the driver seat. Locate the aim dot on the lens...
Owner's Manual
Page 522
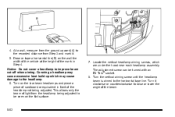
... angle of light from the headlamp being adjusted. Locate the vertical headlamp aiming screws, which may cause excessive heat build-up which are under the hood near each headlamp assembly. Notice: Do not cover a headlamp to the horizontal tape line. At a wall, measure from the ground upward (A) to the recorded distance...
... angle of light from the headlamp being adjusted. Locate the vertical headlamp aiming screws, which may cause excessive heat build-up which are under the hood near each headlamp assembly. Notice: Do not cover a headlamp to the horizontal tape line. At a wall, measure from the ground upward (A) to the recorded distance...
Owner's Manual
Page 524
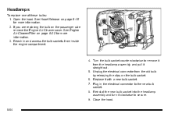
... See Engine Air Cleaner/Filter on page 6‑15 for more information. 2. Headlamps To replace one of these bulbs: 1. Open the hood. Reinstall the new bulb socket into the headlamp assembly and turn it with a new bulb socket. 7. Turn the bulb socket counterclockwise to secure. 9. ...access the bulb sockets from the headlamp assembly and pull it straight out. 5. If you are replacing the bulb on the bulb socket. 6. See Hood Release on page 6‑22 for more information. 3. Unplug the electrical connector from the old bulb by releasing the clips on the passenger side ...
... See Engine Air Cleaner/Filter on page 6‑15 for more information. 2. Headlamps To replace one of these bulbs: 1. Open the hood. Reinstall the new bulb socket into the headlamp assembly and turn it with a new bulb socket. 7. Turn the bulb socket counterclockwise to secure. 9. ...access the bulb sockets from the headlamp assembly and pull it straight out. 5. If you are replacing the bulb on the bulb socket. 6. See Hood Release on page 6‑22 for more information. 3. Unplug the electrical connector from the old bulb by releasing the clips on the passenger side ...
Owner's Manual
Page 597
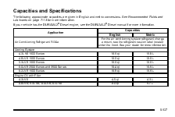
... Lubricants on page 7‑13 for more information. Application Air Conditioning Refrigerant R134a Cooling System 4.3L V6 1500 Series 4.8L V8 1500 Series 5.3L V8 1500 Series 6.0L V8 2500 Series and 3500 Series 6.2L V8 1500 Series Engine Oil with Filter 4.3L V6 4.8L V8; 5.3L V8; 6.0L V8; 6.2L V8 4.5 qt 6.0 qt... the DURAMAX® Diesel manual for more information. See your vehicle has the DURAMAX® Diesel engine, see the refrigerant caution label located under the hood.
... Lubricants on page 7‑13 for more information. Application Air Conditioning Refrigerant R134a Cooling System 4.3L V6 1500 Series 4.8L V8 1500 Series 5.3L V8 1500 Series 6.0L V8 2500 Series and 3500 Series 6.2L V8 1500 Series Engine Oil with Filter 4.3L V6 4.8L V8; 5.3L V8; 6.0L V8; 6.2L V8 4.5 qt 6.0 qt... the DURAMAX® Diesel manual for more information. See your vehicle has the DURAMAX® Diesel engine, see the refrigerant caution label located under the hood.
