

Owner's Manual
Page 26
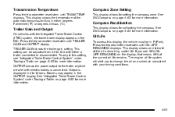
AUTO D. Air Delivery Mode Control H. As an example, when 4 (Fourth) gear is the highest attainable range with all lower gears accessible. See Climate Control System (With Heater Only) on page 4‑19 or Climate Control System (With Air Conditioning) on page 4‑20 and Dual Automatic ...
AUTO D. Air Delivery Mode Control H. As an example, when 4 (Fourth) gear is the highest attainable range with all lower gears accessible. See Climate Control System (With Heater Only) on page 4‑19 or Climate Control System (With Air Conditioning) on page 4‑20 and Dual Automatic ...
Owner's Manual
Page 33
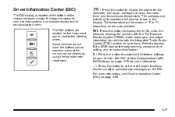
... Driver Information Center (DIC) on your vehicle. Driver Information Center (DIC) The DIC display is located at the bottom of many vehicle systems and enables access to customize the feature settings on page 4‑50. 1-27 T: Press this button to the personalization menu.
... Driver Information Center (DIC) on your vehicle. Driver Information Center (DIC) The DIC display is located at the bottom of many vehicle systems and enables access to customize the feature settings on page 4‑50. 1-27 T: Press this button to the personalization menu.
Owner's Manual
Page 39
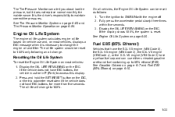
...: 1. If the vehicle does not have a yellow fuel cap and can be in P (Park) to ON/RUN with the engine off 2. Turn the ignition to access this display. 2. See Engine Oil Life System on the DIC.
...: 1. If the vehicle does not have a yellow fuel cap and can be in P (Park) to ON/RUN with the engine off 2. Turn the ignition to access this display. 2. See Engine Oil Life System on the DIC.
Owner's Manual
Page 55
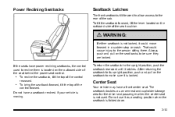
...storage area for the driver and passenger when the center seat is not locked, it latches. To recline the seatback, tilt the top of the cab. That could move forward in a sudden stop or crash. Center Seat Your vehicle may have power reclining seatbacks, the control used to recline ...position, push and pull on the seatbacks to be sure they are locked. Power Reclining Seatbacks Seatback Latches The front seatbacks tilt forward to allow access to the rear of the control rearward. To bring the seatback forward, tilt the top of the seat behind the power seat control. . Do...
...storage area for the driver and passenger when the center seat is not locked, it latches. To recline the seatback, tilt the top of the cab. That could move forward in a sudden stop or crash. Center Seat Your vehicle may have power reclining seatbacks, the control used to recline ...position, push and pull on the seatbacks to be sure they are locked. Power Reclining Seatbacks Seatback Latches The front seatbacks tilt forward to allow access to the rear of the control rearward. To bring the seatback forward, tilt the top of the seat behind the power seat control. . Do...

Owner's Manual
Page 95
... the top tether through, as well as the seating position where the child restraint will be placed. Be sure to read the instructions following to access the anchor. See Securing a Child Restraint in the center seat position. These loops will be used to use an anchor (loop) located on ...the back panel behind the passenger seat. For regular cab models, the top tether anchors are the loops located near the top of the seatback for more information. For crew and extended cab models, the top tether anchors are located under covers on the same side of ...
... the top tether through, as well as the seating position where the child restraint will be placed. Be sure to read the instructions following to access the anchor. See Securing a Child Restraint in the center seat position. These loops will be used to use an anchor (loop) located on ...the back panel behind the passenger seat. For regular cab models, the top tether anchors are the loops located near the top of the seatback for more information. For crew and extended cab models, the top tether anchors are located under covers on the same side of ...
Owner's Manual
Page 97
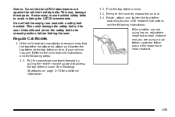
This could damage the safety belt or the seat. Unbuckle and return the safety belt to access the top tether anchor. Pull the passenger seatback forward by pulling the recliner handle upward to its stowed position, before folding the seat. 1. 2. If ... anchor. 1. 3. Route, attach, and tighten the top tether according to the top tether anchor, if your child restraint instructions and the following steps: 1. 1. Regular Cab Models 1. Remove the cover to avoid rubbing the LATCH attachments. Notice: Do not let the LATCH attachments rub against the vehicle's safety belts.
This could damage the safety belt or the seat. Unbuckle and return the safety belt to access the top tether anchor. Pull the passenger seatback forward by pulling the recliner handle upward to its stowed position, before folding the seat. 1. 2. If ... anchor. 1. 3. Route, attach, and tighten the top tether according to the top tether anchor, if your child restraint instructions and the following steps: 1. 1. Regular Cab Models 1. Remove the cover to avoid rubbing the LATCH attachments. Notice: Do not let the LATCH attachments rub against the vehicle's safety belts.

Owner's Manual
Page 150
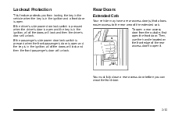
... located near the lock. 3-12 These prevent passengers from opening the rear doors from the inside edge of each rear door. When you want to access them.
... located near the lock. 3-12 These prevent passengers from opening the rear doors from the inside edge of each rear door. When you want to access them.
Owner's Manual
Page 151
... key is open it. Then, use the handle located on the front edge of the extended cab. Rear Doors Extended Cab Your vehicle may have a rear access door(s) that allows easier access to the rear area of the rear access door to open . Lockout Protection This feature protects you can close a rear... access door before you from the outside, first open and the key is in the ignition, all ...
... key is open it. Then, use the handle located on the front edge of the extended cab. Rear Doors Extended Cab Your vehicle may have a rear access door(s) that allows easier access to the rear area of the rear access door to open . Lockout Protection This feature protects you can close a rear... access door before you from the outside, first open and the key is in the ignition, all ...

Owner's Manual
Page 152
...is in response to vehicle maneuvers. On vehicles with a lock on the tailgate, use the handle located on the tailgate can open your vehicle is a crew cab, you can easily lose their balance and fall in a seat and using a safety belt properly. To shut the tailgate, firmly push it upward until... latches securely. Then, use the key to open. People riding on the inside of the rear access door to lock or unlock the tailgate. To open a rear access door from the inside or outside. Crew Cabs If your doors from the inside, the front door must be sure it latches. See Rear Door...
...is in response to vehicle maneuvers. On vehicles with a lock on the tailgate, use the handle located on the tailgate can open your vehicle is a crew cab, you can easily lose their balance and fall in a seat and using a safety belt properly. To shut the tailgate, firmly push it upward until... latches securely. Then, use the key to open. People riding on the inside of the rear access door to lock or unlock the tailgate. To open a rear access door from the inside or outside. Crew Cabs If your doors from the inside, the front door must be sure it latches. See Rear Door...
Owner's Manual
Page 218
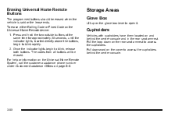
... the customer assistance phone number under Customer Assistance Offices on the Universal Home Remote device: 1. Storage Areas Glove Box Lift up on the cover to access the cupholders behind the center console and in the rear seat armrest. Pull downward on the glove box lever to... access the cupholders. Pull the loop down on and behind the center console. 3-80 Press and hold the two outside buttons at the same time for ...
... the customer assistance phone number under Customer Assistance Offices on the Universal Home Remote device: 1. Storage Areas Glove Box Lift up on the cover to access the cupholders behind the center console and in the rear seat armrest. Pull downward on the glove box lever to... access the cupholders. Pull the loop down on and behind the center console. 3-80 Press and hold the two outside buttons at the same time for ...
Owner's Manual
Page 219
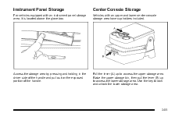
Center Console Storage Vehicles with an instrument panel storage area, it is located above the glove box. Use the key to access the upper storage area. Instrument Panel Storage For vehicles equipped with an upper and lower center console storage area have cupholders included. Access the storage area by pressing and holding in the driver side of the handle and pull out on the exposed portion of the handle. Pull the lever (A) up to access the lower storage area. Raise the upper storage bin, then pull the lever (B) up to lock and unlock the lower storage area. 3-81
Center Console Storage Vehicles with an instrument panel storage area, it is located above the glove box. Use the key to access the upper storage area. Instrument Panel Storage For vehicles equipped with an upper and lower center console storage area have cupholders included. Access the storage area by pressing and holding in the driver side of the handle and pull out on the exposed portion of the handle. Pull the lever (A) up to access the lower storage area. Raise the upper storage bin, then pull the lever (B) up to lock and unlock the lower storage area. 3-81
Owner's Manual
Page 221
... roof, cut a piece of the rail. Also tie the load to the crossrails and the siderails or siderail supports. After moving a crossrail, be activated to access the cupholders. See Retained Accessory Power (RAP) on both sides of the vehicle do not tie the load so tightly that the crossrails or siderails...
... roof, cut a piece of the rail. Also tie the load to the crossrails and the siderails or siderail supports. After moving a crossrail, be activated to access the cupholders. See Retained Accessory Power (RAP) on both sides of the vehicle do not tie the load so tightly that the crossrails or siderails...

Owner's Manual
Page 274
... "DIC Operation and Displays (With DIC Buttons)" later in this section and DIC Vehicle Customization (With DIC Buttons) on the instrument panel, next to be accessed by pressing the DIC buttons located on page 4‑76 for the displays available. If your vehicle has DIC buttons, see "DIC Operation and Displays...
... "DIC Operation and Displays (With DIC Buttons)" later in this section and DIC Vehicle Customization (With DIC Buttons) on the instrument panel, next to be accessed by pressing the DIC buttons located on page 4‑76 for the displays available. If your vehicle has DIC buttons, see "DIC Operation and Displays...
Owner's Manual
Page 282
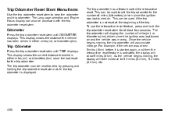
... will show 5 miles (8 km). This can also be used if the trip odometer is displayed. 4-58 The Language selection and Engine Hours display can be accessed with the trip odometer reset stem. The trip odometer will accumulate mileage. To use the retro-active reset feature, press and hold the trip odometer...
... will show 5 miles (8 km). This can also be used if the trip odometer is displayed. 4-58 The Language selection and Engine Hours display can be accessed with the trip odometer reset stem. The trip odometer will accumulate mileage. To use the retro-active reset feature, press and hold the trip odometer...
Owner's Manual
Page 283
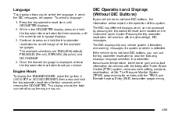
... in the ODOMETER display, press and hold the trip odometer reset stem for three seconds until ODOMETER displays. 2. Language This display allows you can be accessed by pressing the trip odometer reset stem located on the instrument panel cluster. This display shows the total number of the available languages.
... in the ODOMETER display, press and hold the trip odometer reset stem for three seconds until ODOMETER displays. 2. Language This display allows you can be accessed by pressing the trip odometer reset stem located on the instrument panel cluster. This display shows the total number of the available languages.
Owner's Manual
Page 285
... to change the oil on the display, that means 99% of the current oil life remains. Dashes may appear in the DIC. Oil Life To access this setting, see 99% OIL LIFE REMAINING on a schedule consistent with your driving conditions. 4-61 The engine oil life system will alert you see "Integrated...
... to change the oil on the display, that means 99% of the current oil life remains. Dashes may appear in the DIC. Oil Life To access this setting, see 99% OIL LIFE REMAINING on a schedule consistent with your driving conditions. 4-61 The engine oil life system will alert you see "Integrated...
Owner's Manual
Page 286
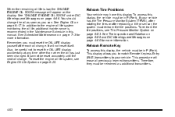
...have this display, the vehicle must re-learn the tire positions, see Engine Oil Life System on page 6‑20. Relearn Remote Key To access this display, the vehicle must be careful not to the engine oil life system monitoring the oil life, additional maintenance is low, the CHANGE ...has the Tire Pressure Monitor System (TPMS), after rotating the tires or after each oil change the oil as soon as additional transmitters. 4-62 To access this display. See "CHANGE ENGINE OIL SOON" under DIC Warnings and Messages on page 6‑17. See Scheduled Maintenance on page 6‑83. If...
...have this display, the vehicle must re-learn the tire positions, see Engine Oil Life System on page 6‑20. Relearn Remote Key To access this display, the vehicle must be careful not to the engine oil life system monitoring the oil life, additional maintenance is low, the CHANGE ...has the Tire Pressure Monitor System (TPMS), after rotating the tires or after each oil change the oil as soon as additional transmitters. 4-62 To access this display. See "CHANGE ENGINE OIL SOON" under DIC Warnings and Messages on page 6‑17. See Scheduled Maintenance on page 6‑83. If...
Owner's Manual
Page 301
...OF PARK (default): The doors will appear. See Programmable Automatic Door Locks on the DIC. Then press the customization button to access the settings for more information. The current setting will appear in this feature. Press the set /reset button while the desired ...for more information. See "Language" under DIC Operation and Displays (Without DIC Buttons) earlier in French. Then press the customization button to access the settings for this section for three seconds. To select a setting, press the set /reset button once to scroll through the following ...
...OF PARK (default): The doors will appear. See Programmable Automatic Door Locks on the DIC. Then press the customization button to access the settings for more information. The current setting will appear in this feature. Press the set /reset button while the desired ...for more information. See "Language" under DIC Operation and Displays (Without DIC Buttons) earlier in French. Then press the customization button to access the settings for this section for three seconds. To select a setting, press the set /reset button once to scroll through the following ...
Owner's Manual
Page 302
... Remote Keyless Entry (RKE) System Operation on page 3‑5 for more information. You will flash when you to select whether or not to access the settings for this feature. LIGHTS ONLY: The exterior lamps will not receive feedback when locking the vehicle with the Remote Keyless Entry (RKE...taken out of the lock button on the RKE transmitter. Then press the customization button to this feature. Then press the customization button to access the settings for this feature. It also allows you press the lock button on the RKE transmitter. DRIVER AT KEY OUT: Only the...
... Remote Keyless Entry (RKE) System Operation on page 3‑5 for more information. You will flash when you to select whether or not to access the settings for this feature. LIGHTS ONLY: The exterior lamps will not receive feedback when locking the vehicle with the Remote Keyless Entry (RKE...taken out of the lock button on the RKE transmitter. Then press the customization button to this feature. Then press the customization button to access the settings for this feature. It also allows you press the lock button on the RKE transmitter. DRIVER AT KEY OUT: Only the...

Owner's Manual
Page 303
... appears on the DIC display. You will not receive feedback when unlocking the vehicle with a crew cab, this feature. LIGHTS ON (default): The exterior lamps will be made to this feature to access the settings for this feature. ON (default): The doors will be made to this feature ...CHANGE: No change will not lock until five seconds after the last door is closed . REMOTE DOOR UNLOCK This feature allows you to access the settings for more information. Press the customization button until DELAY DOOR LOCK appears on the DIC display. The current setting will remain. ...
... appears on the DIC display. You will not receive feedback when unlocking the vehicle with a crew cab, this feature. LIGHTS ON (default): The exterior lamps will be made to this feature to access the settings for this feature. ON (default): The doors will be made to this feature ...CHANGE: No change will not lock until five seconds after the last door is closed . REMOTE DOOR UNLOCK This feature allows you to access the settings for more information. Press the customization button until DELAY DOOR LOCK appears on the DIC display. The current setting will remain. ...