

Owner's Manual
Page 13
Lift the bar to the desired position and release the bar. • Slide the horizontal control forward or rearward. • Move the front or rear of it: 1. Slide the seat to unlock the seat. 2. Seat Adjustment Manual Seats Power Seats To adjust the seat using the control on the outboard side of the horizontal control up or down. • Move the entire horizontal control up or down. 1-7
Lift the bar to the desired position and release the bar. • Slide the horizontal control forward or rearward. • Move the front or rear of it: 1. Slide the seat to unlock the seat. 2. Seat Adjustment Manual Seats Power Seats To adjust the seat using the control on the outboard side of the horizontal control up or down. • Move the entire horizontal control up or down. 1-7
Owner's Manual
Page 30
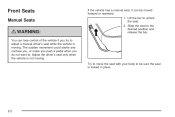
The sudden movement could startle and confuse you, or make you push a pedal when you try to . Adjust the driver's seat only when the vehicle is moving . Front Seats Manual Seats If the vehicle has a manual seat, it can lose control of the vehicle if you do not want to adjust a manual driver's seat while the vehicle is not moving . Slide the seat to the desired position and release the bar. { WARNING: You can be sure the seat is locked in place. 2-2 Lift the bar to be moved forward or rearward. 1. Try to move the seat with your body to unlock the seat. 2.
The sudden movement could startle and confuse you, or make you push a pedal when you try to . Adjust the driver's seat only when the vehicle is moving . Front Seats Manual Seats If the vehicle has a manual seat, it can lose control of the vehicle if you do not want to adjust a manual driver's seat while the vehicle is not moving . Slide the seat to the desired position and release the bar. { WARNING: You can be sure the seat is locked in place. 2-2 Lift the bar to be moved forward or rearward. 1. Try to move the seat with your body to unlock the seat. 2.
Owner's Manual
Page 33
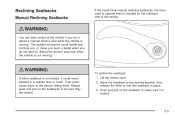
... to the person sitting there. Move the seatback to the desired position, then release the lever to lock the seatback in a sudden stop or crash. Lift the recline lever. 2. Reclining Seatbacks Manual Reclining Seatbacks If the seats have manual reclining seatbacks, the lever used to operate them is located on the...
... to the person sitting there. Move the seatback to the desired position, then release the lever to lock the seatback in a sudden stop or crash. Lift the recline lever. 2. Reclining Seatbacks Manual Reclining Seatbacks If the seats have manual reclining seatbacks, the lever used to operate them is located on the...
Owner's Manual
Page 34
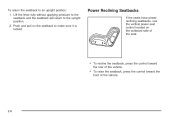
Power Reclining Seatbacks If the seats have power reclining seatbacks, use the vertical power seat control located on the seatback to make sure it is locked. To return the seatback to the upright position. 2. Lift the lever fully without applying pressure to the seatback and the seatback will return to an upright position: 1. Push and pull on the outboard side of the seat. • To recline the seatback, press the control toward the rear of the vehicle. • To raise the seatback, press the control toward the front of the vehicle. 2-6
Power Reclining Seatbacks If the seats have power reclining seatbacks, use the vertical power seat control located on the seatback to make sure it is locked. To return the seatback to the upright position. 2. Lift the lever fully without applying pressure to the seatback and the seatback will return to an upright position: 1. Push and pull on the outboard side of the seat. • To recline the seatback, press the control toward the rear of the vehicle. • To raise the seatback, press the control toward the front of the vehicle. 2-6

Owner's Manual
Page 40
... the seatback is improperly routed, not properly attached, or twisted will not provide the protection needed in a crash. Make sure the seatback(s) is not twisted. 4. Lift the seatback(s) and push it . 2-12 That could be sure they are not twisted. 3. Make sure the safety belt is locked by pushing and pulling...
... the seatback is improperly routed, not properly attached, or twisted will not provide the protection needed in a crash. Make sure the seatback(s) is not twisted. 4. Lift the seatback(s) and push it . 2-12 That could be sure they are not twisted. 3. Make sure the safety belt is locked by pushing and pulling...
Owner's Manual
Page 119
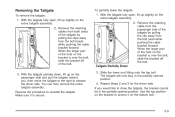
... tailgate assembly. 2. When the larger part of the bolt. Slide the lower end fitting onto the top bolt. With the tailgate partially down, lift up slightly on the bracket is secure. 3-9 Remove the retaining cables from both sides of the tailgate by pulling the clips away from the bolt... the bolt heads while pushing the cable bracket forward. The tailgate will now stay in the partially opened position. 4. With the tailgate fully open , lift up slightly on the passenger side and pull the tailgate toward you would like to anchor it is over the bolt, slide the bracket off...
... tailgate assembly. 2. When the larger part of the bolt. Slide the lower end fitting onto the top bolt. With the tailgate partially down, lift up slightly on the bracket is secure. 3-9 Remove the retaining cables from both sides of the tailgate by pulling the clips away from the bolt... the bolt heads while pushing the cable bracket forward. The tailgate will now stay in the partially opened position. 4. With the tailgate fully open , lift up slightly on the passenger side and pull the tailgate toward you would like to anchor it is over the bolt, slide the bracket off...
Owner's Manual
Page 150
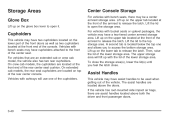
... rear seat cupholders are assist handles located above the doors. Storage Areas Glove Box Lift up on the glove box lever to access the bottom storage area. On crew cab models, the cupholders are an extended cab or crew cab model, the vehicle also has two rear cupholders. A second tab is located below... the top one of the lower storage area. Lift up on the lower tab to open it. Lift the lid to release the latch....
... rear seat cupholders are assist handles located above the doors. Storage Areas Glove Box Lift up on the glove box lever to access the bottom storage area. On crew cab models, the cupholders are an extended cab or crew cab model, the vehicle also has two rear cupholders. A second tab is located below... the top one of the lower storage area. Lift up on the lower tab to open it. Lift the lid to release the latch....
Owner's Manual
Page 151
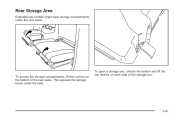
To access the storage compartments, lift the cushion on each side of the rear seats. To open a storage box, unhook the bottom and lift the two latches on the bottom of the storage box. 3-41 Rear Storage Area Extended cab models might have storage compartments under the seat. This exposes the storage boxes under the rear seats.
To access the storage compartments, lift the cushion on each side of the rear seats. To open a storage box, unhook the bottom and lift the two latches on the bottom of the storage box. 3-41 Rear Storage Area Extended cab models might have storage compartments under the seat. This exposes the storage boxes under the rear seats.
Owner's Manual
Page 152
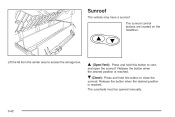
Lift the lid from the center area to close the sunroof. Release the button when the desired position is reached. Q (Open/Vent): Press and hold this button to vent, and open the sunroof. R (Close): Press and hold this button to access the storage box. Sunroof The vehicle may have a sunroof. The sunroof control buttons are located on the headliner. The sunshade must be opened manually. 3-42 Release the button when the desired position is reached.
Lift the lid from the center area to close the sunroof. Release the button when the desired position is reached. Q (Open/Vent): Press and hold this button to vent, and open the sunroof. R (Close): Press and hold this button to access the storage box. Sunroof The vehicle may have a sunroof. The sunroof control buttons are located on the headliner. The sunshade must be opened manually. 3-42 Release the button when the desired position is reached.
Owner's Manual
Page 170
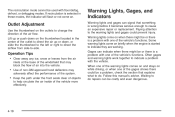
... gages shows there could prevent injury. Often gages and warning lights work together to do repairs can be used with one of the vehicle's functions. Lift up or down on the thumbwheel located in these modes, the indicator will flash or not come on the outlets to the warning lights...
... gages shows there could prevent injury. Often gages and warning lights work together to do repairs can be used with one of the vehicle's functions. Lift up or down on the thumbwheel located in these modes, the indicator will flash or not come on the outlets to the warning lights...
Owner's Manual
Page 287
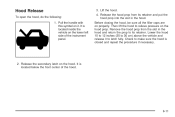
Pull the handle with this symbol on it to relieve pressure on the lower left side of the hood. 6-11 Lift the hood. 4. Release the hood prop from the slot in the hood. Then lift the hood to latch fully. Lower the hood 10 to 12 inches (25 to 30 cm) above the...
Pull the handle with this symbol on it to relieve pressure on the lower left side of the hood. 6-11 Lift the hood. 4. Release the hood prop from the slot in the hood. Then lift the hood to latch fully. Lower the hood 10 to 12 inches (25 to 30 cm) above the...
Owner's Manual
Page 296
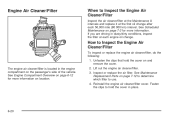
How to use. 4. Lift out the engine air cleaner/filter. 3. Engine Air Cleaner/Filter When to Inspect the Engine Air Cleaner/Filter Inspect the air cleaner/filter ...
How to use. 4. Lift out the engine air cleaner/filter. 3. Engine Air Cleaner/Filter When to Inspect the Engine Air Cleaner/Filter Inspect the air cleaner/filter ...
Owner's Manual
Page 311
... engine is parked on a level surface. The costly repairs would not be badly damaged. If you just open the hood. You may decide not to lift the hood when the warning appears, but instead get out of steam or coolant before you see if the engine cooling fan is running the... Steam is normal and helps cool the engine. If it cools down . Stay away from the engine if you open the hood. Then check to lift the hood, make sure the vehicle is overheating, the fan should increase when idle speed is overheating.
... engine is parked on a level surface. The costly repairs would not be badly damaged. If you just open the hood. You may decide not to lift the hood when the warning appears, but instead get out of steam or coolant before you see if the engine cooling fan is running the... Steam is normal and helps cool the engine. If it cools down . Stay away from the engine if you open the hood. Then check to lift the hood, make sure the vehicle is overheating, the fan should increase when idle speed is overheating.

Owner's Manual
Page 328
... the socket until it clicks. 6. Front Turn Signal, Parking and Daytime Running Lamps (DRL) To replace one of these bulbs: 1. Remove the two screws and lift off the lamp assembly from the lamp assembly. 3. Turn the bulb socket counterclockwise and remove it clockwise to access either one of the bulb sockets...
... the socket until it clicks. 6. Front Turn Signal, Parking and Daytime Running Lamps (DRL) To replace one of these bulbs: 1. Remove the two screws and lift off the lamp assembly from the lamp assembly. 3. Turn the bulb socket counterclockwise and remove it clockwise to access either one of the bulb sockets...
Owner's Manual
Page 331
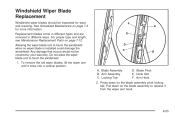
Replacement blades come in different types and are removed in different ways. To remove the old wiper blades, lift the wiper arm until it from the wiper arm hook. 6-55 Blade Assembly B. Arm Assembly C. Hook Slot F. Pull down on the blade assembly to release ...
Replacement blades come in different types and are removed in different ways. To remove the old wiper blades, lift the wiper arm until it from the wiper arm hook. 6-55 Blade Assembly B. Arm Assembly C. Hook Slot F. Pull down on the blade assembly to release ...
Owner's Manual
Page 355
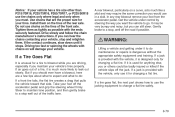
..., or P235/50R18 use tire chains only where legal and only when you must. Gently brake to a stop, well off the road if possible. { WARNING: Lifting a vehicle and getting under control by steering the way you can hear the chains contacting your tires. Notice: If your foot from the accelerator pedal...
..., or P235/50R18 use tire chains only where legal and only when you must. Gently brake to a stop, well off the road if possible. { WARNING: Lifting a vehicle and getting under control by steering the way you can hear the chains contacting your tires. Notice: If your foot from the accelerator pedal...
Owner's Manual
Page 363
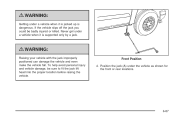
Position the jack (A) under the vehicle as shown for the front or rear locations. 6-87 Never get under a vehicle when it is jacked up is supported only by a jack. { WARNING: Raising your vehicle with the jack improperly positioned can damage the vehicle and even make the vehicle fall. { WARNING: Getting under a vehicle when it is dangerous. If the vehicle slips off the jack you could be sure to fit the jack lift head into the proper location before raising the vehicle. Front Position 4. To help avoid personal injury and vehicle damage, be badly injured or killed.
Position the jack (A) under the vehicle as shown for the front or rear locations. 6-87 Never get under a vehicle when it is jacked up is supported only by a jack. { WARNING: Raising your vehicle with the jack improperly positioned can damage the vehicle and even make the vehicle fall. { WARNING: Getting under a vehicle when it is dangerous. If the vehicle slips off the jack you could be sure to fit the jack lift head into the proper location before raising the vehicle. Front Position 4. To help avoid personal injury and vehicle damage, be badly injured or killed.
Owner's Manual
Page 370
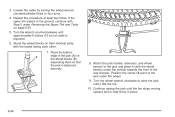
... the front of the jack under Removing the Spare Tire and Tools on their shortest ends, with the backs facing each other. 7. Position the center lift point of the rear bumper. Turn the wrench counterclockwise until approximately 6 inches (15 cm) of the jack (A) on the wheel blocks (B), separating them so that... or four turns. 4. Continue raising the jack until it (with Step 5 under the wheel. 9. Turn the wheel wrench clockwise to the jack and place it lifts the tire. 10. 3. Repeat this procedure at least two times. Stand the wheel blocks on page 6-81. 5.
... the front of the jack under Removing the Spare Tire and Tools on their shortest ends, with the backs facing each other. 7. Position the center lift point of the rear bumper. Turn the wrench counterclockwise until approximately 6 inches (15 cm) of the jack (A) on the wheel blocks (B), separating them so that... or four turns. 4. Continue raising the jack until it (with Step 5 under the wheel. 9. Turn the wheel wrench clockwise to the jack and place it lifts the tire. 10. 3. Repeat this procedure at least two times. Stand the wheel blocks on page 6-81. 5.
Owner's Manual
Page 388
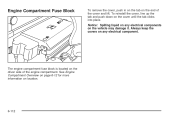
Notice: Spilling liquid on the vehicle may damage it. To reinstall the cover, line up the tab and push down on the driver side of the cover and lift. Always keep the covers on any electrical components on any electrical component. The engine compartment fuse block is located on the cover until the tab clicks into place. Engine Compartment Fuse Block To remove the cover, push in on the tab on location. 6-112 See Engine Compartment Overview on page 6-12 for more information on the end of the engine compartment.
Notice: Spilling liquid on the vehicle may damage it. To reinstall the cover, line up the tab and push down on the driver side of the cover and lift. Always keep the covers on any electrical components on any electrical component. The engine compartment fuse block is located on the cover until the tab clicks into place. Engine Compartment Fuse Block To remove the cover, push in on the tab on location. 6-112 See Engine Compartment Overview on page 6-12 for more information on the end of the engine compartment.

Owner's Manual
Page 419
... Canada also has a Mobility Program. GM Mobility Reimbursement Program Roadside Assistance Program For U.S. Text telephone (TTY) users, call 1-800-268-6800. TTY users call 1-800-GMC-8782 (1-800-462-8782); (Text telephone (TTY): 1-888-889-2438). Service is available for Assistance When calling Roadside Assistance, have the following information ready: This... 1-800-263-3830. • Your name, home address, and home telephone number • Telephone number of your vehicle, such as hand controls or a wheelchair/scooter lift.
... Canada also has a Mobility Program. GM Mobility Reimbursement Program Roadside Assistance Program For U.S. Text telephone (TTY) users, call 1-800-268-6800. TTY users call 1-800-GMC-8782 (1-800-462-8782); (Text telephone (TTY): 1-888-889-2438). Service is available for Assistance When calling Roadside Assistance, have the following information ready: This... 1-800-263-3830. • Your name, home address, and home telephone number • Telephone number of your vehicle, such as hand controls or a wheelchair/scooter lift.