
Owner's Manual
Page 108
... anything I might add to get my vehicle modified. See Passenger Sensing System on page 8-2. If you have to or change the vehicle's frame, bumper system, height, front end or side sheet metal, they may keep the airbags from working properly. If you have a passenger sensing system for Customer Assistance...
... anything I might add to get my vehicle modified. See Passenger Sensing System on page 8-2. If you have to or change the vehicle's frame, bumper system, height, front end or side sheet metal, they may keep the airbags from working properly. If you have a passenger sensing system for Customer Assistance...
Owner's Manual
Page 271
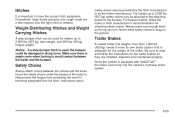
... read and follow the trailer or hitch manufacturer's recommendation for trailers up to 2,000 lbs (907 kg) safety chains may be used , the bumper could be attached to the attaching points on the ground. Safety Chains Always attach chains between the trailer and the...contact between the vehicle and the trailer. Make sure there is ample room when turning to drag on the bumper. Since the vehicle is used for attaching safety chains. Notice: If a step-bumper hitch is equipped with StabiliTrak®, the trailer cannot tap into the vehicle's hydraulic brake system. Instructions about...
... read and follow the trailer or hitch manufacturer's recommendation for trailers up to 2,000 lbs (907 kg) safety chains may be used , the bumper could be attached to the attaching points on the ground. Safety Chains Always attach chains between the trailer and the...contact between the vehicle and the trailer. Make sure there is ample room when turning to drag on the bumper. Since the vehicle is used for attaching safety chains. Notice: If a step-bumper hitch is equipped with StabiliTrak®, the trailer cannot tap into the vehicle's hydraulic brake system. Instructions about...

Owner's Manual
Page 330
...Turn the bulb socket clockwise to secure it . 5. Pull the old bulb straight out from the bulb socket. 4. Reach under the rear bumper to the connector. Turn the bulb socket counterclockwise and pull the bulb socket out of these bulbs: Replacement Bulbs Exterior Lamp Center High-Mounted ... Stoplamp, Rear Turn Signal, Taillamp, and Back-up Lamp For replacement bulbs not listed here, contact your dealer/retailer. 6-54 Reach under the rear bumper for the bulb socket. 2. Push the new bulb straight in until it clicks to secure it to reinstall the bulb socket into the connector. 6. License...
...Turn the bulb socket clockwise to secure it . 5. Pull the old bulb straight out from the bulb socket. 4. Reach under the rear bumper to the connector. Turn the bulb socket counterclockwise and pull the bulb socket out of these bulbs: Replacement Bulbs Exterior Lamp Center High-Mounted ... Stoplamp, Rear Turn Signal, Taillamp, and Back-up Lamp For replacement bulbs not listed here, contact your dealer/retailer. 6-54 Reach under the rear bumper for the bulb socket. 2. Push the new bulb straight in until it clicks to secure it to reinstall the bulb socket into the connector. 6. License...

Owner's Manual
Page 353
..., wheel bolts, wheel nuts, or Tire Pressure Monitor System (TPMS) sensors, replace them only with bearing life, brake cooling, speedometer or odometer calibration, headlamp aim, bumper height, vehicle ground clearance, and tire or tire chain clearance to give you lose control. See Changing a Flat Tire on page 6-80 for your tires...
..., wheel bolts, wheel nuts, or Tire Pressure Monitor System (TPMS) sensors, replace them only with bearing life, brake cooling, speedometer or odometer calibration, headlamp aim, bumper height, vehicle ground clearance, and tire or tire chain clearance to give you lose control. See Changing a Flat Tire on page 6-80 for your tires...

Owner's Manual
Page 360
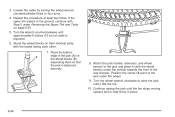
1. Assemble the wheel wrench (D), the jack handle extensions (A) and the jack handle (C) as shown. 2. Insert the chiseled end of the jack handle (C) at a slight angle through the hole in the rear bumper and into the funnel-shaped guide. 6-84
1. Assemble the wheel wrench (D), the jack handle extensions (A) and the jack handle (C) as shown. 2. Insert the chiseled end of the jack handle (C) at a slight angle through the hole in the rear bumper and into the funnel-shaped guide. 6-84
Owner's Manual
Page 370
... jack and place it lifts the tire. 10. Position the center lift point of cable is balanced securely. 8. Place the bottom edge of the rear bumper. Continue raising the jack until it (with the wheel blocks) under Removing the Spare Tire and Tools on their shortest ends, with Step 5 under the...
... jack and place it lifts the tire. 10. Position the center lift point of cable is balanced securely. 8. Place the bottom edge of the rear bumper. Continue raising the jack until it (with the wheel blocks) under Removing the Spare Tire and Tools on their shortest ends, with Step 5 under the...

Owner's Manual
Page 371
If the spare tire is hanging by turning the wheel wrench counterclockwise. Reinsert the jack handle into the hoist shaft hole in the rear bumper. Lower the jack by the cable. 6-95 Keep lowering the jack until the wheel retainer assembly is behind you pull the jack out from the .... Remove the jack handle and insert the hoist end of you as you or on either side of the extension through the hole in the bumper and turn or until the spare tire slides off the jack completely, make sure no one is disengaged. 12. { WARNING: Someone standing too close during...
If the spare tire is hanging by turning the wheel wrench counterclockwise. Reinsert the jack handle into the hoist shaft hole in the rear bumper. Lower the jack by the cable. 6-95 Keep lowering the jack until the wheel retainer assembly is behind you pull the jack out from the .... Remove the jack handle and insert the hoist end of you as you or on either side of the extension through the hole in the bumper and turn or until the spare tire slides off the jack completely, make sure no one is disengaged. 12. { WARNING: Someone standing too close during...

Owner's Manual
Page 374
Turn the wheel wrench clockwise to ensure proper stowage. 6. You cannot overtighten the cable. 4. Make sure the retainer is seated in the rear bumper and into the funnel-shaped guide. 6-98 5. Repeat this procedure as many times as needed to raise the tire part way up. If the tire ...
Turn the wheel wrench clockwise to ensure proper stowage. 6. You cannot overtighten the cable. 4. Make sure the retainer is seated in the rear bumper and into the funnel-shaped guide. 6-98 5. Repeat this procedure as many times as needed to raise the tire part way up. If the tire ...
