
Owner's Manual
Page 108
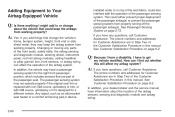
... whether this manual. See Customer Satisfaction Procedure on page 8-2. In addition, your dealer/retailer and the service manual have to or change the vehicle's frame, bumper system, height, front end or side sheet metal, they may keep the airbags from properly turning off the passenger airbag(s). A: If you have questions, call...
... whether this manual. See Customer Satisfaction Procedure on page 8-2. In addition, your dealer/retailer and the service manual have to or change the vehicle's frame, bumper system, height, front end or side sheet metal, they may keep the airbags from properly turning off the passenger airbag(s). A: If you have questions, call...
Owner's Manual
Page 271
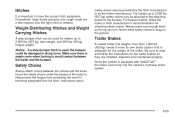
... the instructions for trailers up to have the correct hitch equipment. Hitches It is important to drag on the bumper. Notice: If a step-bumper hitch is used, the bumper could be used for the trailer brakes so they are a few reasons why the right hitch is equipped with... StabiliTrak®, the trailer cannot tap into the vehicle's hydraulic brake system. Safety Chains Always attach chains between the trailer and the bumper. Instructions about 5-55 Since the vehicle is needed. safety chains may be provided by the hitch manufacturer or by and rough roads are...
... the instructions for trailers up to have the correct hitch equipment. Hitches It is important to drag on the bumper. Notice: If a step-bumper hitch is used, the bumper could be used for the trailer brakes so they are a few reasons why the right hitch is equipped with... StabiliTrak®, the trailer cannot tap into the vehicle's hydraulic brake system. Safety Chains Always attach chains between the trailer and the bumper. Instructions about 5-55 Since the vehicle is needed. safety chains may be provided by the hitch manufacturer or by and rough roads are...

Owner's Manual
Page 330
... reinstall the bulb socket into the connector. 6. Pull the old bulb straight out from the bulb socket. 4. Reach under the rear bumper for the bulb socket. 2. Parking Lamp (Inboard) Stoplamp, Rear Turn Signal, Taillamp, and Back-up Lamp For replacement bulbs not listed here, contact your dealer/...
... reinstall the bulb socket into the connector. 6. Pull the old bulb straight out from the bulb socket. 4. Reach under the rear bumper for the bulb socket. 2. Parking Lamp (Inboard) Stoplamp, Rear Turn Signal, Taillamp, and Back-up Lamp For replacement bulbs not listed here, contact your dealer/...

Owner's Manual
Page 353
..., wheel bolts, wheel nuts, or Tire Pressure Monitor System (TPMS) sensors, replace them only with bearing life, brake cooling, speedometer or odometer calibration, headlamp aim, bumper height, vehicle ground clearance, and tire or tire chain clearance to the body and chassis. Each new wheel should be replaced. Wheel Alignment and Tire...
..., wheel bolts, wheel nuts, or Tire Pressure Monitor System (TPMS) sensors, replace them only with bearing life, brake cooling, speedometer or odometer calibration, headlamp aim, bumper height, vehicle ground clearance, and tire or tire chain clearance to the body and chassis. Each new wheel should be replaced. Wheel Alignment and Tire...

Owner's Manual
Page 360
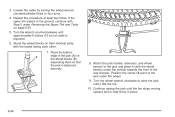
Assemble the wheel wrench (D), the jack handle extensions (A) and the jack handle (C) as shown. 2. Insert the chiseled end of the jack handle (C) at a slight angle through the hole in the rear bumper and into the funnel-shaped guide. 6-84 1.
Assemble the wheel wrench (D), the jack handle extensions (A) and the jack handle (C) as shown. 2. Insert the chiseled end of the jack handle (C) at a slight angle through the hole in the rear bumper and into the funnel-shaped guide. 6-84 1.
Owner's Manual
Page 370
3. Turn the wrench counterclockwise until approximately 6 inches (15 cm) of the rear bumper. Attach the jack handle, extension, and wheel wrench to the jack and place it lifts the tire. 10. Continue raising the jack until it (with ...
3. Turn the wrench counterclockwise until approximately 6 inches (15 cm) of the rear bumper. Attach the jack handle, extension, and wheel wrench to the jack and place it lifts the tire. 10. Continue raising the jack until it (with ...

Owner's Manual
Page 371
... be injured by turning the wheel wrench counterclockwise. Use one hand to lower the spare the rest of the extension through the hole in the bumper and turn or until the spare tire slides off the jack completely, make sure no one turn the wheel wrench counterclockwise to push against the... pulling the jack out from under the spare tire with the other hand. Reinsert the jack handle into the hoist shaft hole in the rear bumper. Keep lowering the jack until the wheel retainer assembly is hanging by the cable. 6-95 Remove the jack handle and insert the hoist end of...
... be injured by turning the wheel wrench counterclockwise. Use one hand to lower the spare the rest of the extension through the hole in the bumper and turn or until the spare tire slides off the jack completely, make sure no one turn the wheel wrench counterclockwise to push against the... pulling the jack out from under the spare tire with the other hand. Reinsert the jack handle into the hoist shaft hole in the rear bumper. Keep lowering the jack until the wheel retainer assembly is hanging by the cable. 6-95 Remove the jack handle and insert the hoist end of...

Owner's Manual
Page 374
... the wheel opening and the valve stem is properly seated to make sure it skip twice. Make sure the retainer is seated in the rear bumper and into the funnel-shaped guide. 6-98 When the tire is pointed down. Continue raising the tire, watch to the underbody, continue turning the wheel...
... the wheel opening and the valve stem is properly seated to make sure it skip twice. Make sure the retainer is seated in the rear bumper and into the funnel-shaped guide. 6-98 When the tire is pointed down. Continue raising the tire, watch to the underbody, continue turning the wheel...
