
Owner's Manual
Page 80
... heater or a comfort enhancing pad or device, Q: Because I have a disability, I find out whether this manual. If you have to or change the vehicle's frame, bumper system, height, front end or side sheet metal, they may not operate properly if the original seat trim is replaced with non-GM covers, upholstery...
... heater or a comfort enhancing pad or device, Q: Because I have a disability, I find out whether this manual. If you have to or change the vehicle's frame, bumper system, height, front end or side sheet metal, they may not operate properly if the original seat trim is replaced with non-GM covers, upholstery...

Owner's Manual
Page 243
... heavier trailers, follow the instructions for the vehicle, or the GAWR, including the weight of the vehicle, or see Loading the Vehicle on the bumper. If using a weight distributing hitch, make sure not to 2,000 lbs (907 kg) safety chains may be sure it becomes separated from contacting...trailer. Total Weight on the ground. Crosswinds, large trucks going by the trailer manufacturer. Since the vehicle is needed. Notice: If a step-bumper hitch is to be provided by the hitch manufacturer or by and rough roads are a few reasons why the right hitch is equipped with ...
... heavier trailers, follow the instructions for the vehicle, or the GAWR, including the weight of the vehicle, or see Loading the Vehicle on the bumper. If using a weight distributing hitch, make sure not to 2,000 lbs (907 kg) safety chains may be sure it becomes separated from contacting...trailer. Total Weight on the ground. Crosswinds, large trucks going by the trailer manufacturer. Since the vehicle is needed. Notice: If a step-bumper hitch is to be provided by the hitch manufacturer or by and rough roads are a few reasons why the right hitch is equipped with ...

Owner's Manual
Page 299
... To replace one of the connector. 3. Turn the bulb socket clockwise to secure it to secure it clicks to the connector. Reach under the rear bumper to reinstall the bulb socket into the connector. 6. Push the new bulb straight in until it . 5. Reach under the rear... bumper for the bulb socket. 2. Stoplamp, Rear Turn Signal, Taillamp, and Back-up Lamp For replacement bulbs not listed here, contact your dealer/retailer. 5-51 Turn ...
... To replace one of the connector. 3. Turn the bulb socket clockwise to secure it to secure it clicks to the connector. Reach under the rear bumper to reinstall the bulb socket into the connector. 6. Push the new bulb straight in until it . 5. Reach under the rear... bumper for the bulb socket. 2. Stoplamp, Rear Turn Signal, Taillamp, and Back-up Lamp For replacement bulbs not listed here, contact your dealer/retailer. 5-51 Turn ...

Owner's Manual
Page 323
..., wheel bolts, wheel nuts, or Tire Pressure Monitor System (TPMS) sensors, replace them only with bearing life, brake cooling, speedometer or odometer calibration, headlamp aim, bumper height, vehicle ground clearance, and tire or tire chain clearance to replace a wheel, use the correct wheel, wheel bolts, and wheel nuts for more information...
..., wheel bolts, wheel nuts, or Tire Pressure Monitor System (TPMS) sensors, replace them only with bearing life, brake cooling, speedometer or odometer calibration, headlamp aim, bumper height, vehicle ground clearance, and tire or tire chain clearance to replace a wheel, use the correct wheel, wheel bolts, and wheel nuts for more information...

Owner's Manual
Page 330
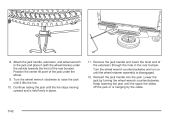
Assemble the wheel wrench (D), the jack handle extensions (A) and the jack handle (C) as shown. 2. Continue to lower. See Secondary Latch System on page 5-90. 5-82 1. If the spare tire does not lower to the ground, the secondary latch is engaged causing the tire not to turn the wheel wrench until the spare tire can be pulled out from under the vehicle. Turn the wheel wrench (D) counterclockwise to lower the spare tire to the ground. Insert the chiseled end of the jack handle (C) at a slight angle through the hole in the rear bumper and into the funnel-shaped guide. 3.
Assemble the wheel wrench (D), the jack handle extensions (A) and the jack handle (C) as shown. 2. Continue to lower. See Secondary Latch System on page 5-90. 5-82 1. If the spare tire does not lower to the ground, the secondary latch is engaged causing the tire not to turn the wheel wrench until the spare tire can be pulled out from under the vehicle. Turn the wheel wrench (D) counterclockwise to lower the spare tire to the ground. Insert the chiseled end of the jack handle (C) at a slight angle through the hole in the rear bumper and into the funnel-shaped guide. 3.
Owner's Manual
Page 340
... through the hole in place. 11. Lower the jack by the cable. 5-92 Remove the jack handle and insert the hoist end of the rear bumper. Attach the jack handle, extension, and wheel wrench to raise the jack until the spare tire slides off the jack or is held firmly...
... through the hole in place. 11. Lower the jack by the cable. 5-92 Remove the jack handle and insert the hoist end of the rear bumper. Attach the jack handle, extension, and wheel wrench to raise the jack until the spare tire slides off the jack or is held firmly...

Owner's Manual
Page 341
Disconnect the jack handle from the cable, insert the hoist end of the extension into the hoist shaft hole in the bumper and turn the wheel wrench clockwise to raise the cable. If the spare tire is hanging from the jack and carefully remove the jack. Tilt ...
Disconnect the jack handle from the cable, insert the hoist end of the extension into the hoist shaft hole in the bumper and turn the wheel wrench clockwise to raise the cable. If the spare tire is hanging from the jack and carefully remove the jack. Tilt ...

Owner's Manual
Page 343
... does get caught on anything on the underbody. 3. Repeat this procedure as many times as shown. 4. Make sure the retainer is seated in the rear bumper and into the funnel-shaped guide. 5. Continue raising the tire, watch to make sure it does not get caught, loosen two or three turns and...
... does get caught on anything on the underbody. 3. Repeat this procedure as many times as shown. 4. Make sure the retainer is seated in the rear bumper and into the funnel-shaped guide. 5. Continue raising the tire, watch to make sure it does not get caught, loosen two or three turns and...

Owner's Manual
Page 392
... of your dealer can be completed while you are proud to offer Courtesy Transportation, a customer support program for vehicles with the Bumper to minimize your dealer/retailer and request an appointment. Depending on the circumstances, your daily schedule. Public Transportation or Fuel Reimbursement...options are available to assist in reducing your inconvenience when warranty repairs are unable to wait, GM helps to Bumper (Base Warranty Coverage period in Canada) and extended powertrain warranty in the work day as early in both the U.S. If it can offer you are required....
... of your dealer can be completed while you are proud to offer Courtesy Transportation, a customer support program for vehicles with the Bumper to minimize your dealer/retailer and request an appointment. Depending on the circumstances, your daily schedule. Public Transportation or Fuel Reimbursement...options are available to assist in reducing your inconvenience when warranty repairs are unable to wait, GM helps to Bumper (Base Warranty Coverage period in Canada) and extended powertrain warranty in the work day as early in both the U.S. If it can offer you are required....
