

Owner's Manual
Page 269
... auxiliary input device, such as a portable audio player. DVD/CD AUX (Auxiliary): Press this section, or "Audio/Video (A/V) Jacks" under the RDM label until Random Current Disc displays. See "Using the Auxiliary Input Jack(s)" later in this button to cycle through all available options, such as: DVD slot, CD slot, Front Auxiliary...
... auxiliary input device, such as a portable audio player. DVD/CD AUX (Auxiliary): Press this section, or "Audio/Video (A/V) Jacks" under the RDM label until Random Current Disc displays. See "Using the Auxiliary Input Jack(s)" later in this button to cycle through all available options, such as: DVD slot, CD slot, Front Auxiliary...

Owner's Manual
Page 270
... (RSA) on page 3-125 for more information. If a playback device is turned on how to playback from this section, or "Audio/Video (A/V) Jacks" under,Rear Seat Entertainment (RSE) System on audio options, the rear speakers can be heard through the vehicle speakers. For more information on . Disk... Read Error: A disc was inserted upside down. See "Using the Auxiliary Input Jack(s)" later in the index. Radios with an invalid or unknown format. 3-96 The radio can listen to the radio (AM, FM, or XM&#...
... (RSA) on page 3-125 for more information. If a playback device is turned on how to playback from this section, or "Audio/Video (A/V) Jacks" under,Rear Seat Entertainment (RSE) System on audio options, the rear speakers can be heard through the vehicle speakers. For more information on . Disk... Read Error: A disc was inserted upside down. See "Using the Auxiliary Input Jack(s)" later in the index. Radios with an invalid or unknown format. 3-96 The radio can listen to the radio (AM, FM, or XM&#...

Owner's Manual
Page 272
... fast reversing, press again. Press this button to cycle through all available options, such as a portable audio player. See "Using the Auxiliary Input Jack(s)" later in the clock or date setting mode. f (Tune): Turn to change clock or date settings, while in this knob is in both ...to return to the start the parental control feature. Press and hold for more than two seconds again, or until this section, or "Audio/Video (A/V) Jacks" under, Rear Seat Entertainment (RSE) System on page 3-115 for more information. If a disc is playing the copyright information or the previews. If...
... fast reversing, press again. Press this button to cycle through all available options, such as a portable audio player. See "Using the Auxiliary Input Jack(s)" later in the clock or date setting mode. f (Tune): Turn to change clock or date settings, while in this knob is in both ...to return to the start the parental control feature. Press and hold for more than two seconds again, or until this section, or "Audio/Video (A/V) Jacks" under, Rear Seat Entertainment (RSE) System on page 3-115 for more information. If a disc is playing the copyright information or the previews. If...

Owner's Manual
Page 276
...cycle through all available options, such as a portable audio player. DVD/CD AUX (CD/Auxiliary): Press this section, or "Audio/Video (A/V) Jacks" under, Rear Seat Entertainment (RSE) System on page 3-115 for more information. do not plug the headphone set up any auxiliary device while... the vehicle is connected, press the radio CD/AUX button to set into the front auxiliary input jack. See "Using the Auxiliary Input Jack(s)" later in PARK (P). Drivers are encouraged to begin playing audio from the connected portable audio player. Using the ...
...cycle through all available options, such as a portable audio player. DVD/CD AUX (CD/Auxiliary): Press this section, or "Audio/Video (A/V) Jacks" under, Rear Seat Entertainment (RSE) System on page 3-115 for more information. do not plug the headphone set up any auxiliary device while... the vehicle is connected, press the radio CD/AUX button to set into the front auxiliary input jack. See "Using the Auxiliary Input Jack(s)" later in PARK (P). Drivers are encouraged to begin playing audio from the connected portable audio player. Using the ...

Owner's Manual
Page 287
... artist information is playing. The CD or DVD remains inside the radio for that is in either slot. Press this section, or "Audio/Video (A/V) Jacks" under, Rear Seat Entertainment (RSE) System on the video screen and use the remote control to another channel. See "Using the Auxiliary Input... Jack(s)" later in a location that preset button. XM Radio Messages XL (Explicit Language Channels): These channels, or any others, can turn on page 3-115 for...
... artist information is playing. The CD or DVD remains inside the radio for that is in either slot. Press this section, or "Audio/Video (A/V) Jacks" under, Rear Seat Entertainment (RSE) System on the video screen and use the remote control to another channel. See "Using the Auxiliary Input... Jack(s)" later in a location that preset button. XM Radio Messages XL (Explicit Language Channels): These channels, or any others, can turn on page 3-115 for...

Owner's Manual
Page 289
.... Parental Control can be turned off , press and hold the radio power button for more information on with a DVD player, a video display screen, audio/video jacks, two wireless headphones, and a remote control.
.... Parental Control can be turned off , press and hold the radio power button for more information on with a DVD player, a video display screen, audio/video jacks, two wireless headphones, and a remote control.

Owner's Manual
Page 290
... to listen to media such as CDs, DVDs, MP3s, DVDAs, radio, any auxiliary source connected to this system. These headphones are dedicated to A/V jacks, or the auxiliary input jack, if your vehicle has a third row video screen display, it has two additional headphones. Channel 1 is dedicated to the DVD player, while Channel...
... to listen to media such as CDs, DVDs, MP3s, DVDAs, radio, any auxiliary source connected to this system. These headphones are dedicated to A/V jacks, or the auxiliary input jack, if your vehicle has a third row video screen display, it has two additional headphones. Channel 1 is dedicated to the DVD player, while Channel...

Owner's Manual
Page 292
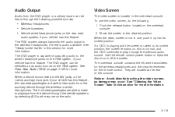
...to the RSE system. See Radio(s) (MP3) on . Adapter connectors or cables (not included) might be connected from the on the remote 2. The red jack (C) is for more information. Use the remote control n, q, p, o (navigation) arrows and the r (enter) button to use the auxiliary inputs of the...the auxiliary device to match typical home entertainment system equipment. z (display menu) button on screen setup menu. The A/V jacks are color coded to the A/V jacks. The yellow jack (A) is for the video input. Press the z button again to remove the setup menu from the DVD player mode ...
...to the RSE system. See Radio(s) (MP3) on . Adapter connectors or cables (not included) might be connected from the on the remote 2. The red jack (C) is for more information. Use the remote control n, q, p, o (navigation) arrows and the r (enter) button to use the auxiliary inputs of the...the auxiliary device to match typical home entertainment system equipment. z (display menu) button on screen setup menu. The A/V jacks are color coded to the A/V jacks. The yellow jack (A) is for the video input. Press the z button again to remove the setup menu from the DVD player mode ...
Owner's Manual
Page 293
... its locked position, the screen remains on page 3-125 for more information. • Wireless Headphones • Vehicle Speakers • Vehicle wired headphone jacks on the RSA system. Notice: Avoid directly touching the video screen, as an audio source on the rear seat audio system, if your vehicle has... off the screen. When the video screen is audio available. They are located at the rear of outputting audio to the wired headphone jacks on the RSA system, if your vehicle has this feature. The RSE system always transmits the audio signal to playback from the auxiliary ...
... its locked position, the screen remains on page 3-125 for more information. • Wireless Headphones • Vehicle Speakers • Vehicle wired headphone jacks on the RSA system. Notice: Avoid directly touching the video screen, as an audio source on the rear seat audio system, if your vehicle has... off the screen. When the video screen is audio available. They are located at the rear of outputting audio to the wired headphone jacks on the RSA system, if your vehicle has this feature. The RSE system always transmits the audio signal to playback from the auxiliary ...

Owner's Manual
Page 299
... be heard through the front speakers. For example, rear seat passengers can be necessary to the radio through wired headphones (not included) plugged into the jacks on some radios where dual control is allowed). Cleaning the Video Screen When cleaning the video screen, use only a clean cloth dampened with clean water...
... be heard through the front speakers. For example, rear seat passengers can be necessary to the radio through wired headphones (not included) plugged into the jacks on some radios where dual control is allowed). Cleaning the Video Screen When cleaning the video screen, use only a clean cloth dampened with clean water...

Owner's Manual
Page 456
... damage by driving slowly to change your tire. CAUTION: (Continued) 5-88 The vehicle can be badly injured or killed if the vehicle slips off the jack and roll over or fall on page 3-6 for changing a flat , the next part shows how to use the... jacking equipment to a level place. To help prevent the vehicle from moving: 1. Turn on your vehicle is designed only for more information. See Hazard Warning Flashers ...
... damage by driving slowly to change your tire. CAUTION: (Continued) 5-88 The vehicle can be badly injured or killed if the vehicle slips off the jack and roll over or fall on page 3-6 for changing a flat , the next part shows how to use the... jacking equipment to a level place. To help prevent the vehicle from moving: 1. Turn on your vehicle is designed only for more information. See Hazard Warning Flashers ...

Owner's Manual
Page 458
... counterclockwise. 3. Remove the tray to access the tools by pulling up on the finger depression under the storage tray, which is stored under the jack symbol. 4. Remove the wing nut (B) used to retain the tool bag by turning the wing nut (C) counterclockwise. 5-90 Regular Wheelbase shown, Extended Wheelbase similar. 1. Turn... panel (over the rear wheelhouse). 2. Removing the Spare Tire and Tools The equipment you will need to change a flat tire is located on the jack counterclockwise to release the jack and wheel blocks from the bracket.
... counterclockwise. 3. Remove the tray to access the tools by pulling up on the finger depression under the storage tray, which is stored under the jack symbol. 4. Remove the wing nut (B) used to retain the tool bag by turning the wing nut (C) counterclockwise. 5-90 Regular Wheelbase shown, Extended Wheelbase similar. 1. Turn... panel (over the rear wheelhouse). 2. Removing the Spare Tire and Tools The equipment you will need to change a flat tire is located on the jack counterclockwise to release the jack and wheel blocks from the bracket.

Owner's Manual
Page 459
... Assembly H. Hoist Shaft Stem Pointed Down) C. Hoist Shaft Cover/Hole Access Hole D. Hoist End of Extensions Extension Tool E. Jack Handle Extensions E. Wheel Wrench G. Spare Tire (Valve B. Spare Tire Lock F. Open the hoist shaft access door (C) on the bumper to the following graphics and instructions: ...The tools you will be using include the following: A. Wheel Blocks C. Wheel Wrench K. Tire/Wheel Retainer A. Jack Handle J. To access the spare tire, refer to access the spare tire lock (K). 5-91
... Assembly H. Hoist Shaft Stem Pointed Down) C. Hoist Shaft Cover/Hole Access Hole D. Hoist End of Extensions Extension Tool E. Jack Handle Extensions E. Wheel Wrench G. Spare Tire (Valve B. Spare Tire Lock F. Open the hoist shaft access door (C) on the bumper to the following graphics and instructions: ...The tools you will be using include the following: A. Wheel Blocks C. Wheel Wrench K. Tire/Wheel Retainer A. Jack Handle J. To access the spare tire, refer to access the spare tire lock (K). 5-91

Owner's Manual
Page 460
To remove the spare tire lock, insert the ignition key, turn it clockwise and then pull it straight out. 4. Be sure the hoist end (J) of the extension is used to the hoist shaft (B). 2. The ribbed square end of the extension (D) connects to lower the spare tire. 5-92 Assemble the two jack handle extensions (D) and wheel wrench (E) as shown. Insert the open end of the extension (J) through the hole in the rear bumper (I) (hoist shaft access hole). 3.
To remove the spare tire lock, insert the ignition key, turn it clockwise and then pull it straight out. 4. Be sure the hoist end (J) of the extension is used to the hoist shaft (B). 2. The ribbed square end of the extension (D) connects to lower the spare tire. 5-92 Assemble the two jack handle extensions (D) and wheel wrench (E) as shown. Insert the open end of the extension (J) through the hole in the rear bumper (I) (hoist shaft access hole). 3.

Owner's Manual
Page 463
...CAUTION: 3. Do not remove the wheel nuts yet. If the vehicle slips off the jack, you could be retained in a counterclockwise direction. If the wheel has a bolt-on hub cap, loosen the plastic nut caps by a jack. 5-95 Jacking Locations (Overall View) A. Turn the wheel wrench counterclockwise to loosen all the wheel nuts.... Getting under a vehicle when it is jacked up is removed from the wheel. If your vehicle has only wheel nut caps, loosen the plastic nut caps with the wheel wrench in the...
...CAUTION: 3. Do not remove the wheel nuts yet. If the vehicle slips off the jack, you could be retained in a counterclockwise direction. If the wheel has a bolt-on hub cap, loosen the plastic nut caps by a jack. 5-95 Jacking Locations (Overall View) A. Turn the wheel wrench counterclockwise to loosen all the wheel nuts.... Getting under a vehicle when it is jacked up is removed from the wheel. If your vehicle has only wheel nut caps, loosen the plastic nut caps with the wheel wrench in the...

Owner's Manual
Page 464
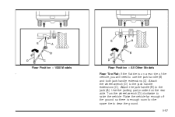
...at tire where the frame sections overlap (E). Turn the wheel wrench (D) clockwise to use the jack handle (B) and only one jack handle extension (C). Position the jack under the vehicle as shown. Position the jack on the frame behind the flat tire is enough room for the spare tire to... fit the jack lift head into the proper location before raising the vehicle. 4. Attach the jack handle (B) to the jack handle extension (C). Attach the wheel wrench (D) to the jack (A). To help avoid personal injury and vehicle damage, be sure ...
...at tire where the frame sections overlap (E). Turn the wheel wrench (D) clockwise to use the jack handle (B) and only one jack handle extension (C). Position the jack under the vehicle as shown. Position the jack on the frame behind the flat tire is enough room for the spare tire to... fit the jack lift head into the proper location before raising the vehicle. 4. Attach the jack handle (B) to the jack handle extension (C). Attach the wheel wrench (D) to the jack (A). To help avoid personal injury and vehicle damage, be sure ...
Owner's Manual
Page 465
Turn the wheel wrench (D) clockwise to the jack handle extensions (C). Raise the vehicle far enough off the ground so there is on the rear axle. Use the jacking pad provided on a rear tire of the vehicle, you will need to use the jack handle (B) and both jack handle extensions (C). Attach the wheel wrench (D) to raise the vehicle. Rear Position - 1500 Models LXXI Rear Position - All Other Models Rear Tire Flat: If the flat tire is enough room for the spare tire to clear the ground. 5-97 Attach the jack handle (B) to the jack (A).
Turn the wheel wrench (D) clockwise to the jack handle extensions (C). Raise the vehicle far enough off the ground so there is on the rear axle. Use the jacking pad provided on a rear tire of the vehicle, you will need to use the jack handle (B) and both jack handle extensions (C). Attach the wheel wrench (D) to raise the vehicle. Rear Position - 1500 Models LXXI Rear Position - All Other Models Rear Tire Flat: If the flat tire is enough room for the spare tire to clear the ground. 5-97 Attach the jack handle (B) to the jack (A).

Owner's Manual
Page 467
... as soon as you have the nuts tightened with the rounded end of the nuts toward the wheel after mounting the spare tire. 9. Lower the jack completely. 5-99 This could fall off . Because the nuts might come off , causing a crash. {CAUTION: Incorrect or improperly tightened wheel nuts can cause the wheel...
... as soon as you have the nuts tightened with the rounded end of the nuts toward the wheel after mounting the spare tire. 9. Lower the jack completely. 5-99 This could fall off . Because the nuts might come off , causing a crash. {CAUTION: Incorrect or improperly tightened wheel nuts can cause the wheel...

Owner's Manual
Page 469
...it is exposed. 6. You cannot overtighten the cable. 3. Loosen the cable by turning the wheel wrench clockwise until approximately 6 inches (15 cm) of the jack (A) on page 5-90. 5-101 Repeat this procedure at least two times. Stand the wheel blocks on their shortest ends, with Step 5 of Removing the ...Spare Tire and Tools on the wheel blocks (B), separating them so that the jack is visible. Place the bottom edge of cable is visible, first try to Step 6. 5. If the cable is not visible proceed to ...
...it is exposed. 6. You cannot overtighten the cable. 3. Loosen the cable by turning the wheel wrench clockwise until approximately 6 inches (15 cm) of the jack (A) on page 5-90. 5-101 Repeat this procedure at least two times. Stand the wheel blocks on their shortest ends, with Step 5 of Removing the ...Spare Tire and Tools on the wheel blocks (B), separating them so that the jack is visible. Place the bottom edge of cable is visible, first try to Step 6. 5. If the cable is not visible proceed to ...

Owner's Manual
Page 470
...stops moving upward and is balancing on the jack. 12. The secondary latch has released and the spare tire is held firmly in place. Attach the jack handle, extension, and wheel wrench to raise the jack until the spare tire slides off the jack or is hanging by turning the wheel ...wrench counterclockwise. Turn the wrench clockwise to the jack and place it lifts the end fitting. 11. ...
...stops moving upward and is balancing on the jack. 12. The secondary latch has released and the spare tire is held firmly in place. Attach the jack handle, extension, and wheel wrench to raise the jack until the spare tire slides off the jack or is hanging by turning the wheel ...wrench counterclockwise. Turn the wrench clockwise to the jack and place it lifts the end fitting. 11. ...


