

Owner's Manual
Page 269
...message showing the track or chapter number displays when a disc is not connected, "No Aux Input Device" displays. See "Using the Auxiliary Input Jack(s)" later in either slot. Press the pushbutton again to the radio. For the radio with CD and DVD, press the DVD/CD AUX button ... as: DVD slot, CD slot, Front Auxiliary, and Rear Auxiliary (if available). DVD/CD AUX (Auxiliary): Press this section, or "Audio/Video (A/V) Jacks" under the RDM label until Random Current Disc displays. CD/AUX (CD/Auxiliary): Press to play . Press again and the system automatically searches for more...
...message showing the track or chapter number displays when a disc is not connected, "No Aux Input Device" displays. See "Using the Auxiliary Input Jack(s)" later in either slot. Press the pushbutton again to the radio. For the radio with CD and DVD, press the DVD/CD AUX button ... as: DVD slot, CD slot, Front Auxiliary, and Rear Auxiliary (if available). DVD/CD AUX (Auxiliary): Press this section, or "Audio/Video (A/V) Jacks" under the RDM label until Random Current Disc displays. CD/AUX (CD/Auxiliary): Press to play . Press again and the system automatically searches for more...

Owner's Manual
Page 270
...or CD-RW Disc Radios with an invalid or unknown format. 3-96 For more information on how to playback from this section, or "Audio/Video (A/V) Jacks" under,Rear Seat Entertainment (RSE) System on . Disk Read Error: A disc was inserted upside down. For more information on how to play an ...3-125 for more information. If a playback device is defined as DVD slot, CD slot, XM™, FM/AM, Front Auxiliary Jack, or Rear Auxiliary Jack. In some vehicles, depending on audio options, the rear speakers can listen to the radio (AM, FM, or XM™) by pressing ...
...or CD-RW Disc Radios with an invalid or unknown format. 3-96 For more information on how to playback from this section, or "Audio/Video (A/V) Jacks" under,Rear Seat Entertainment (RSE) System on . Disk Read Error: A disc was inserted upside down. For more information on how to play an ...3-125 for more information. If a playback device is defined as DVD slot, CD slot, XM™, FM/AM, Front Auxiliary Jack, or Rear Auxiliary Jack. In some vehicles, depending on audio options, the rear speakers can listen to the radio (AM, FM, or XM™) by pressing ...

Owner's Manual
Page 272
... two sources and does not indicate "No Aux Input Device". This button might not work when the DVD is in this section, or "Audio/Video (A/V) Jacks" under, Rear Seat Entertainment (RSE) System on a CD or DVD, to manually tune a radio station, or to the radio, CD, and the DVD. Parental... the Rear Seat Audio (RSA) system or remote control. If a disc is not connected, "No Aux Input Device" displays. See "Using the Auxiliary Input Jack(s)" later in either slot. To stop fast reversing, press again. If a front auxiliary device is pressed and held for an auxiliary input device, such as...
... two sources and does not indicate "No Aux Input Device". This button might not work when the DVD is in this section, or "Audio/Video (A/V) Jacks" under, Rear Seat Entertainment (RSE) System on a CD or DVD, to manually tune a radio station, or to the radio, CD, and the DVD. Parental... the Rear Seat Audio (RSA) system or remote control. If a disc is not connected, "No Aux Input Device" displays. See "Using the Auxiliary Input Jack(s)" later in either slot. To stop fast reversing, press again. If a front auxiliary device is pressed and held for an auxiliary input device, such as...

Owner's Manual
Page 276
...portable audio player is not connected, "No Input Device Found" displays. O (Power/Volume): Turn clockwise or counterclockwise to the radio's front auxiliary input jack. To use as an iPod, laptop computer, MP3 player, CD player, or cassette tape player, etc. The DVD/CD text label and a ...when a portable audio device is in this button again and the system automatically searches for more information. Press this section, or "Audio/Video (A/V) Jacks" under, Rear Seat Entertainment (RSE) System on driver distraction. If a front auxiliary device is always best to play a CD when a ...
...portable audio player is not connected, "No Input Device Found" displays. O (Power/Volume): Turn clockwise or counterclockwise to the radio's front auxiliary input jack. To use as an iPod, laptop computer, MP3 player, CD player, or cassette tape player, etc. The DVD/CD text label and a ...when a portable audio device is in this button again and the system automatically searches for more information. Press this section, or "Audio/Video (A/V) Jacks" under, Rear Seat Entertainment (RSE) System on driver distraction. If a front auxiliary device is always best to play a CD when a ...

Owner's Manual
Page 287
...can be blocked at this time on this button again and the system automatically searches for more information. If this section, or "Audio/Video (A/V) Jacks" under, Rear Seat Entertainment (RSE) System on the video screen and use the remote control to navigate the CD (tracks only) through the ...CD or a DVD is blocking the XM™ signal. If a disc is acquiring and processing audio and text data. See "Using the Auxiliary Input Jack(s)" later in a location that preset button. XM Radio Messages XL (Explicit Language Channels): These channels, or any others, can turn on page 3-115 for...
...can be blocked at this time on this button again and the system automatically searches for more information. If this section, or "Audio/Video (A/V) Jacks" under, Rear Seat Entertainment (RSE) System on the video screen and use the remote control to navigate the CD (tracks only) through the ...CD or a DVD is blocking the XM™ signal. If a disc is acquiring and processing audio and text data. See "Using the Auxiliary Input Jack(s)" later in a location that preset button. XM Radio Messages XL (Explicit Language Channels): These channels, or any others, can turn on page 3-115 for...

Owner's Manual
Page 289
... radio power button for more information on the vehicle's audio/DVD system. The RSE system includes a radio with a DVD player, a video display screen, audio/video jacks, two wireless headphones, and a remote control. While Parental Control is part of the RSE system. 3-115 To turn Parental Control off by inserting or ejecting...
... radio power button for more information on the vehicle's audio/DVD system. The RSE system includes a radio with a DVD player, a video display screen, audio/video jacks, two wireless headphones, and a remote control. While Parental Control is part of the RSE system. 3-115 To turn Parental Control off by inserting or ejecting...

Owner's Manual
Page 290
.... 3-116 Infrared transmitters are dedicated to be replaced. Headphones If your vehicle has this section for more information. Push the power button to A/V jacks, or the auxiliary input jack, if your vehicle has a third row video screen display, it has two additional headphones. The RSE includes two 2-channel wireless headphones that are...
.... 3-116 Infrared transmitters are dedicated to be replaced. Headphones If your vehicle has this section for more information. Push the power button to A/V jacks, or the auxiliary input jack, if your vehicle has a third row video screen display, it has two additional headphones. The RSE includes two 2-channel wireless headphones that are...

Owner's Manual
Page 292
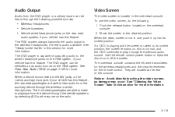
... turn both the auxiliary device and the video screen power on screen setup menu. The white jack (B) is not supplied by sourcing to the A/V jacks. Audio/Video (A/V) Jacks To use the setup menu. 3. To change any feature, do the following: 1. Press the control. Power for auxiliary ...again to use the auxiliary inputs of the RSE system, connect an external auxiliary device to the manufacturer's instructions for proper usage. The yellow jack (A) is for the left audio input. The screen display mode (normal, full, and zoom), screen brightness, and setup menu language can ...
... turn both the auxiliary device and the video screen power on screen setup menu. The white jack (B) is not supplied by sourcing to the A/V jacks. Audio/Video (A/V) Jacks To use the setup menu. 3. To change any feature, do the following: 1. Press the control. Power for auxiliary ...again to use the auxiliary inputs of the RSE system, connect an external auxiliary device to the manufacturer's instructions for proper usage. The yellow jack (A) is for the left audio input. The screen display mode (normal, full, and zoom), screen brightness, and setup menu language can ...
Owner's Manual
Page 293
...can be selected as an audio source on the RSA system. The front seat passengers are able to listen to the A/V jacks, or the radio's auxiliary input jack, if your vehicle has this feature. Push the release button located on page 3-125 for more information. • Wireless... Headphones • Vehicle Speakers • Vehicle wired headphone jacks on the RSA system, if your vehicle has this feature. The overhead console contains the infrared transmitters for the wireless headphones and the infrared...
...can be selected as an audio source on the RSA system. The front seat passengers are able to listen to the A/V jacks, or the radio's auxiliary input jack, if your vehicle has this feature. Push the release button located on page 3-125 for more information. • Wireless... Headphones • Vehicle Speakers • Vehicle wired headphone jacks on the RSA system, if your vehicle has this feature. The overhead console contains the infrared transmitters for the wireless headphones and the infrared...

Owner's Manual
Page 299
... is off. Rear Seat Audio (RSA) This feature allows rear seat passengers to listen to the radio through wired headphones (not included) plugged into the jacks on some radios where dual control is allowed). You can occur when operating cellular phones, scanners, CB radios, Global Position Systems (GPS)*, two-way radios...
... is off. Rear Seat Audio (RSA) This feature allows rear seat passengers to listen to the radio through wired headphones (not included) plugged into the jacks on some radios where dual control is allowed). You can occur when operating cellular phones, scanners, CB radios, Global Position Systems (GPS)*, two-way radios...

Owner's Manual
Page 456
...vehicle only for changing a flat tire. If it to change a flat , the next part shows how to use the jacking equipment to a level place. Use the jack provided with your vehicle is a Two-mode Hybrid, see the Two-mode Hybrid manual for more information. {CAUTION: Changing a tire can ...vehicle is designed only for changing a flat tire. You and they could be badly injured or killed if the vehicle slips off the jack and roll over or fall on your tire. Find a level place to do maintenance or repairs is dangerous without the appropriate safety equipment and training...
...vehicle only for changing a flat tire. If it to change a flat , the next part shows how to use the jacking equipment to a level place. Use the jack provided with your vehicle is a Two-mode Hybrid, see the Two-mode Hybrid manual for more information. {CAUTION: Changing a tire can ...vehicle is designed only for changing a flat tire. You and they could be badly injured or killed if the vehicle slips off the jack and roll over or fall on your tire. Find a level place to do maintenance or repairs is dangerous without the appropriate safety equipment and training...

Owner's Manual
Page 458
... equipment you will need to change a flat tire is stored under the storage tray, which is located on the finger depression under the jack symbol. 4. Regular Wheelbase shown, Extended Wheelbase similar. 1. Turn the knob (A) on the...
... equipment you will need to change a flat tire is stored under the storage tray, which is located on the finger depression under the jack symbol. 4. Regular Wheelbase shown, Extended Wheelbase similar. 1. Turn the knob (A) on the...

Owner's Manual
Page 459
...Wheel Wrench G. Hoist Shaft Cover/Hole Access Hole D. Hoist End of Extensions Extension Tool E. Wheel Wrench K. Hoist Assembly H. Spare Tire (Valve B. Jack Handle Extensions E. Jack Handle D. Hoist Shaft Stem Pointed Down) C. Spare Tire Lock F. Wheel Blocks C. Tire/Wheel Retainer A. Open the hoist shaft access door (C) on ...the bumper to the following graphics and instructions: The tools you will be using include the following: A. Hoist Cable 1. Jack Handle J. To access the spare tire, refer to access the spare tire lock (K). 5-91 Hoist Shaft Access...
...Wheel Wrench G. Hoist Shaft Cover/Hole Access Hole D. Hoist End of Extensions Extension Tool E. Wheel Wrench K. Hoist Assembly H. Spare Tire (Valve B. Jack Handle Extensions E. Jack Handle D. Hoist Shaft Stem Pointed Down) C. Spare Tire Lock F. Wheel Blocks C. Tire/Wheel Retainer A. Open the hoist shaft access door (C) on ...the bumper to the following graphics and instructions: The tools you will be using include the following: A. Hoist Cable 1. Jack Handle J. To access the spare tire, refer to access the spare tire lock (K). 5-91 Hoist Shaft Access...

Owner's Manual
Page 460
Insert the open end of the extension (D) connects to lower the spare tire. 5-92 Assemble the two jack handle extensions (D) and wheel wrench (E) as shown. Be sure the hoist end (J) of the extension (J) through the hole in the rear bumper (I) (hoist shaft access hole). 3. To remove the spare tire lock, insert the ignition key, turn it clockwise and then pull it straight out. 4. The ribbed square end of the extension is used to the hoist shaft (B). 2.
Insert the open end of the extension (D) connects to lower the spare tire. 5-92 Assemble the two jack handle extensions (D) and wheel wrench (E) as shown. Be sure the hoist end (J) of the extension (J) through the hole in the rear bumper (I) (hoist shaft access hole). 3. To remove the spare tire lock, insert the ignition key, turn it clockwise and then pull it straight out. 4. The ribbed square end of the extension is used to the hoist shaft (B). 2.

Owner's Manual
Page 463
... Turn the wheel wrench counterclockwise to loosen all the wheel nuts. If the wheel has a bolt-on hub cap, loosen the plastic nut caps by a jack. 5-95 Never get under a vehicle when it is supported only by turning the wheel wrench counterclockwise. Do not remove the wheel nuts yet. Getting under... a vehicle when it is jacked up is removed from the wheel. If your vehicle has only wheel nut caps, loosen the plastic nut caps with the wheel wrench in the...
... Turn the wheel wrench counterclockwise to loosen all the wheel nuts. If the wheel has a bolt-on hub cap, loosen the plastic nut caps by a jack. 5-95 Never get under a vehicle when it is supported only by turning the wheel wrench counterclockwise. Do not remove the wheel nuts yet. Getting under... a vehicle when it is jacked up is removed from the wheel. If your vehicle has only wheel nut caps, loosen the plastic nut caps with the wheel wrench in the...

Owner's Manual
Page 464
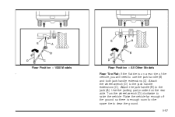
... a front tire of the vehicle, you will need to clear the ground. 5-96 Turn the wheel wrench (D) clockwise to the jack handle extension (C). Raise the vehicle far enough off the ground so there is on the frame behind the flat tire is enough room for ...the spare tire to use the jack handle (B) and only one jack handle extension (C). {CAUTION: Raising your vehicle with the jack improperly positioned can damage the vehicle and even make the vehicle fall. Attach the wheel wrench (D) to raise the...
... a front tire of the vehicle, you will need to clear the ground. 5-96 Turn the wheel wrench (D) clockwise to the jack handle extension (C). Raise the vehicle far enough off the ground so there is on the frame behind the flat tire is enough room for ...the spare tire to use the jack handle (B) and only one jack handle extension (C). {CAUTION: Raising your vehicle with the jack improperly positioned can damage the vehicle and even make the vehicle fall. Attach the wheel wrench (D) to raise the...
Owner's Manual
Page 465
Attach the jack handle (B) to the jack handle extensions (C). Use the jacking pad provided on a rear tire of the vehicle, you will need to use the jack handle (B) and both jack handle extensions (C). Attach the wheel wrench (D) to the jack (A). Rear Position - 1500 Models LXXI Rear Position - All Other Models Rear Tire Flat: If the flat tire is enough room for the spare tire to raise the vehicle. Turn the wheel wrench (D) clockwise to clear the ground. 5-97 Raise the vehicle far enough off the ground so there is on the rear axle.
Attach the jack handle (B) to the jack handle extensions (C). Use the jacking pad provided on a rear tire of the vehicle, you will need to use the jack handle (B) and both jack handle extensions (C). Attach the wheel wrench (D) to the jack (A). Rear Position - 1500 Models LXXI Rear Position - All Other Models Rear Tire Flat: If the flat tire is enough room for the spare tire to raise the vehicle. Turn the wheel wrench (D) clockwise to clear the ground. 5-97 Raise the vehicle far enough off the ground so there is on the rear axle.

Owner's Manual
Page 467
... the wheel nut torque specification. 8. Then use oil or grease on with a torque wrench to the proper torque specification. Lower the jack completely. 5-99 If you can and have to replace them, be sure to get new original equipment wheel nuts. Put the wheel nuts back on...
... the wheel nut torque specification. 8. Then use oil or grease on with a torque wrench to the proper torque specification. Lower the jack completely. 5-99 If you can and have to replace them, be sure to get new original equipment wheel nuts. Put the wheel nuts back on...

Owner's Manual
Page 469
... the wheel blocks on their shortest ends, with Step 5 of Removing the Spare Tire and Tools on the wheel blocks (B), separating them so that the jack is not visible proceed to tighten the cable by turning the wrench counterclockwise three or four turns. 4. Place the bottom edge of cable is visible... lowers to see if the cable end is exposed. 6. Loosen the cable by turning the wheel wrench clockwise until approximately 6 inches (15 cm) of the jack (A) on page 5-90. 5-101 Check under the vehicle to the ground, continue with the backs facing each other. 7.
... the wheel blocks on their shortest ends, with Step 5 of Removing the Spare Tire and Tools on the wheel blocks (B), separating them so that the jack is not visible proceed to tighten the cable by turning the wrench counterclockwise three or four turns. 4. Place the bottom edge of cable is visible... lowers to see if the cable end is exposed. 6. Loosen the cable by turning the wheel wrench clockwise until approximately 6 inches (15 cm) of the jack (A) on page 5-90. 5-101 Check under the vehicle to the ground, continue with the backs facing each other. 7.

Owner's Manual
Page 470
...the spare tire. 10. Turn the wrench clockwise to the jack and place it lifts the end fitting. 11. Attach the jack handle, extension, and wheel wrench to raise the jack until the spare tire slides off the jack or is hanging by turning the wheel wrench counterclockwise. Keep lowering... the jack until it (with the wheel blocks) under the center of...
...the spare tire. 10. Turn the wrench clockwise to the jack and place it lifts the end fitting. 11. Attach the jack handle, extension, and wheel wrench to raise the jack until the spare tire slides off the jack or is hanging by turning the wheel wrench counterclockwise. Keep lowering... the jack until it (with the wheel blocks) under the center of...


