

Owner's Manual
Page 94
... your vehicle should be injured if you are probably part of the airbag system. Servicing Your Airbag-Equipped Vehicle Airbags affect how your vehicle's frame, bumper system, height, front end or side sheet metal, they may keep the airbags from working properly?
... your vehicle should be injured if you are probably part of the airbag system. Servicing Your Airbag-Equipped Vehicle Airbags affect how your vehicle's frame, bumper system, height, front end or side sheet metal, they may keep the airbags from working properly?

Owner's Manual
Page 156
... other vehicles while in the following information. 2-58 It cannot detect: • objects that are below the bumper, underneath the vehicle, or if they are too close objects are located on the rear bumper. It can be sure to look for objects and check your right shoulder. {CAUTION: The Ultrasonic Rear Parking..., always check behind your vehicle does not have the display and it helps you do not use proper care before backing up to the rear bumper, up . It operates at speeds less than 5 mph (8 km/h).
... other vehicles while in the following information. 2-58 It cannot detect: • objects that are below the bumper, underneath the vehicle, or if they are too close objects are located on the rear bumper. It can be sure to look for objects and check your right shoulder. {CAUTION: The Ultrasonic Rear Parking..., always check behind your vehicle does not have the display and it helps you do not use proper care before backing up to the rear bumper, up . It operates at speeds less than 5 mph (8 km/h).

Owner's Manual
Page 157
... will occur for three seconds English 8 ft 40 in 23 in 1 ft Metric 2.5 m 1.0 m 0.6 m 0.3 m The system can be at speeds less than 1 foot (0.3 m) from your rear bumper. The rear display will flash. Objects must be disabled by pressing the rear park aid disable button located next to indicate that URPA is...
... will occur for three seconds English 8 ft 40 in 23 in 1 ft Metric 2.5 m 1.0 m 0.6 m 0.3 m The system can be at speeds less than 1 foot (0.3 m) from your rear bumper. The rear display will flash. Objects must be disabled by pressing the rear park aid disable button located next to indicate that URPA is...

Owner's Manual
Page 158
... your location. Once the attached object is removed, URPA will return to normal operation. • A tow bar is attached to your vehicle. • The vehicle's bumper is provided to you . OnStar® System • A trailer was attached to your vehicle, or a bicycle or an object was hanging out of your liftgate... Your Vehicle on a very large truck. You may cancel your OnStar service at least 15 mph (25 km/h), take your vehicle to your vehicle's rear bumper free of air brakes on page 5-111. Take the vehicle to your dealer/retailer.
... your location. Once the attached object is removed, URPA will return to normal operation. • A tow bar is attached to your vehicle. • The vehicle's bumper is provided to you . OnStar® System • A trailer was attached to your vehicle, or a bicycle or an object was hanging out of your liftgate... Your Vehicle on a very large truck. You may cancel your OnStar service at least 15 mph (25 km/h), take your vehicle to your vehicle's rear bumper free of air brakes on page 5-111. Take the vehicle to your dealer/retailer.

Owner's Manual
Page 170
... maximum vehicle capacity when loading your vehicle. Press the release lever on the roof of the vehicle. The luggage carrier has siderails attached to the bumpers. Also tie the load to the roof. To prevent damage or loss of the rail, up to side. Tie the load to make sure the...
... maximum vehicle capacity when loading your vehicle. Press the release lever on the roof of the vehicle. The luggage carrier has siderails attached to the bumpers. Also tie the load to the roof. To prevent damage or loss of the rail, up to side. Tie the load to make sure the...
Owner's Manual
Page 361
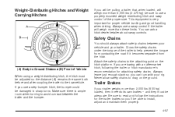
... than 2,000 lbs (900 kg) loaded, then it becomes separated from the hitch. Always use a step-bumper hitch, the bumper could be adequate. Safety Chains You should always attach safety chains between the trailer and the bumper. If you 'll be able to drag on the hitch platform. Never allow safety chains to...
... than 2,000 lbs (900 kg) loaded, then it becomes separated from the hitch. Always use a step-bumper hitch, the bumper could be adequate. Safety Chains You should always attach safety chains between the trailer and the bumper. If you 'll be able to drag on the hitch platform. Never allow safety chains to...
Owner's Manual
Page 453
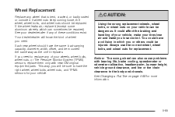
..., wheel bolts, wheel nuts, or Tire Pressure Monitor System (TPMS) sensors, replace them only with bearing life, brake cooling, speedometer or odometer calibration, headlamp aim, bumper height, vehicle ground clearance, and tire or tire chain clearance to the body and chassis. If wheel nuts keep coming loose, the wheel, wheel bolts...
..., wheel bolts, wheel nuts, or Tire Pressure Monitor System (TPMS) sensors, replace them only with bearing life, brake cooling, speedometer or odometer calibration, headlamp aim, bumper height, vehicle ground clearance, and tire or tire chain clearance to the body and chassis. If wheel nuts keep coming loose, the wheel, wheel bolts...

Owner's Manual
Page 459
Tire/Wheel Retainer A. Spare Tire (Valve B. Hoist Shaft Access I. Hoist End of Extensions Extension Tool E. Open the hoist shaft access door (C) on the bumper to the following graphics and instructions: The tools you will be using include the following: A. Hoist Cable 1. Wheel Wrench G. Hoist Shaft Cover/Hole Access Hole D. ...
Tire/Wheel Retainer A. Spare Tire (Valve B. Hoist Shaft Access I. Hoist End of Extensions Extension Tool E. Open the hoist shaft access door (C) on the bumper to the following graphics and instructions: The tools you will be using include the following: A. Hoist Cable 1. Wheel Wrench G. Hoist Shaft Cover/Hole Access Hole D. ...

Owner's Manual
Page 460
2. Assemble the two jack handle extensions (D) and wheel wrench (E) as shown. The ribbed square end of the extension (D) connects to lower the spare tire. 5-92 To remove the spare tire lock, insert the ignition key, turn it clockwise and then pull it straight out. 4. Be sure the hoist end (J) of the extension is used to the hoist shaft (B). Insert the open end of the extension (J) through the hole in the rear bumper (I) (hoist shaft access hole). 3.
2. Assemble the two jack handle extensions (D) and wheel wrench (E) as shown. The ribbed square end of the extension (D) connects to lower the spare tire. 5-92 To remove the spare tire lock, insert the ignition key, turn it clockwise and then pull it straight out. 4. Be sure the hoist end (J) of the extension is used to the hoist shaft (B). Insert the open end of the extension (J) through the hole in the rear bumper (I) (hoist shaft access hole). 3.

Owner's Manual
Page 470
.... 5-102 Attach the jack handle, extension, and wheel wrench to raise the jack until it (with the wheel blocks) under the center of the rear bumper. 9. The secondary latch has released and the spare tire is hanging by turning the wheel wrench counterclockwise. Turn the wrench clockwise to the jack and...
.... 5-102 Attach the jack handle, extension, and wheel wrench to raise the jack until it (with the wheel blocks) under the center of the rear bumper. 9. The secondary latch has released and the spare tire is hanging by turning the wheel wrench counterclockwise. Turn the wrench clockwise to the jack and...

Owner's Manual
Page 471
... against the spare while firmly pulling the jack out from under the vehicle. Turn the wheel wrench in the hoist shaft hole in the bumper clockwise to raise the cable back up if the cable is hanging from under the spare. 13. Have the hoist assembly inspected as soon as... other hand. Pull the tire out from the cable, insert the hoist end of extension, and wheel wrench into the hoist shaft hole in the bumper and turn the wheel wrench counterclockwise to lower the spare the rest of the way. 14. {CAUTION: Someone standing too close during the procedure could...
... against the spare while firmly pulling the jack out from under the vehicle. Turn the wheel wrench in the hoist shaft hole in the bumper clockwise to raise the cable back up if the cable is hanging from under the spare. 13. Have the hoist assembly inspected as soon as... other hand. Pull the tire out from the cable, insert the hoist end of extension, and wheel wrench into the hoist shaft hole in the bumper and turn the wheel wrench counterclockwise to lower the spare the rest of the way. 14. {CAUTION: Someone standing too close during the procedure could...

Owner's Manual
Page 473
Pull the pin through the center of the extension (J) through the center wheel opening . 5-105 Insert the open end of the wheel. Tilt the retainer down through the hole in the wheel opening . Make sure the retainer is fully seated across the underside of the wheel. 3. Assemble the two jack handle extensions (D) and wheel wrench (E) as shown. 4. Raise the tire part way upward. 2. Separate the tire/wheel retainer (D) from the guide pin. Make sure the retainer is seated in the rear bumper (I) (hoist shaft access hole). 5. Tilt the tire toward the vehicle.
Pull the pin through the center of the extension (J) through the center wheel opening . 5-105 Insert the open end of the wheel. Tilt the retainer down through the hole in the wheel opening . Make sure the retainer is fully seated across the underside of the wheel. 3. Assemble the two jack handle extensions (D) and wheel wrench (E) as shown. 4. Raise the tire part way upward. 2. Separate the tire/wheel retainer (D) from the guide pin. Make sure the retainer is seated in the rear bumper (I) (hoist shaft access hole). 5. Tilt the tire toward the vehicle.
Owner's Manual
Page 523
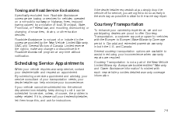
...If your ownership experience, we and our participating dealers are proud to assist in both the U.S. GMC and General Motors of Canada Limited reserve the right to Bumper (Base Warranty Coverage period in Canada) and extended powertrain warranty in reducing your dealer/retailer and request... an appointment. A separate booklet entitled "Warranty and Owner Assistance Information" furnished with the Bumper to make any changes or discontinue the Roadside Assistance program at any time without notification. Towing and Road Service ...
...If your ownership experience, we and our participating dealers are proud to assist in both the U.S. GMC and General Motors of Canada Limited reserve the right to Bumper (Base Warranty Coverage period in Canada) and extended powertrain warranty in reducing your dealer/retailer and request... an appointment. A separate booklet entitled "Warranty and Owner Assistance Information" furnished with the Bumper to make any changes or discontinue the Roadside Assistance program at any time without notification. Towing and Road Service ...


