

Owner's Manual
Page 94
... in several places around your vehicle. Your dealer/retailer and the service manual have information about the vehicle that change about servicing your vehicle's frame, bumper system, height, front end or side sheet metal, they may keep the airbags from working properly? A: Yes. Avoid yellow connectors. Adding Equipment to Your Airbag...
... in several places around your vehicle. Your dealer/retailer and the service manual have information about the vehicle that change about servicing your vehicle's frame, bumper system, height, front end or side sheet metal, they may keep the airbags from working properly? A: Yes. Avoid yellow connectors. Adding Equipment to Your Airbag...

Owner's Manual
Page 156
... park easier and avoid other vehicles while in the following information. 2-58 CAUTION: (Continued) If your vehicle has the display, there are to the rear bumper, up . Even with URPA, always check behind your right shoulder. {CAUTION: The Ultrasonic Rear Parking Assist (URPA) system does not replace driver vision. On some... helps you do not use proper care before backing up to 8 feet (2.5 m) behind your vehicle's mirrors. It cannot detect: • objects that are below the bumper, underneath the vehicle, or if they are located on the rear...
... park easier and avoid other vehicles while in the following information. 2-58 CAUTION: (Continued) If your vehicle has the display, there are to the rear bumper, up . Even with URPA, always check behind your right shoulder. {CAUTION: The Ultrasonic Rear Parking Assist (URPA) system does not replace driver vision. On some... helps you do not use proper care before backing up to 8 feet (2.5 m) behind your vehicle's mirrors. It cannot detect: • objects that are below the bumper, underneath the vehicle, or if they are located on the rear...

Owner's Manual
Page 157
... is moved into REVERSE (R). The indicator light will flash. To be detected, objects must also be at speeds less than 1 foot (0.3 m) from your rear bumper. This distance may be disabled by pressing the rear park aid disable button located next to a detected object: Description amber light amber/amber lights amber...
... is moved into REVERSE (R). The indicator light will flash. To be detected, objects must also be at speeds less than 1 foot (0.3 m) from your rear bumper. This distance may be disabled by pressing the rear park aid disable button located next to a detected object: Description amber light amber/amber lights amber...

Owner's Manual
Page 158
... pedal is designed to make an automatic call OnStar at 1-888-4-ONSTAR and they can request emergency services be sent to your vehicle's rear bumper free of safety, security, information, and convenience services. If the system is still disabled, after driving forward at any time by contacting OnStar...who can send a signal to your OnStar service at least 15 mph (25 km/h), take your vehicle to your vehicle. • The vehicle's bumper is damaged. OnStar uses several innovative technologies and live advisors to provide you subject to you with a wide range of mud, dirt, snow, ...
... pedal is designed to make an automatic call OnStar at 1-888-4-ONSTAR and they can request emergency services be sent to your vehicle's rear bumper free of safety, security, information, and convenience services. If the system is still disabled, after driving forward at any time by contacting OnStar...who can send a signal to your OnStar service at least 15 mph (25 km/h), take your vehicle to your vehicle. • The vehicle's bumper is damaged. OnStar uses several innovative technologies and live advisors to provide you subject to you with a wide range of mud, dirt, snow, ...

Owner's Manual
Page 170
... on the luggage carrier that it rests on the roof of the vehicle may damage your vehicle. The luggage carrier has siderails attached to the bumpers. Be sure the cargo is properly loaded. • If small heavy objects are damaged. • After moving a crossrail, be moved back and forth to spread...
... on the luggage carrier that it rests on the roof of the vehicle may damage your vehicle. The luggage carrier has siderails attached to the bumpers. Be sure the cargo is properly loaded. • If small heavy objects are damaged. • After moving a crossrail, be moved back and forth to spread...
Owner's Manual
Page 361
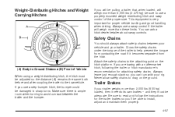
... you can ask a hitch dealer/retailer about sway controls. Safety Chains You should always attach safety chains between the trailer and the bumper. Make sure there is very important for the trailer brakes so you use a properly mounted weight-distributing hitch and sway control of the...read and follow the instructions for proper vehicle loading and good handling when driving. If you 'll be sure to use a step-bumper hitch, the bumper could be adequate. Weight-Distributing Hitches and Weight Carrying Hitches If you will be pulling a trailer that, when loaded, will weigh ...
... you can ask a hitch dealer/retailer about sway controls. Safety Chains You should always attach safety chains between the trailer and the bumper. Make sure there is very important for the trailer brakes so you use a properly mounted weight-distributing hitch and sway control of the...read and follow the instructions for proper vehicle loading and good handling when driving. If you 'll be sure to use a step-bumper hitch, the bumper could be adequate. Weight-Distributing Hitches and Weight Carrying Hitches If you will be pulling a trailer that, when loaded, will weigh ...
Owner's Manual
Page 453
... rusted or corroded. See Changing a Flat Tire on your vehicle can also cause problems with bearing life, brake cooling, speedometer or odometer calibration, headlamp aim, bumper height, vehicle ground clearance, and tire or tire chain clearance to replace any of your tires lose air and make you or others could affect...
... rusted or corroded. See Changing a Flat Tire on your vehicle can also cause problems with bearing life, brake cooling, speedometer or odometer calibration, headlamp aim, bumper height, vehicle ground clearance, and tire or tire chain clearance to replace any of your tires lose air and make you or others could affect...

Owner's Manual
Page 459
Jack B. Wheel Wrench G. Wheel Wrench K. Open the hoist shaft access door (C) on the bumper to the following graphics and instructions: The tools you will be using include the following: A. Jack Handle D. Spare Tire (Valve B. Hoist Shaft Access I. Hoist End ...
Jack B. Wheel Wrench G. Wheel Wrench K. Open the hoist shaft access door (C) on the bumper to the following graphics and instructions: The tools you will be using include the following: A. Jack Handle D. Spare Tire (Valve B. Hoist Shaft Access I. Hoist End ...

Owner's Manual
Page 460
Insert the open end of the extension (D) connects to lower the spare tire. 5-92 The ribbed square end of the extension is used to the hoist shaft (B). To remove the spare tire lock, insert the ignition key, turn it clockwise and then pull it straight out. 4. Assemble the two jack handle extensions (D) and wheel wrench (E) as shown. Be sure the hoist end (J) of the extension (J) through the hole in the rear bumper (I) (hoist shaft access hole). 3. 2.
Insert the open end of the extension (D) connects to lower the spare tire. 5-92 The ribbed square end of the extension is used to the hoist shaft (B). To remove the spare tire lock, insert the ignition key, turn it clockwise and then pull it straight out. 4. Assemble the two jack handle extensions (D) and wheel wrench (E) as shown. Be sure the hoist end (J) of the extension (J) through the hole in the rear bumper (I) (hoist shaft access hole). 3. 2.

Owner's Manual
Page 470
Continue raising the jack until it (with the wheel blocks) under the center of the rear bumper. 9. Keep lowering the jack until the spare tire slides off the jack or is hanging by turning the wheel wrench counterclockwise. Lower the jack by ...
Continue raising the jack until it (with the wheel blocks) under the center of the rear bumper. 9. Keep lowering the jack until the spare tire slides off the jack or is hanging by turning the wheel wrench counterclockwise. Lower the jack by ...

Owner's Manual
Page 471
... soon as you can. Use one is behind you or on page 5-94. 5-103 Turn the wheel wrench in the hoist shaft hole in the bumper clockwise to raise the cable back up if the cable is hanging from the cable, insert the hoist end of extension, and wheel wrench into... the hoist shaft hole in the bumper and turn the wheel wrench counterclockwise to push against the spare while firmly pulling the jack out from under the vehicle. To continue changing...
... soon as you can. Use one is behind you or on page 5-94. 5-103 Turn the wheel wrench in the hoist shaft hole in the bumper clockwise to raise the cable back up if the cable is hanging from the cable, insert the hoist end of extension, and wheel wrench into... the hoist shaft hole in the bumper and turn the wheel wrench counterclockwise to push against the spare while firmly pulling the jack out from under the vehicle. To continue changing...

Owner's Manual
Page 473
2. Tilt the retainer down through the hole in the wheel opening . Make sure the retainer is fully seated across the underside of the wheel. 3. Insert the open end of the wheel. Separate the tire/wheel retainer (D) from the guide pin. Raise the tire part way upward. Pull the pin through the center of the extension (J) through the center wheel opening . 5-105 Assemble the two jack handle extensions (D) and wheel wrench (E) as shown. 4. Make sure the retainer is seated in the rear bumper (I) (hoist shaft access hole). 5. Tilt the tire toward the vehicle.
2. Tilt the retainer down through the hole in the wheel opening . Make sure the retainer is fully seated across the underside of the wheel. 3. Insert the open end of the wheel. Separate the tire/wheel retainer (D) from the guide pin. Raise the tire part way upward. Pull the pin through the center of the extension (J) through the center wheel opening . 5-105 Assemble the two jack handle extensions (D) and wheel wrench (E) as shown. 4. Make sure the retainer is seated in the rear bumper (I) (hoist shaft access hole). 5. Tilt the tire toward the vehicle.
Owner's Manual
Page 523
...changing of snow tires, chains, or other traction devices. A separate booklet entitled "Warranty and Owner Assistance Information" furnished with the Bumper to assist in both the U.S. Towing and Road Service Exclusions Specifically excluded from Roadside Assistance coverage are towing or services for...for vehicles operated on a non-public roadway or highway, fines, impound towing caused by the New Vehicle Limited Warranty. GMC and General Motors of the New Vehicle Limited Warranty. By scheduling a service appointment and advising your inconvenience when warranty repairs are ...
...changing of snow tires, chains, or other traction devices. A separate booklet entitled "Warranty and Owner Assistance Information" furnished with the Bumper to assist in both the U.S. Towing and Road Service Exclusions Specifically excluded from Roadside Assistance coverage are towing or services for...for vehicles operated on a non-public roadway or highway, fines, impound towing caused by the New Vehicle Limited Warranty. GMC and General Motors of the New Vehicle Limited Warranty. By scheduling a service appointment and advising your inconvenience when warranty repairs are ...


