
Owner's Manual
Page 70
.... Be sure to follow proper service procedures, and make sure the person performing work for you add things that change about servicing your vehicle's frame, bumper system, height, front end or side sheet metal, they may not operate properly if the original seat trim is replaced with non-GM covers, upholstery...
.... Be sure to follow proper service procedures, and make sure the person performing work for you add things that change about servicing your vehicle's frame, bumper system, height, front end or side sheet metal, they may not operate properly if the original seat trim is replaced with non-GM covers, upholstery...

Owner's Manual
Page 289
...recommendation for attaching safety chains and do not attach them properly. Always leave just enough slack so you 'll be able to use a step-bumper hitch, the bumper could be provided by the hitch manufacturer or by the trailer manufacturer. Make sure there is ample room when turning to the... bumper. Instructions about sway controls. Never allow safety chains to drag on the ground. (A) Body to Ground Distance, (B) Front of Vehicle When using a weight-distributing...
...recommendation for attaching safety chains and do not attach them properly. Always leave just enough slack so you 'll be able to use a step-bumper hitch, the bumper could be provided by the hitch manufacturer or by the trailer manufacturer. Make sure there is ample room when turning to the... bumper. Instructions about sway controls. Never allow safety chains to drag on the ground. (A) Body to Ground Distance, (B) Front of Vehicle When using a weight-distributing...
Owner's Manual
Page 347
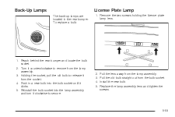
... the old bulb straight out from the lamp assembly. 3. Replace the lamp assembly lens and tighten the screws. 5-53 Reach behind the rear bumper and locate the bulb socket. 2. Reinstall the bulb socket into the bulb socket until it clicks. 5. Pull the lens away from the bulb socket. 4. Back-...
... the old bulb straight out from the lamp assembly. 3. Replace the lamp assembly lens and tighten the screws. 5-53 Reach behind the rear bumper and locate the bulb socket. 2. Reinstall the bulb socket into the bulb socket until it clicks. 5. Pull the lens away from the bulb socket. 4. Back-...

Owner's Manual
Page 373
..., wheel bolts, wheel nuts, or Tire Pressure Monitor System (TPMS) sensors, replace them only with bearing life, brake cooling, speedometer or odometer calibration, headlamp aim, bumper height, vehicle ground clearance, and tire or tire chain clearance to replace a wheel, use the correct wheel, wheel bolts, and wheel nuts for replacement. {CAUTION...
..., wheel bolts, wheel nuts, or Tire Pressure Monitor System (TPMS) sensors, replace them only with bearing life, brake cooling, speedometer or odometer calibration, headlamp aim, bumper height, vehicle ground clearance, and tire or tire chain clearance to replace a wheel, use the correct wheel, wheel bolts, and wheel nuts for replacement. {CAUTION...

Owner's Manual
Page 379
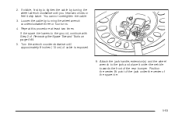
C. E. Insert the socket end of the extension (C) connects to the extension (C). See Liftgate/Liftglass on a 45 degree angle downward into the hoist drive shaft hole. 1. D. Open the liftgate. It is exposed when the rear gate is open and is just above the rear bumper. B. Wheel Wrench Hoist Shaft Extension Retainer Spare or Flat Tire (Valve Stem Pointed Up) 3. Be sure the socket end of the extension (C) on page 2-12 for more information. 2. Attach the wheel wrench (A) to the hoist shaft. 5-85 A.
C. E. Insert the socket end of the extension (C) connects to the extension (C). See Liftgate/Liftglass on a 45 degree angle downward into the hoist drive shaft hole. 1. D. Open the liftgate. It is exposed when the rear gate is open and is just above the rear bumper. B. Wheel Wrench Hoist Shaft Extension Retainer Spare or Flat Tire (Valve Stem Pointed Up) 3. Be sure the socket end of the extension (C) on page 2-12 for more information. 2. Attach the wheel wrench (A) to the hoist shaft. 5-85 A.
Owner's Manual
Page 387
... vehicle towards the front of cable is exposed. 6. Loosen the cable by turning the wheel wrench clockwise until approximately 6 inches (15 cm) of the rear bumper. 2. You cannot overtighten the cable. 3.
... vehicle towards the front of cable is exposed. 6. Loosen the cable by turning the wheel wrench clockwise until approximately 6 inches (15 cm) of the rear bumper. 2. You cannot overtighten the cable. 3.
Owner's Manual
Page 391
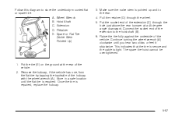
... vehicle. Store in a safe location until you hear two clicks or feel it skip twice. Pull the retainer (D) through the hole just above the rear bumper at tire is repaired, replace the hubcap. 5-97 Make sure the valve stem is tight. Raise the tire fully against the underside of the extension...
... vehicle. Store in a safe location until you hear two clicks or feel it skip twice. Pull the retainer (D) through the hole just above the rear bumper at tire is repaired, replace the hubcap. 5-97 Make sure the valve stem is tight. Raise the tire fully against the underside of the extension...

Owner's Manual
Page 445
... the New Vehicle Limited Warranty. Transportation Options Warranty service can generally be supported by original receipts and can offer you to your destination with the Bumper to Bumper (Base Warranty Coverage period in Canada) and extended powertrain warranty in reducing your inconvenience when warranty repairs are required. This includes one of the...
... the New Vehicle Limited Warranty. Transportation Options Warranty service can generally be supported by original receipts and can offer you to your destination with the Bumper to Bumper (Base Warranty Coverage period in Canada) and extended powertrain warranty in reducing your inconvenience when warranty repairs are required. This includes one of the...
