Owner's Manual
Page 70
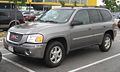
..., upholstery or trim, or with GM covers, upholstery or trim designed for the right front passenger's position, which includes sensors that change your vehicle's frame, bumper system, height, front end or side sheet metal, they may not operate properly if the original seat trim is qualified to an airbag...
..., upholstery or trim, or with GM covers, upholstery or trim designed for the right front passenger's position, which includes sensors that change your vehicle's frame, bumper system, height, front end or side sheet metal, they may not operate properly if the original seat trim is qualified to an airbag...

Owner's Manual
Page 289
... Be sure to Ground Distance, (B) Front of the proper size. Safety Chains You should always attach chains between the trailer and the bumper. Never allow safety chains to drag on the ground. (A) Body to read and follow the instructions for proper vehicle loading and good ... so you will be adequate. Instructions about sway controls. If you can ask a hitch dealer about safety chains may be able to the bumper. Weight Distributing Hitches and Weight Carrying Hitches control of Vehicle When using a weight-distributing hitch, the hitch must be pulling a trailer that,...
... Be sure to Ground Distance, (B) Front of the proper size. Safety Chains You should always attach chains between the trailer and the bumper. Never allow safety chains to drag on the ground. (A) Body to read and follow the instructions for proper vehicle loading and good ... so you will be adequate. Instructions about sway controls. If you can ask a hitch dealer about safety chains may be able to the bumper. Weight Distributing Hitches and Weight Carrying Hitches control of Vehicle When using a weight-distributing hitch, the hitch must be pulling a trailer that,...
Owner's Manual
Page 347
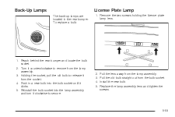
Reach behind the rear bumper and locate the bulb socket. 2. Reinstall the bulb socket into the bulb socket until it clicks. 5. Pull the old bulb straight out from the socket. 4. ...Replace the lamp assembly lens and tighten the screws. 5-53 To replace a bulb: License Plate Lamp 1. Turn it counterclockwise to secure. 2. Push in the rear bumper. Back-Up Lamps The back-up lamps are located in a new bulb into the lamp assembly and turn it clockwise to remove from the lamp...
Reach behind the rear bumper and locate the bulb socket. 2. Reinstall the bulb socket into the bulb socket until it clicks. 5. Pull the old bulb straight out from the socket. 4. ...Replace the lamp assembly lens and tighten the screws. 5-53 To replace a bulb: License Plate Lamp 1. Turn it counterclockwise to secure. 2. Push in the rear bumper. Back-Up Lamps The back-up lamps are located in a new bulb into the lamp assembly and turn it clockwise to remove from the lamp...

Owner's Manual
Page 373
..., wheel bolts, wheel nuts, or Tire Pressure Monitor System (TPMS) sensors, replace them only with bearing life, brake cooling, speedometer or odometer calibration, headlamp aim, bumper height, vehicle ground clearance, and tire or tire chain clearance to have the right wheel, wheel bolts, wheel nuts, and TPMS sensors for replacement. {CAUTION...
..., wheel bolts, wheel nuts, or Tire Pressure Monitor System (TPMS) sensors, replace them only with bearing life, brake cooling, speedometer or odometer calibration, headlamp aim, bumper height, vehicle ground clearance, and tire or tire chain clearance to have the right wheel, wheel bolts, wheel nuts, and TPMS sensors for replacement. {CAUTION...

Owner's Manual
Page 379
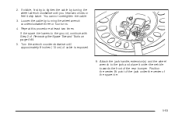
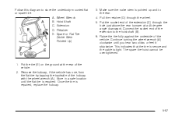
Insert the socket end of the extension (C) connects to the extension (C). D. Attach the wheel wrench (A) to the hoist shaft. 5-85 Be sure the socket end of the extension (C) on page 2-12 for more information. 2. Open the liftgate. A. It is exposed when the rear gate is open and is just above the rear bumper. Wheel Wrench Hoist Shaft Extension Retainer Spare or Flat Tire (Valve Stem Pointed Up) 3. E. See Liftgate/Liftglass on a 45 degree angle downward into the hoist drive shaft hole. 1. B. C.
Insert the socket end of the extension (C) connects to the extension (C). D. Attach the wheel wrench (A) to the hoist shaft. 5-85 Be sure the socket end of the extension (C) on page 2-12 for more information. 2. Open the liftgate. A. It is exposed when the rear gate is open and is just above the rear bumper. Wheel Wrench Hoist Shaft Extension Retainer Spare or Flat Tire (Valve Stem Pointed Up) 3. E. See Liftgate/Liftglass on a 45 degree angle downward into the hoist drive shaft hole. 1. B. C.
Owner's Manual
Page 387
... the front of the spare tire. 5-93 Turn the wrench counterclockwise until you hear two clicks or feel it under the center of the rear bumper. Loosen the cable by turning the wheel wrench clockwise until approximately 6 inches (15 cm) of Removing the Spare Tire and Tools on page 5-84. 5. Attach...
... the front of the spare tire. 5-93 Turn the wrench counterclockwise until you hear two clicks or feel it under the center of the rear bumper. Loosen the cable by turning the wheel wrench clockwise until approximately 6 inches (15 cm) of Removing the Spare Tire and Tools on page 5-84. 5. Attach...
Owner's Manual
Page 391
... hubcap, if the vehicle has one, from the flat the rear of the vehicle. Pull the retainer (D) through the hole just above the rear bumper at or spare tire. A.
... hubcap, if the vehicle has one, from the flat the rear of the vehicle. Pull the retainer (D) through the hole just above the rear bumper at or spare tire. A.

Owner's Manual
Page 445
... unable to wait, GM helps to assist in both the U.S. customers, should reflect actual costs and be up to your destination with the Bumper to Bumper (Base Warranty Coverage period in Canada) and extended powertrain warranty in reducing your inconvenience when warranty repairs are proud to offer Courtesy Transportation, a customer...
... unable to wait, GM helps to assist in both the U.S. customers, should reflect actual costs and be up to your destination with the Bumper to Bumper (Base Warranty Coverage period in Canada) and extended powertrain warranty in reducing your inconvenience when warranty repairs are proud to offer Courtesy Transportation, a customer...
