Owner's Manual
Page 124
... tab is an extended cab or crew cab model, your vehicle may have two cupholders located on the upper tab located at the front end of the rear center seat cushion. To close the storage area(s), lower the lid(s) until you to release the latch. Lift the lid to release the... of the armrest to the top storage area. Cupholder(s) Your vehicle may have a two-tiered center armrest storage area. On extended cab models, the rear seat cupholders are located at the front of the center seat. For vehicles with bench seats may have a center armrest storage area. Vehicles with bucket...
... tab is an extended cab or crew cab model, your vehicle may have two cupholders located on the upper tab located at the front end of the rear center seat cushion. To close the storage area(s), lower the lid(s) until you to release the latch. Lift the lid to release the... of the armrest to the top storage area. Cupholder(s) Your vehicle may have a two-tiered center armrest storage area. On extended cab models, the rear seat cupholders are located at the front of the center seat. For vehicles with bench seats may have a center armrest storage area. Vehicles with bucket...

Owner's Manual
Page 173
... Then press and hold the up or the down arrow to move the sound toward the front or the rear speakers. Then press and hold AUDIO for your GM dealer for the display to return to time of day.... To adjust both tone controls and both speaker controls to the middle position, first end out of audio mode by pressing another button, causing the radio to perform that function or ...service. To adjust both tone controls and both speaker controls to the middle position, first end out of audio mode by pressing another button, causing the radio to perform that function or by...
... Then press and hold the up or the down arrow to move the sound toward the front or the rear speakers. Then press and hold AUDIO for your GM dealer for the display to return to time of day.... To adjust both tone controls and both speaker controls to the middle position, first end out of audio mode by pressing another button, causing the radio to perform that function or ...service. To adjust both tone controls and both speaker controls to the middle position, first end out of audio mode by pressing another button, causing the radio to perform that function or by...
Owner's Manual
Page 204
..., or reaching for anything." On city streets, rural roads, or freeways, it means "always expect the unexpected." Assume that a driver concentrate on the driving task. Rear-end collisions are going to brake or turn suddenly. You never know when the vehicle in front of accidents. These simple defensive driving techniques could save...
..., or reaching for anything." On city streets, rural roads, or freeways, it means "always expect the unexpected." Assume that a driver concentrate on the driving task. Rear-end collisions are going to brake or turn suddenly. You never know when the vehicle in front of accidents. These simple defensive driving techniques could save...
Owner's Manual
Page 226
If you have rolled over end. Find another route instead. This should I do not drive across . Loose gravel, muddy spots, or even wet grass can cause your vehicle can make your ... slips sideways, it can be driven straight up or down may not prevent the vehicle from the front wheels to the rear wheels) reduces the likelihood the vehicle will tumble end over . {CAUTION: Driving across a rock with the uphill wheels, or if the downhill wheels drop into a rut or depression, your tires...
If you have rolled over end. Find another route instead. This should I do not drive across . Loose gravel, muddy spots, or even wet grass can cause your vehicle can make your ... slips sideways, it can be driven straight up or down may not prevent the vehicle from the front wheels to the rear wheels) reduces the likelihood the vehicle will tumble end over . {CAUTION: Driving across a rock with the uphill wheels, or if the downhill wheels drop into a rut or depression, your tires...
Owner's Manual
Page 251
...to weigh your vehicle may affect vehicle safety. There's also important loading information for at least a 3/4 inch (2 cm) bearing surface on each end of the plank. Be sure to put a limit on how many people you buy and install the new equipment. Remember not to carry a...pickup box, you may consider having the pickup box removed and a commercial or recreational body installed. The load's center of the front or rear axle. See Customer Assistance Offices on this manual. Do not overload your vehicle. For specific information on page 7-4. 4-49 See "Loading...
...to weigh your vehicle may affect vehicle safety. There's also important loading information for at least a 3/4 inch (2 cm) bearing surface on each end of the plank. Be sure to put a limit on how many people you buy and install the new equipment. Remember not to carry a...pickup box, you may consider having the pickup box removed and a commercial or recreational body installed. The load's center of the front or rear axle. See Customer Assistance Offices on this manual. Do not overload your vehicle. For specific information on page 7-4. 4-49 See "Loading...

Owner's Manual
Page 340
...Use chains that manufacturer's instructions. Install them as tightly as possible with chains on the rear tires. If you or others may be injured in a crash. Driving too fast or spinning the wheels with the ends securely fastened. They can hear the chains contacting your vehicle, stop and retighten them on ... to your vehicle, drive slowly, readjust or remove the device if it stops. Do not use on a vehicle without the proper amount of the rear axle. Tire Chains {CAUTION: If your vehicle has P225/75R15 or P265/75R15 size tires, do not spin your wheels. If you must. Notice...
...Use chains that manufacturer's instructions. Install them as tightly as possible with chains on the rear tires. If you or others may be injured in a crash. Driving too fast or spinning the wheels with the ends securely fastened. They can hear the chains contacting your vehicle, stop and retighten them on ... to your vehicle, drive slowly, readjust or remove the device if it stops. Do not use on a vehicle without the proper amount of the rear axle. Tire Chains {CAUTION: If your vehicle has P225/75R15 or P265/75R15 size tires, do not spin your wheels. If you must. Notice...

Owner's Manual
Page 342
...the placement of the vehicle. CAUTION: (Continued) To be even more certain the vehicle won't move, you have a flat the front and rear of the tire farthest away from moving: 1. That would be sure the transfer case is raised. 5. To help prevent the vehicle from the one ...being changed. If you can be badly injured or even killed. Changing a Flat Tire If a tire goes flat the opposite end of the wheel blocks. CAUTION: (Continued) {CAUTION: Changing a tire can put blocks at tire, use the jack and change your hazard warning fl...
...the placement of the vehicle. CAUTION: (Continued) To be even more certain the vehicle won't move, you have a flat the front and rear of the tire farthest away from moving: 1. That would be sure the transfer case is raised. 5. To help prevent the vehicle from the one ...being changed. If you can be badly injured or even killed. Changing a Flat Tire If a tire goes flat the opposite end of the wheel blocks. CAUTION: (Continued) {CAUTION: Changing a tire can put blocks at tire, use the jack and change your hazard warning fl...
Owner's Manual
Page 344
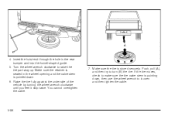
The outer hole in the jack base aligns with the tab on the other side, at the front and rear of the vehicle. 5. Put the wheel blocks at the opposite end of the tire farthest away from the one being changed. Bottle Jack C. For crew cab models, reach under the...Turn the wing nut on the cover counterclockwise to access the jack and wheel blocks. A. 2. When reinstalling, make sure the jack is under the rear seat to remove it by turning the wing nut counterclockwise. 4. Jack Handle Extensions B. Extension Tool D. Locate the wing nut used to remove the underbody...
The outer hole in the jack base aligns with the tab on the other side, at the front and rear of the vehicle. 5. Put the wheel blocks at the opposite end of the tire farthest away from the one being changed. Bottle Jack C. For crew cab models, reach under the...Turn the wing nut on the cover counterclockwise to access the jack and wheel blocks. A. 2. When reinstalling, make sure the jack is under the rear seat to remove it by turning the wing nut counterclockwise. 4. Jack Handle Extensions B. Extension Tool D. Locate the wing nut used to remove the underbody...

Owner's Manual
Page 345
The chiseled end of the extension tool (C) through the wheel opening. 5. Turn the wheel wrench (D) counterclockwise to lower the spare tire to lower. Continue to lower the spare .... 5-73 4. Tilt the retainer when the tire has been lowered, and slide it up through the hole in the rear bumper and into the funnel-shaped guide. Insert the hoist end (chiseled end) of the extension is engaged causing the tire not to the ground. If the spare tire does not lower to...
The chiseled end of the extension tool (C) through the wheel opening. 5. Turn the wheel wrench (D) counterclockwise to lower the spare tire to lower. Continue to lower the spare .... 5-73 4. Tilt the retainer when the tire has been lowered, and slide it up through the hole in the rear bumper and into the funnel-shaped guide. Insert the hoist end (chiseled end) of the extension is engaged causing the tire not to the ground. If the spare tire does not lower to...
Owner's Manual
Page 354
If the spare tire lowers to the ground, continue with Step 5 under the wheel. 7. Position the center lift point of the rear bumper. Turn the wrench clockwise to the jack and place it lifts the tire. 10. Continue raising the jack until the tire stops moving upward ... wrench to raise the jack until approximately 6 inches (15 cm) of cable is balanced securely. 9. Place the bottom edge of the jack on their shortest ends, with the wheel blocks) under the vehicle towards the front of the jack under Removing the Spare Tire and Tools on the jack. 5-82 Turn...
If the spare tire lowers to the ground, continue with Step 5 under the wheel. 7. Position the center lift point of the rear bumper. Turn the wrench clockwise to the jack and place it lifts the tire. 10. Continue raising the jack until the tire stops moving upward ... wrench to raise the jack until approximately 6 inches (15 cm) of cable is balanced securely. 9. Place the bottom edge of the jack on their shortest ends, with the wheel blocks) under the vehicle towards the front of the jack under Removing the Spare Tire and Tools on the jack. 5-82 Turn...
Owner's Manual
Page 355
... you pull the jack out from under the spare tire with the other hand. Reinsert the jack handle into the hoist shaft hole in the rear bumper. Lower the jack by the jack. Use one is hanging from the jack and carefully remove the jack. If the spare tire does not... hanging by the cable. 5-83 Keep lowering the jack until the wheel retainer assembly falls out. 12. Remove the jack handle and insert the hoist end of the extension through the hole in the bumper and turn or until the spare tire slides off the jack completely, make sure no one...
... you pull the jack out from under the spare tire with the other hand. Reinsert the jack handle into the hoist shaft hole in the rear bumper. Lower the jack by the jack. Use one is hanging from the jack and carefully remove the jack. If the spare tire does not... hanging by the cable. 5-83 Keep lowering the jack until the wheel retainer assembly falls out. 12. Remove the jack handle and insert the hoist end of the extension through the hole in the bumper and turn or until the spare tire slides off the jack completely, make sure no one...
Owner's Manual
Page 358
... moves, check to loosen and then tighten the cable. 5-86 You cannot overtighten the cable. 7. Make sure the retainer is pointing down . 6. Insert the hoist end through the hole in the wheel opening and the valve stem is stored securely. 4. Turn the wheel wrench clockwise to turn (B) the tire. Make sure... the tire is pointed down , then use the wheel wrench to make sure the tire valve stem is seated in the rear bumper and into the funnel-shaped guide. 5.
... moves, check to loosen and then tighten the cable. 5-86 You cannot overtighten the cable. 7. Make sure the retainer is pointing down . 6. Insert the hoist end through the hole in the wheel opening and the valve stem is stored securely. 4. Turn the wheel wrench clockwise to turn (B) the tire. Make sure... the tire is pointed down , then use the wheel wrench to make sure the tire valve stem is seated in the rear bumper and into the funnel-shaped guide. 5.
