
Owner's Manual
Page 12
But don't have a seatback reclined if your seatback, lift the lever on the seatback, the seat will go to an upright position. 1-6 To manually recline your vehicle is moving the control toward the front ...
But don't have a seatback reclined if your seatback, lift the lever on the seatback, the seat will go to an upright position. 1-6 To manually recline your vehicle is moving the control toward the front ...
Owner's Manual
Page 15
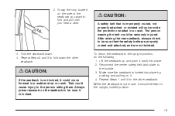
... the rear seatback, always check to fold down . 4. Make sure the seatback is locked. 1-9 Repeat Steps 2 and 3 to be kept in a sudden stop or crash. Lift the seatback up and push it back into place by pushing and pulling on the side of the seatback you want to the person sitting...
... the rear seatback, always check to fold down . 4. Make sure the seatback is locked. 1-9 Repeat Steps 2 and 3 to be kept in a sudden stop or crash. Lift the seatback up and push it back into place by pushing and pulling on the side of the seatback you want to the person sitting...
Owner's Manual
Page 93
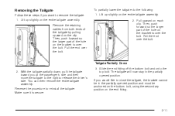
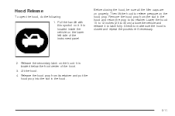
Lift up slightly on the entire tailgate assembly. 2. Then, push forward so the larger part of the hole on the bracket is secure. 3. Make sure it ... Tailgate Follow these steps if you want to reinstall the tailgate. Pull the end over the bolt. To partially lower the tailgate do the following: 1. Lift up slightly on the end fitting. 2-11 Pull the end over the bolt. With the tailgate partially down, pull the tailgate toward you at...
Lift up slightly on the entire tailgate assembly. 2. Then, push forward so the larger part of the hole on the bracket is secure. 3. Make sure it ... Tailgate Follow these steps if you want to reinstall the tailgate. Pull the end over the bolt. To partially lower the tailgate do the following: 1. Lift up slightly on the end fitting. 2-11 Pull the end over the bolt. With the tailgate partially down, pull the tailgate toward you at...
Owner's Manual
Page 124
... lower tab to release the latch. To close . Vehicles with the lid of the center seat. Storage Areas Glove Box To open the storage area. Lift the lid to the front of the lower storage area. Then, raise the lid of the armrest to access the bottom storage area.... Lift up on the lever. Lift up with bench seats may have a two-tiered center armrest storage area. Lift the lid to open the glove box, pull on the upper tab located at the front of...
... lower tab to release the latch. To close . Vehicles with the lid of the center seat. Storage Areas Glove Box To open the storage area. Lift the lid to the front of the lower storage area. Then, raise the lid of the armrest to access the bottom storage area.... Lift up on the lever. Lift up with bench seats may have a two-tiered center armrest storage area. Lift the lid to open the glove box, pull on the upper tab located at the front of...
Owner's Manual
Page 125
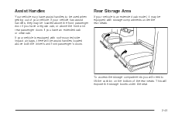
... crew cab. If your vehicle is an extended cab model, it may be located above the front passenger door if you have assist handles to lift the cushion on the bottom of your vehicle is equipped with roof-mounted side impact air bags, there will be equipped with storage compartments under...
... crew cab. If your vehicle is an extended cab model, it may be located above the front passenger door if you have assist handles to lift the cushion on the bottom of your vehicle is equipped with roof-mounted side impact air bags, there will be equipped with storage compartments under...
Owner's Manual
Page 126
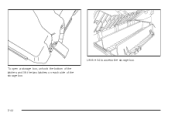
To open a storage box, unhook the bottom of the latches and lift the two latches on each side of the storage box. 2-44 Lift the lid to access the storage box.
To open a storage box, unhook the bottom of the latches and lift the two latches on each side of the storage box. 2-44 Lift the lid to access the storage box.

Owner's Manual
Page 147
... Defogging and Defrosting Fog on the inside of your vehicle more quickly. Use the defog mode to change the direction of the air flow. Lift up or push down , or slide the thumbwheel to the left or right to direct the airflow from the windshield before defrosting. When...
... Defogging and Defrosting Fog on the inside of your vehicle more quickly. Use the defog mode to change the direction of the air flow. Lift up or push down , or slide the thumbwheel to the left or right to direct the airflow from the windshield before defrosting. When...
Owner's Manual
Page 283
Then lift the hood to its retainer and put the hood prop into the slot in the hood and return the prop to relieve pressure on the ... closing the hood, be sure all the filler caps are on the hood. Release the hood prop from the slot in the hood. 5-11 Lift the hood. 4. Check to 30 cm) above the vehicle and release it . Release the secondary latch on properly.
Then lift the hood to its retainer and put the hood prop into the slot in the hood and return the prop to relieve pressure on the ... closing the hood, be sure all the filler caps are on the hood. Release the hood prop from the slot in the hood. 5-11 Lift the hood. 4. Check to 30 cm) above the vehicle and release it . Release the secondary latch on properly.

Owner's Manual
Page 290
... Scheduled Maintenance on page 6-4 for more information. If you are driving in dusty/dirty conditions, inspect the filter at the first oil change . Lift out the engine air cleaner/filter. 3. Fasten the clips to hold the cover on page 5-12 for more information on location. See Normal Maintenance...
... Scheduled Maintenance on page 6-4 for more information. If you are driving in dusty/dirty conditions, inspect the filter at the first oil change . Lift out the engine air cleaner/filter. 3. Fasten the clips to hold the cover on page 5-12 for more information on location. See Normal Maintenance...
Owner's Manual
Page 301
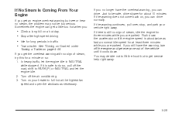
... Grades" under Towing a Trailer on a hot day. Turn off the engine and get the overheat warning with no steam, the problem may decide not to lift the hood but see or hear no sign of steam, try this for three minutes while you get everyone out of steam, idle the engine...
... Grades" under Towing a Trailer on a hot day. Turn off the engine and get the overheat warning with no steam, the problem may decide not to lift the hood but see or hear no sign of steam, try this for three minutes while you get everyone out of steam, idle the engine...
Owner's Manual
Page 302
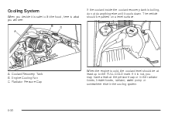
Cooling System When you decide it is safe to lift the hood, here is what you may have a leak at least up to the FULL COLD mark. If it cools down. Radiator Pressure Cap When the engine is not, you will see: If the coolant inside the coolant recovery tank is boiling, do not do anything else until it is cold, the coolant level should be at the pressure cap or in the radiator hoses, heater hoses, radiator, water pump or somewhere else in the cooling system. 5-30 Engine Cooling Fan C. A. The vehicle should be parked on a level surface. Coolant Recovery Tank B.
Cooling System When you decide it is safe to lift the hood, here is what you may have a leak at least up to the FULL COLD mark. If it cools down. Radiator Pressure Cap When the engine is not, you will see: If the coolant inside the coolant recovery tank is boiling, do not do anything else until it is cold, the coolant level should be at the pressure cap or in the radiator hoses, heater hoses, radiator, water pump or somewhere else in the cooling system. 5-30 Engine Cooling Fan C. A. The vehicle should be parked on a level surface. Coolant Recovery Tank B.
Owner's Manual
Page 322
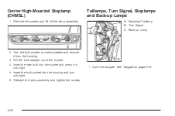
Pull the bulb straight out of the socket. 4. Insert the new bulb into the housing and turn until tight. 5. See Tailgate on page 2-10. 5-50 Stoplamp/Taillamp B. Turn Signal C. Back-up Lamps A. Open the tailgate. Center High-Mounted Stoplamp (CHMSL) 1. Taillamps, Turn Signal, Stoplamps and Back-up Lamp 2. Reinstall the lamp assembly and tighten the screws. 1. Remove the screws and lift off the lamp assembly. Turn the bulb socket counterclockwise and remove it in until tight. 6. Insert the bulb socket into the socket and press it from the housing. 3.
Pull the bulb straight out of the socket. 4. Insert the new bulb into the housing and turn until tight. 5. See Tailgate on page 2-10. 5-50 Stoplamp/Taillamp B. Turn Signal C. Back-up Lamps A. Open the tailgate. Center High-Mounted Stoplamp (CHMSL) 1. Taillamps, Turn Signal, Stoplamps and Back-up Lamp 2. Reinstall the lamp assembly and tighten the screws. 1. Remove the screws and lift off the lamp assembly. Turn the bulb socket counterclockwise and remove it in until tight. 6. Insert the bulb socket into the socket and press it from the housing. 3.
Owner's Manual
Page 324
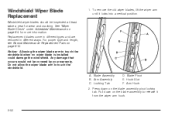
... F. Arm Hook 2. Any damage that occurs would not be inspected at least twice a year for more information. Blade Pivot E. To remove the old wiper blades, lift the wiper arm until it from the wiper arm hook. 5-52 Pull down on the blade assembly to release it locks into a vertical position. Windshield...
... F. Arm Hook 2. Any damage that occurs would not be inspected at least twice a year for more information. Blade Pivot E. To remove the old wiper blades, lift the wiper arm until it from the wiper arm hook. 5-52 Pull down on the blade assembly to release it locks into a vertical position. Windshield...

Owner's Manual
Page 341
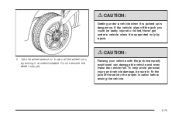
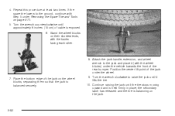
... part shows how to use in a skid. Steer to maintain lane position, and then gently brake to a stop , well off the road if possible. {CAUTION: Lifting a vehicle and getting under control by steering the way you want the vehicle to leak out slowly. In any rear blowout, remove your foot off...
... part shows how to use in a skid. Steer to maintain lane position, and then gently brake to a stop , well off the road if possible. {CAUTION: Lifting a vehicle and getting under control by steering the way you want the vehicle to leak out slowly. In any rear blowout, remove your foot off...
Owner's Manual
Page 347
Do not remove the wheel nuts yet. Use the wheel wrench to fit the jack lift head into the proper location before raising the vehicle. 5-75 Never get under a vehicle when it is dangerous. To help avoid personal injury and vehicle ...
Do not remove the wheel nuts yet. Use the wheel wrench to fit the jack lift head into the proper location before raising the vehicle. 5-75 Never get under a vehicle when it is dangerous. To help avoid personal injury and vehicle ...
Owner's Manual
Page 354
... the jack. 5-82 Turn the wrench counterclockwise until it (with the backs facing each other. 8. Turn the wrench clockwise to the jack and place it lifts the tire. 10. Repeat this procedure at least two times. Attach the jack handle, extension, and wheel wrench to raise the jack until approximately 6 inches...
... the jack. 5-82 Turn the wrench counterclockwise until it (with the backs facing each other. 8. Turn the wrench clockwise to the jack and place it lifts the tire. 10. Repeat this procedure at least two times. Attach the jack handle, extension, and wheel wrench to raise the jack until approximately 6 inches...

Owner's Manual
Page 372
To reinstall the cover, line up the tab and push down on location. See Engine Compartment Overview on page 5-12 for more information on the cover until the tab clicks into place. Fuse 1 2 5 8 9 10 11 Usage Brake Switch, Stoplamps Auxiliary Power 1 Air Conditioning Control Head Wiper/Washer Switch Fog Lamps (If Equipped) Ignition Transducers Driver's Side Headlamp 5-100 Engine Compartment Fuse Block The engine compartment fuse block is located on the driver's side of the cover and lift. To remove the cover, push in on the tab on the end of the engine compartment.
To reinstall the cover, line up the tab and push down on location. See Engine Compartment Overview on page 5-12 for more information on the cover until the tab clicks into place. Fuse 1 2 5 8 9 10 11 Usage Brake Switch, Stoplamps Auxiliary Power 1 Air Conditioning Control Head Wiper/Washer Switch Fog Lamps (If Equipped) Ignition Transducers Driver's Side Headlamp 5-100 Engine Compartment Fuse Block The engine compartment fuse block is located on the driver's side of the cover and lift. To remove the cover, push in on the tab on the end of the engine compartment.
Owner's Manual
Page 399
... details, or to $1,000 toward eligible aftermarket driver's or passenger's adaptive equipment you up to determine your vehicle, such as hand controls and wheelchair/scooter lifts. Call 1-800-GM-DRIVE (463-7483) for your vehicle's eligibility, visit gmmobility.com or call the GM Mobility Assistance Center at 1-800-323-9935...
... details, or to $1,000 toward eligible aftermarket driver's or passenger's adaptive equipment you up to determine your vehicle, such as hand controls and wheelchair/scooter lifts. Call 1-800-GM-DRIVE (463-7483) for your vehicle's eligibility, visit gmmobility.com or call the GM Mobility Assistance Center at 1-800-323-9935...
