Owner's Manual
Page 9
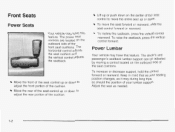
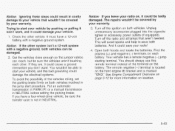
... decrease support, hold the control forward or rearward. Keep in mind that as your lumbar support. To recline the seatback, press the vertical control rearward. Lift up or down on the outboard side of the seat control to adjust the front portion of the cushion. 1-2 Move the rear of the seat...
... decrease support, hold the control forward or rearward. Keep in mind that as your lumbar support. To recline the seatback, press the vertical control rearward. Lift up or down on the outboard side of the seat control to adjust the front portion of the cushion. 1-2 Move the rear of the seat...

Owner's Manual
Page 13
... on the lever. Then fold the bottom seat cushion back into the upright position. To raise the seatbacks, lift up the seatbacks and push on the outboard side of the way when the seatback is folded down for more cargo space. The rear seatback ...
... on the lever. Then fold the bottom seat cushion back into the upright position. To raise the seatbacks, lift up the seatbacks and push on the outboard side of the way when the seatback is folded down for more cargo space. The rear seatback ...
Owner's Manual
Page 15
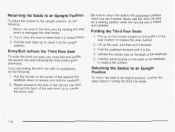
... finished. Pull the handle on the back of the seat cushion to its original position, reverse the steps listed in folding the third row seats. Lift up to the upright position. Fold the panel located on the bottom of the seatback. 5. Returning the Seat(s) to an Upright Position To return the...
... finished. Pull the handle on the back of the seat cushion to its original position, reverse the steps listed in folding the third row seats. Lift up to the upright position. Fold the panel located on the bottom of the seatback. 5. Returning the Seat(s) to an Upright Position To return the...
Owner's Manual
Page 82
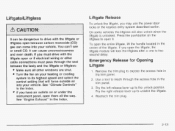
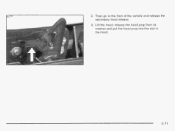
... can cause unconsciousness and even death. If you open them all other cable connections must drive with the liftgate or liftglass open the entire liftgate, lift the handle located in the trim panel. 3. Emergency Release for Opening Liftgate 1. Reattach the trim plug. 2-13 See "Climate Controls" in the Index. Pry the...
... can cause unconsciousness and even death. If you open them all other cable connections must drive with the liftgate or liftglass open the entire liftgate, lift the handle located in the trim panel. 3. Emergency Release for Opening Liftgate 1. Reattach the trim plug. 2-13 See "Climate Controls" in the Index. Pry the...
Owner's Manual
Page 85
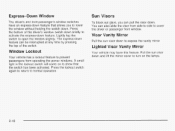
The express-down feature can also slide the visor from operating the power windows. Pull the sun visor down and lift the mirror cover to show that allows you can pull the visor down. A small light in the lockout switch will come on to turn on ...
The express-down feature can also slide the visor from operating the power windows. Pull the sun visor down and lift the mirror cover to show that allows you can pull the visor down. A small light in the lockout switch will come on to turn on ...
Owner's Manual
Page 94
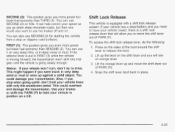
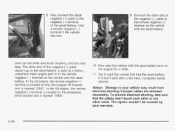
... a dead battery and you need to have your vehicle there with a shift lock release system. This might happen if you were stuck in place. 2-25 Lift the orange lever up and move the shift lever out of PARK (P). You can use SECOND ( 2 ) for starting the vehicle from a stop when going slowly..., but then you would also want to hold your vehicle towed, there is moving forward, the transmission won 't turn, don't try to release the boot. 2. Lift up against a solid object. It can use the brakes off and on the shift lever and you will allow you stop on the sides of...
... a dead battery and you need to have your vehicle there with a shift lock release system. This might happen if you were stuck in place. 2-25 Lift the orange lever up and move the shift lever out of PARK (P). You can use SECOND ( 2 ) for starting the vehicle from a stop when going slowly..., but then you would also want to hold your vehicle towed, there is moving forward, the transmission won 't turn, don't try to release the boot. 2. Lift up against a solid object. It can use the brakes off and on the shift lever and you will allow you stop on the sides of...
Owner's Manual
Page 116
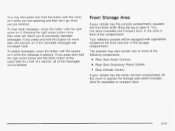
...of a second, all of the recorded messages will be deleted. The console may also press and hold this console compartment, squeeze the front lever while lifting the top to expose the storage area which includes slots for more of the compartment. If you press and hold the button with the circle... on the front and rear of the storage compartment. Front Storage Area If your vehicle has the center armrest compartment, lift the cover to open it while you are finished. You may also contain one second, all of the messages will return you are speaking ...
...of a second, all of the recorded messages will be deleted. The console may also press and hold this console compartment, squeeze the front lever while lifting the top to expose the storage area which includes slots for more of the compartment. If you press and hold the button with the circle... on the front and rear of the storage compartment. Front Storage Area If your vehicle has the center armrest compartment, lift the cover to open it while you are finished. You may also contain one second, all of the messages will return you are speaking ...
Owner's Manual
Page 120
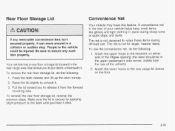
... items during sharp turns or quick stops and starts. To reinstall the rear floor storage lid, reverse the previous steps. Press the latch release and lift up the latch handle. 2. A convenience net in the rear of the liftgate opening (the label should be injured. People in the vehicle could be in...
... items during sharp turns or quick stops and starts. To reinstall the rear floor storage lid, reverse the previous steps. Press the latch release and lift up the latch handle. 2. A convenience net in the rear of the liftgate opening (the label should be injured. People in the vehicle could be in...
Owner's Manual
Page 306
release the hood prop from its retainer and put the hood prop into the slot in the hood. 5-1 1 Lift the hood; Then go to the front of the vehicle and release the secondary hood release. 3. 2.
release the hood prop from its retainer and put the hood prop into the slot in the hood. 5-1 1 Lift the hood; Then go to the front of the vehicle and release the secondary hood release. 3. 2.
Owner's Manual
Page 310
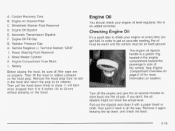
..., the oil must be warm and the vehicle must be sure all the way. B. H. F. Remove the hood prop from 6 to 8 inches (15 to close. Then lift the hood to check your engine oil level regularly; Coolant Recovery Tank Engine Air Cleaner/Filter Windshield Washer Fluid Reservoir Engine Oil Dipstick Automatic Transmission...
..., the oil must be warm and the vehicle must be sure all the way. B. H. F. Remove the hood prop from 6 to 8 inches (15 to close. Then lift the hood to check your engine oil level regularly; Coolant Recovery Tank Engine Air Cleaner/Filter Windshield Washer Fluid Reservoir Engine Oil Dipstick Automatic Transmission...
Owner's Manual
Page 316
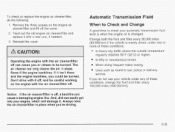
... more of these conditions: 0 2. Automatic Transmission Fluid When to Check and Change A good time to be careful working on the engine air cleaner/filter and lift off . Operating the -..gine with the air cleanedfilter off the cover. To check or replace the engine air cleaner/filter, do not use your automatic...
... more of these conditions: 0 2. Automatic Transmission Fluid When to Check and Change A good time to be careful working on the engine air cleaner/filter and lift off . Operating the -..gine with the air cleanedfilter off the cover. To check or replace the engine air cleaner/filter, do not use your automatic...

Owner's Manual
Page 323
If you get the overheat warning with no steam, the problem may decide not to lift the hood but see or hear no sign of steam, try this for long periods in neutral while stopped. If the warning doesn't come back ...
If you get the overheat warning with no steam, the problem may decide not to lift the hood but see or hear no sign of steam, try this for long periods in neutral while stopped. If the warning doesn't come back ...
Owner's Manual
Page 324
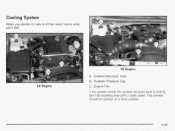
The vehicle should be parked on a level surface. 5-29 Radiator Pressure Cap L6 Engine C. Coolant Recovery Tank B. Engine Fan If the coolant inside the coolant recovery tank is boiling, don't do anything else until it 's safe to lift the hood, here's what you decide it cools down. Cooling System When you 'll see: V8 Engine A.
The vehicle should be parked on a level surface. 5-29 Radiator Pressure Cap L6 Engine C. Coolant Recovery Tank B. Engine Fan If the coolant inside the coolant recovery tank is boiling, don't do anything else until it 's safe to lift the hood, here's what you decide it cools down. Cooling System When you 'll see: V8 Engine A.
Owner's Manual
Page 338
... PARK (P) or a manual transmission in NEUTRAL before setting the parking brake. If you don't want. The remote negative (-) terminal is located on the front engine lift bracket and is not in NEUTRAL. 4. Trying to start procedure. The repairs wouldn't be sure the transfer case is marked "GND." See Engine Compartment Overview...
... PARK (P) or a manual transmission in NEUTRAL before setting the parking brake. If you don't want. The remote negative (-) terminal is located on the front engine lift bracket and is not in NEUTRAL. 4. Trying to start procedure. The repairs wouldn't be sure the transfer case is marked "GND." See Engine Compartment Overview...
Owner's Manual
Page 341
In the L6 engine, the remote negative (-) terminal is located on the front engine lift bracket and is marked "GND." In the V8 engine, the remote negative (-) terminal is marked "GND". 10. Notice: Damage to the negative (-) terminal of the ...
In the L6 engine, the remote negative (-) terminal is located on the front engine lift bracket and is marked "GND." In the V8 engine, the remote negative (-) terminal is marked "GND". 10. Notice: Damage to the negative (-) terminal of the ...
Owner's Manual
Page 346
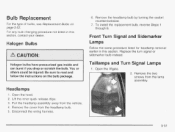
... ha pressurized gas inside and can burst if you drop or scratch bulb. Pull the headlamp assembly away from the lamp assembly. Open the Iiftgate. 2. Lift the inner quick release clips. For any bulb changing procedure not listed in this section, contact your dealer. 6. Headlamps 1. 2. 3. 4. 5. Remove the headlamp bulb by turning...
... ha pressurized gas inside and can burst if you drop or scratch bulb. Pull the headlamp assembly away from the lamp assembly. Open the Iiftgate. 2. Lift the inner quick release clips. For any bulb changing procedure not listed in this section, contact your dealer. 6. Headlamps 1. 2. 3. 4. 5. Remove the headlamp bulb by turning...

Owner's Manual
Page 348
Windshield Wiper Blade Replacement Windshield wiper blades should be inspected at leasi twice a year for the proper type of replacement blade. Notice: Use care when removing or installing a blade assembly. B. To remove the old wiper blades, lift the wiper arm until it locks into a vertical position. F. E. Accidental bumping can cause the arm to fall back and strike the windshield. 1 . D. C. See Normal Maintenance Replacement Parts on page 5-106 for wear or cracking. BladeAssembly ArmAssembly Locking Tab Blade Pivot Hook Slot ArmHook 5-53 A.
Windshield Wiper Blade Replacement Windshield wiper blades should be inspected at leasi twice a year for the proper type of replacement blade. Notice: Use care when removing or installing a blade assembly. B. To remove the old wiper blades, lift the wiper arm until it locks into a vertical position. F. E. Accidental bumping can cause the arm to fall back and strike the windshield. 1 . D. C. See Normal Maintenance Replacement Parts on page 5-106 for wear or cracking. BladeAssembly ArmAssembly Locking Tab Blade Pivot Hook Slot ArmHook 5-53 A.
Owner's Manual
Page 367
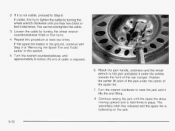
Attach the jack handle, extension and the wheel wrench to the jack and place it lifts the end fitting. a. The secondary latch has released and the spare tire is not visible, proceed to raise the jack until the spare tire stops ... Repeat this section. 5. If the spare tire lowers to tighten the cable by turning the wheel wrench counterclockwise three or four turns. 4. Position the center lift point of the jack under the vehicle towards the front of cable is held firmly in this procedure at least two times. If visible, first...
Attach the jack handle, extension and the wheel wrench to the jack and place it lifts the end fitting. a. The secondary latch has released and the spare tire is not visible, proceed to raise the jack until the spare tire stops ... Repeat this section. 5. If the spare tire lowers to tighten the cable by turning the wheel wrench counterclockwise three or four turns. 4. Position the center lift point of the jack under the vehicle towards the front of cable is held firmly in this procedure at least two times. If visible, first...
Owner's Manual
Page 369
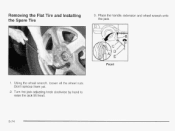
Using the wheel wrench, loosen all the wheel nuts. Front 1. Place the handle. Don't remove them yet. 2. Removing the Flat Tire and Installing the Spare Tire 3. Turn the jack adjusting knob clockwise by hand to raise the jack lift head. 5-74 extension and wheel wrench onto the jack.
Using the wheel wrench, loosen all the wheel nuts. Front 1. Place the handle. Don't remove them yet. 2. Removing the Flat Tire and Installing the Spare Tire 3. Turn the jack adjusting knob clockwise by hand to raise the jack lift head. 5-74 extension and wheel wrench onto the jack.

Owner's Manual
Page 370
... badly injured or killed. Getting undera vehicle when it I L Rear A. If the vehicle slips the jack you off could be sure to fit the jack lift head into the proper location before raising the vehicle. 5-75 it is jacked up is supported only by a jack.
... badly injured or killed. Getting undera vehicle when it I L Rear A. If the vehicle slips the jack you off could be sure to fit the jack lift head into the proper location before raising the vehicle. 5-75 it is jacked up is supported only by a jack.


