
Owner's Manual
Page 127
... ...3.106 Understanding Radio Reception ...3.106 Care of Your Cassette Tape Player ...3-107 Care of Your CDs and DVDs ...3-108 Care of Your CD and DVD Player ...3-108 Cleaning the Video Screen ...3-108 Fixed Mast Antenna ...3-108 Chime Level Adjustment ...3-108 ~ ~~ Audio System(s) ...3.63 Setting the Time ...3.63 Radio with CD ...3-...
... ...3.106 Understanding Radio Reception ...3.106 Care of Your Cassette Tape Player ...3-107 Care of Your CDs and DVDs ...3-108 Care of Your CD and DVD Player ...3-108 Cleaning the Video Screen ...3-108 Fixed Mast Antenna ...3-108 Chime Level Adjustment ...3-108 ~ ~~ Audio System(s) ...3.63 Setting the Time ...3.63 Radio with CD ...3-...
Owner's Manual
Page 217
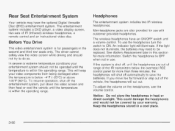
... try to be replaced. In severe or extreme temperature conditions your warranty. The wireless headphones have the optional Digital Versatile Disc (DVD) entertainment system. If the system is shut off the entertainment system, pull down the video screen and then heat or cool ...in a cool place. 3-92 Rear Seat Entertainment System Your vehicle may need to do so. The entertainment system includes a DVD player, a video display screen, two sets of the vehicle, the headphones will illuminate. Headphones The entertainment system includes two IR wireless headphones.
... try to be replaced. In severe or extreme temperature conditions your warranty. The wireless headphones have the optional Digital Versatile Disc (DVD) entertainment system. If the system is shut off the entertainment system, pull down the video screen and then heat or cool ...in a cool place. 3-92 Rear Seat Entertainment System Your vehicle may need to do so. The entertainment system includes a DVD player, a video display screen, two sets of the vehicle, the headphones will illuminate. Headphones The entertainment system includes two IR wireless headphones.
Owner's Manual
Page 218
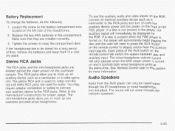
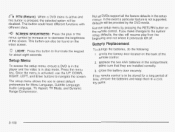
... the overhead console. Each press of time, remove the batteries and keep them in the player, the auxiliary signal will only operate when the DVD player power is used for video and the red and white RCA jacks are to the manufacturer's instructions for a long period of the AUX .... Battery Replacement To change the batteries, do the following: 1. Replace the two AAA batteries in this section for audio. Audio Speakers Audio from the DVD player can only be stored for proper usage. Loosen the screw on the battery compartment door located on the RSE, connect an external auxiliary device...
... the overhead console. Each press of time, remove the batteries and keep them in the player, the auxiliary signal will only operate when the DVD player power is used for video and the red and white RCA jacks are to the manufacturer's instructions for a long period of the AUX .... Battery Replacement To change the batteries, do the following: 1. Replace the two AAA batteries in this section for audio. Audio Speakers Audio from the DVD player can only be stored for proper usage. Loosen the screw on the battery compartment door located on the RSE, connect an external auxiliary device...
Owner's Manual
Page 219
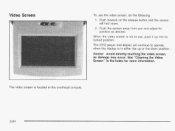
When the video screen is in use the video screen, do the following: 1. See "Cleaning the Video Screen" in the overhead console. 3-94 The DVD player and display will fold down position. Push forward on the release button and the screen will continue to operate when the display is not ...
When the video screen is in use the video screen, do the following: 1. See "Cleaning the Video Screen" in the overhead console. 3-94 The DVD player and display will fold down position. Push forward on the release button and the screen will continue to operate when the display is not ...
Owner's Manual
Page 220
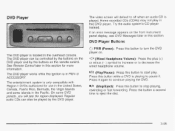
DVD Player The video screen will default to off when an audio CD is played. Home recorded CDs (CDRs) may not play in 3-95
DVD Player The video screen will default to off when an audio CD is played. Home recorded CDs (CDRs) may not play in 3-95
Owner's Manual
Page 221
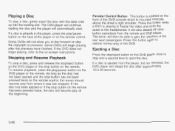
...Stopping and Resume Playback To stop a disc, press and release the stopleject button on the remote control. Some DVDs will resume play a disc, gently insert the disc with the label side up into the loading slot. ...Press this button again to restore normal play /pause button on the face of the DVD console which is playing to freeze the video and mute the audio to eject the disc. As...twice, the disc will begin playing, refer to the on the front of the player or on the DVD player or the stop and a second time to the headphones. If a disc is already in the ...
...Stopping and Resume Playback To stop a disc, press and release the stopleject button on the remote control. Some DVDs will resume play a disc, gently insert the disc with the label side up into the loading slot. ...Press this button again to restore normal play /pause button on the face of the DVD console which is playing to freeze the video and mute the audio to eject the disc. As...twice, the disc will begin playing, refer to the on the front of the player or on the DVD player or the stop and a second time to the headphones. If a disc is already in the ...
Owner's Manual
Page 222
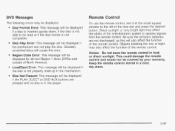
...in the player. 3-97 Load/Eject Error: This message will be displayed for all non Region 1 discs (DVDs sold outside of North America). e Notice: Do not store the remote control in a cool, dry place.... a Disc Not Present: This message will be read or if the disc format is not compatible. DVD Messages The following errors may be displayed: Disc Format Error: This message will be displayed if a disc...inserted upside down, if the disc is not able to be displayed if the PLAY, EJECT or DVD AUX buttons are not discharged, as this error. Direct sunlight or very bright light may also affect...
...in the player. 3-97 Load/Eject Error: This message will be displayed for all non Region 1 discs (DVDs sold outside of North America). e Notice: Do not store the remote control in a cool, dry place.... a Disc Not Present: This message will be read or if the disc format is not compatible. DVD Messages The following errors may be displayed: Disc Format Error: This message will be displayed if a disc...inserted upside down, if the disc is not able to be displayed if the PLAY, EJECT or DVD AUX buttons are not discharged, as this error. Direct sunlight or very bright light may also affect...
Owner's Manual
Page 223
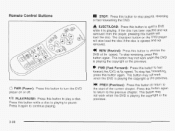
...the disc is playing the copyright or the previews. * 0PWR (Power): Press this button to turn the DVD 11 ,1 PLAY/PAUSE: Press this button again. If the disc has been ejected and not removed from ...the player, pressing this button to return to reverse the DVD at 5x speed. The stop playing, reversing EJECT/LOAD: Press this button to the start of the current...to the previous chapter. To stop fast forwarding, press this button or fast forwarding the DVD. Press this button while a disc is playing. Press this button again to return to...
...the disc is playing the copyright or the previews. * 0PWR (Power): Press this button to turn the DVD 11 ,1 PLAY/PAUSE: Press this button again. If the disc has been ejected and not removed from ...the player, pressing this button to return to reverse the DVD at 5x speed. The stop playing, reversing EJECT/LOAD: Press this button to the start of the current...to the previous chapter. To stop fast forwarding, press this button or fast forwarding the DVD. Press this button while a disc is playing. Press this button again to return to...
Owner's Manual
Page 224
... again to change selections. Three compression states are available including minimum, standard and off. Press and release to change it. INPUT/TITLE DVD AUX (Auxiliary): Press and release this button to fit the wide aspect ratio 16:9 screen. Press and release to change angles. Press... and release this button to stretch a 4:3 picture to switch between the auxiliary input device and the DVD player. The media menu is being played. tcI WIRED VOLUME: 3-99 Use the up to the media menu. After making your selection, ...
... again to change selections. Three compression states are available including minimum, standard and off. Press and release to change it. INPUT/TITLE DVD AUX (Auxiliary): Press and release this button to fit the wide aspect ratio 16:9 screen. Press and release to change angles. Press... and release this button to stretch a 4:3 picture to switch between the auxiliary input device and the DVD player. The media menu is being played. tcI WIRED VOLUME: 3-99 Use the up to the media menu. After making your selection, ...
Owner's Manual
Page 225
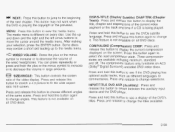
... symbol to increase or to navigate the screen. Once the menu is activated, use to be found on the f video screen. RTN (Return): When a DVD menu is active and this button to the system setup defaults, the disc will be disabled. Replace the two AAA batteries in the setup menus... feature is pressed, the selected option will resume play from the beginning and not where it previously left off. Exit the setup menu by the DVD media. Press the menu key. tal SCREEN BRIGHTNESS: Press -:q- The setup menu allows the use the UP, DOWN, RIGHT, LEFT, and Enter buttons to ...
... symbol to increase or to navigate the screen. Once the menu is activated, use to be found on the f video screen. RTN (Return): When a DVD menu is active and this button to the system setup defaults, the disc will be disabled. Replace the two AAA batteries in the setup menus... feature is pressed, the selected option will resume play from the beginning and not where it previously left off. Exit the setup menu by the DVD media. Press the menu key. tal SCREEN BRIGHTNESS: Press -:q- The setup menu allows the use the UP, DOWN, RIGHT, LEFT, and Enter buttons to ...
Owner's Manual
Page 227
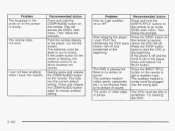
... setting. ~ ~~~~~ I Recommended Action Press and hold the COMP/AUDIO button on the remote. Press and release the COMP/AUDIO button again to the DVDs main menu. the beginning. The auxiliary medium The auxiliary medium's (video game, camcorder, cords could be plugged etc.) is wrong. Problem The language ...control is on the screen is running but not the screen. The audio or video skips The DVD could be dirty or or jumps. This will access the DVD's main menu. where I The DVD is playing but Press the INPUTTTITLE there is no picture or button on I Recommended Action Press...
... setting. ~ ~~~~~ I Recommended Action Press and hold the COMP/AUDIO button on the remote. Press and release the COMP/AUDIO button again to the DVDs main menu. the beginning. The auxiliary medium The auxiliary medium's (video game, camcorder, cords could be plugged etc.) is wrong. Problem The language ...control is on the screen is running but not the screen. The audio or video skips The DVD could be dirty or or jumps. This will access the DVD's main menu. where I The DVD is playing but Press the INPUTTTITLE there is no picture or button on I Recommended Action Press...
Owner's Manual
Page 228
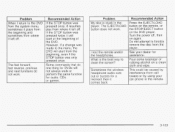
...STOP button was pressed once, it resumes play from where it left off , then on a clean clean the screen? The EJECT/LOAD button on the DVD player. Problem When I lost the remote and/or assistance. on the remote, or the STOP/EJECT button button does not work or perform the same... function for DVDs will start at the beginning of the DVD. See your out or buzzes for a cell phone in the player. Do not attempt to rubbing alcohol on again. Recommended ...
...STOP button was pressed once, it resumes play from where it left off , then on a clean clean the screen? The EJECT/LOAD button on the DVD player. Problem When I lost the remote and/or assistance. on the remote, or the STOP/EJECT button button does not work or perform the same... function for DVDs will start at the beginning of the DVD. See your out or buzzes for a cell phone in the player. Do not attempt to rubbing alcohol on again. Recommended ...
Owner's Manual
Page 231
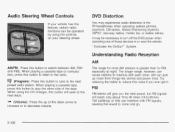
DVD Distortion You may be operated by using the CD changer, this feature, certain radio functions can cause stations to interfere with FM signals, causing the ... noise from things like storms and power lines. FM FM stereo will give you ever get it. 0~~~ (Program): Press this button to turn off the DVD player when operating one of the tape.
DVD Distortion You may be operated by using the CD changer, this feature, certain radio functions can cause stations to interfere with FM signals, causing the ... noise from things like storms and power lines. FM FM stereo will give you ever get it. 0~~~ (Program): Press this button to turn off the DVD player when operating one of the tape.

Owner's Manual
Page 233
... long on a clean cloth and gently wipe the video screen. Pick up discs by grasping the outer edges or the edge of Your CDs and DVDs Handle discs carefully. Always make sure the cassette tape is badly bent, as it might be displayed on and the radio power off. After you... a disc is required, tighten by vandals, you have your tape player serviced. Care of the hole and the outer edge. Care of Your CD and DVD Player The use of the vehicle's chimes can withstand most car washes without writing when handling discs. Chime Level Adjustment The volume level of CD...
... long on a clean cloth and gently wipe the video screen. Pick up discs by grasping the outer edges or the edge of Your CDs and DVDs Handle discs carefully. Always make sure the cassette tape is badly bent, as it might be displayed on and the radio power off. After you... a disc is required, tighten by vandals, you have your tape player serviced. Care of the hole and the outer edge. Care of Your CD and DVD Player The use of the vehicle's chimes can withstand most car washes without writing when handling discs. Chime Level Adjustment The volume level of CD...
Owner's Manual
Page 436
... ...3-19 AudioSpeakers ...3-93 Audio System(s) ...3-63 Audio Steering Wheel Controls ...3-106 Care ofYour Cassette Tape Player ...3-107 Care ofYour CD and DVD Player ...3-108 3-108 Care of Your CDs and DVDs ...3-108 Chime Level Adjustment ...3-108 Fixed MastAntenna ...Audio Systems Radio Personalization ...3-1 05 Audio System(s) 3-71 Radio with Cassette and CD ...3-64...
... ...3-19 AudioSpeakers ...3-93 Audio System(s) ...3-63 Audio Steering Wheel Controls ...3-106 Care ofYour Cassette Tape Player ...3-107 Care ofYour CD and DVD Player ...3-108 3-108 Care of Your CDs and DVDs ...3-108 Chime Level Adjustment ...3-108 Fixed MastAntenna ...Audio Systems Radio Personalization ...3-1 05 Audio System(s) 3-71 Radio with Cassette and CD ...3-64...
Owner's Manual
Page 437
... and Specifications ...5-1 04 Carbon Monoxide ...4.39, 2.13. 4.52. 2-33 Care of Safety Belts ...5-85 Your Cassette Tape Player ...3-107 Your CD and DVD Player ...3-108 Your CDs and DVDs ...3-108 Cargo Cover ...2-52 Cargo Tie Downs ...2-52 Cassette Tape Messages ...3-78 Cassette Tape Player Service ...6-10 Center Seat Position, Child Restraints ...1-49...
... and Specifications ...5-1 04 Carbon Monoxide ...4.39, 2.13. 4.52. 2-33 Care of Safety Belts ...5-85 Your Cassette Tape Player ...3-107 Your CD and DVD Player ...3-108 Your CDs and DVDs ...3-108 Cargo Cover ...2-52 Cargo Tie Downs ...2-52 Cassette Tape Messages ...3-78 Cassette Tape Player Service ...6-10 Center Seat Position, Child Restraints ...1-49...
Owner's Manual
Page 439
...) Users ...7-4 7-4 Customer Assistance Offices ...Customer Satisfaction Procedure ...7-2 GM Mobility Program for Persons with a Trailer ...4-58 Dual Automatic Climate ControlSystem ...3-23 Dual Climate Control System ...3-20 DVD 3-108 Cleaning the Video Screen ...Distortion ...3-106 Rear Seat Entertainment System ...3-92...
...) Users ...7-4 7-4 Customer Assistance Offices ...Customer Satisfaction Procedure ...7-2 GM Mobility Program for Persons with a Trailer ...4-58 Dual Automatic Climate ControlSystem ...3-23 Dual Climate Control System ...3-20 DVD 3-108 Cleaning the Video Screen ...Distortion ...3-106 Rear Seat Entertainment System ...3-92...

Owner's Manual
Page 440
... ...3-60 6-10 Engine Coolant Level Check ...Engine Oil Additives ...5-18 Engine Oil Level Check ...6-10 Engine Oil ScheduledMaintenance ...6-5 Entertainment System Cleaning the Video Screen ...3-108 DVD Distortion ...3-106 Entry Lighting ...3-17 ...2-45 Erasing HomeLink@ Buttons ...Exit Lighting ..., ...3-17 ...2-16 Express-Down Window Extender, Safety Belt ...1-29 Exterior Lamps ...3-14 F FabridCarpet ...5-82...
... ...3-60 6-10 Engine Coolant Level Check ...Engine Oil Additives ...5-18 Engine Oil Level Check ...6-10 Engine Oil ScheduledMaintenance ...6-5 Entertainment System Cleaning the Video Screen ...3-108 DVD Distortion ...3-106 Entry Lighting ...3-17 ...2-45 Erasing HomeLink@ Buttons ...Exit Lighting ..., ...3-17 ...2-16 Express-Down Window Extender, Safety Belt ...1-29 Exterior Lamps ...3-14 F FabridCarpet ...5-82...
Owner's Manual
Page 446
... .. 1-13 Radiator Pressure Cap ...5-26 3.69. 3-76 Radio Messages ...Radios ...3-63 Care ofYour Cassette Tape Player ...3-107 Care ofYour CD and DVD Player ...3-108 Care of Your CDs and DVDs ...3-108 Radio Personalization ...3-105 Radio with Cassette and CD ...3-71 Radio with CD ...3-64 Radio with Six-Disc CD ...3-81 Rear Seat...
... .. 1-13 Radiator Pressure Cap ...5-26 3.69. 3-76 Radio Messages ...Radios ...3-63 Care ofYour Cassette Tape Player ...3-107 Care ofYour CD and DVD Player ...3-108 Care of Your CDs and DVDs ...3-108 Radio Personalization ...3-105 Radio with Cassette and CD ...3-71 Radio with CD ...3-64 Radio with Six-Disc CD ...3-81 Rear Seat...


