Owner's Manual
Page 4
Table of Contents Seats and Restraint Systems Section 1 Seats and Seat Controls Safety Belts Air Bag Systems Child Restraints Features and Controls Section 2 Keys and Door Locks Remote Keyless Entry (RKE) System Liftgate Automatic Transmission Four-Wheel Drive Operation Parking Brake Windows Tilt Wheel Turn Signal/Multifunction Lever Windshield Wipers Cruise Control Interior and Exterior Lamps Mirrors Storage Compartments Luggage Carrier Accessory Power Outlets OnStar® System (If Equipped) Sunroof (If Equipped) Homelink® Transmitter Instrument Panel, Warning Lights and Gages ii
Table of Contents Seats and Restraint Systems Section 1 Seats and Seat Controls Safety Belts Air Bag Systems Child Restraints Features and Controls Section 2 Keys and Door Locks Remote Keyless Entry (RKE) System Liftgate Automatic Transmission Four-Wheel Drive Operation Parking Brake Windows Tilt Wheel Turn Signal/Multifunction Lever Windshield Wipers Cruise Control Interior and Exterior Lamps Mirrors Storage Compartments Luggage Carrier Accessory Power Outlets OnStar® System (If Equipped) Sunroof (If Equipped) Homelink® Transmitter Instrument Panel, Warning Lights and Gages ii
Owner's Manual
Page 63
... While You're Parked Locking Rear Axle Windows Tilt Wheel Turn Signal/Multifunction Lever Exterior Lamps Interior Lamps Mirrors Storage Compartments Ashtrays and Cigarette Lighter Accessory Power Outlets OnStarR System (If Equipped) Sunroof (If Equipped) HomeLinkR Transmitter Instrument Panel Instrument Panel Cluster Warning Lights, Gages and Indicators 2-1
... While You're Parked Locking Rear Axle Windows Tilt Wheel Turn Signal/Multifunction Lever Exterior Lamps Interior Lamps Mirrors Storage Compartments Ashtrays and Cigarette Lighter Accessory Power Outlets OnStarR System (If Equipped) Sunroof (If Equipped) HomeLinkR Transmitter Instrument Panel Instrument Panel Cluster Warning Lights, Gages and Indicators 2-1
Owner's Manual
Page 76
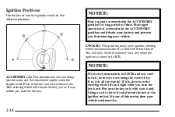
... is it was before you are using the correct key; You will remain locked, just as it all the way in? Push in the ACCESSORY position for long periods of time. But turn the key only with your ignition, steering wheel and transmission. If your key seems stuck in...you from starting your battery and prevent you . Using a tool to remove your vehicle needs service. 2-14 LOCK (B): This position locks your hand. NOTICE: ACCESSORY (A): This position lets you turn the key hard. Ignition Positions Use the key to turn the ignition switch to LOCK. It's a theft-deterrent feature. ...
... is it was before you are using the correct key; You will remain locked, just as it all the way in? Push in the ACCESSORY position for long periods of time. But turn the key only with your ignition, steering wheel and transmission. If your key seems stuck in...you from starting your battery and prevent you . Using a tool to remove your vehicle needs service. 2-14 LOCK (B): This position locks your hand. NOTICE: ACCESSORY (A): This position lets you turn the key hard. Ignition Positions Use the key to turn the ignition switch to LOCK. It's a theft-deterrent feature. ...
Owner's Manual
Page 77
... accelerator pedal, turn the steering wheel. RUN (D): This is the position for example, if your vehicle in any other position -- Retained Accessory Power Your vehicle is equipped with a Retained Accessory Power (RAP) feature which will continue to work when the ignition key is off the engine but still turn your engine. Your...
... accelerator pedal, turn the steering wheel. RUN (D): This is the position for example, if your vehicle in any other position -- Retained Accessory Power Your vehicle is equipped with a Retained Accessory Power (RAP) feature which will continue to work when the ignition key is off the engine but still turn your engine. Your...
Owner's Manual
Page 78
NOTICE: Your engine is designed to help avoid draining your battery or damaging your starter. 2. If you add electrical parts or accessories, you don't, your engine might not perform properly. If your engine still won't start (or starts but then stops), wait 15 seconds and start right ...
NOTICE: Your engine is designed to help avoid draining your battery or damaging your starter. 2. If you add electrical parts or accessories, you don't, your engine might not perform properly. If your engine still won't start (or starts but then stops), wait 15 seconds and start right ...

Owner's Manual
Page 92
... be injured. Follow the proper steps to be sure your vehicle won 't move, even when you additional traction on , in ACCESSORY or when Retained Accessory Power (RAP) is present. (See "Retained Accessory Power" in the Index. It works like a standard axle most of the time, but when one of the rear wheels has...
... be injured. Follow the proper steps to be sure your vehicle won 't move, even when you additional traction on , in ACCESSORY or when Retained Accessory Power (RAP) is present. (See "Retained Accessory Power" in the Index. It works like a standard axle most of the time, but when one of the rear wheels has...
Owner's Manual
Page 102
... in OFF. There is released. To idle your ignition is in lighting lasting longer than the delay. DRL can be helpful in OFF, LOCK or ACCESSORY. As with the automatic headlamp system off, set the parking brake while the ignition is off once the ignition key is in many different driving...
... in OFF. There is released. To idle your ignition is in lighting lasting longer than the delay. DRL can be helpful in OFF, LOCK or ACCESSORY. As with the automatic headlamp system off, set the parking brake while the ignition is off once the ignition key is in many different driving...
Owner's Manual
Page 111
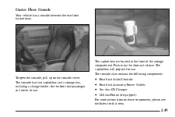
The cupholders will pop out for the front seat passenger and driver to use . D D D D Rear Seat Audio Controls Rear Seat Accessory Power Outlets Six-disc CD Changer Cellular Phone (if equipped) For more information on the door and release. The console has two cupholders and a storage ...
The cupholders will pop out for the front seat passenger and driver to use . D D D D Rear Seat Audio Controls Rear Seat Accessory Power Outlets Six-disc CD Changer Cellular Phone (if equipped) For more information on the door and release. The console has two cupholders and a storage ...
Owner's Manual
Page 114
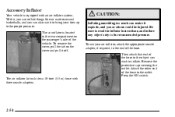
... move the crossrails as far apart as you carry large things, never let them . Put the main weight as far forward as possible. Use GM accessory racks that are still securely fastened. These are even, then tighten the slider knobs. Make sure both sides of various sizes. When you can adjust...
... move the crossrails as far apart as you carry large things, never let them . Put the main weight as far forward as possible. Use GM accessory racks that are still securely fastened. These are even, then tighten the slider knobs. Make sure both sides of various sizes. When you can adjust...
Owner's Manual
Page 116
... you or others could be injured. CAUTION: Inflating something too much can also use your tires up to the proper pressure. Press the ON switch. Accessory Inflator Your vehicle is located in the rear compartment on the cover and pull it off. The air inflator is equipped with three nozzle adapters...
... you or others could be injured. CAUTION: Inflating something too much can also use your tires up to the proper pressure. Press the ON switch. Accessory Inflator Your vehicle is located in the rear compartment on the cover and pull it off. The air inflator is equipped with three nozzle adapters...
Owner's Manual
Page 117
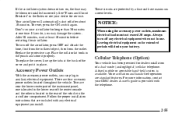
... inflator, press OFF and detach the hose, first from the inflated object, then from the outlet. Your air inflator will drain your GMC dealer. These circuits are standard features. See "Fuses and Circuit Breakers" in auxiliary electrical equipment. If you do, you can plug...the telephone. Two are near the lower center part of the instrument panel, one time. Follow the proper installation instructions that are four accessory power outlets located throughout the vehicle. Replace the protective cap. Leaving electrical equipment on , the fuse may damage the system. A user's...
... inflator, press OFF and detach the hose, first from the inflated object, then from the outlet. Your air inflator will drain your GMC dealer. These circuits are standard features. See "Fuses and Circuit Breakers" in auxiliary electrical equipment. If you do, you can plug...the telephone. Two are near the lower center part of the instrument panel, one time. Follow the proper installation instructions that are four accessory power outlets located throughout the vehicle. Replace the protective cap. Leaving electrical equipment on , the fuse may damage the system. A user's...
Owner's Manual
Page 118
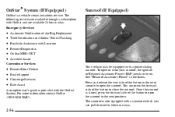
... Equipped) OnStar is also equipped with a sunshade which you can press the forward side of the button to close your sunroof, the ignition or Retained Accessory Power (RAP) needs to be equipped with a power sliding sunroof. See "Retained Accessory Power" in the mini console to open the sunroof to the vent position.
... Equipped) OnStar is also equipped with a sunshade which you can press the forward side of the button to close your sunroof, the ignition or Retained Accessory Power (RAP) needs to be equipped with a power sliding sunroof. See "Retained Accessory Power" in the mini console to open the sunroof to the vent position.
Owner's Manual
Page 122
... vehicle and firmly press and release the HomeLink Transmitter button you may either use the HomeLink Transmitter or the hand-held transmitter to three seconds. Accessories Accessories for two to open the garage door. You may need to do this step up to three times) to flash (after following these instructions, you...
... vehicle and firmly press and release the HomeLink Transmitter button you may either use the HomeLink Transmitter or the hand-held transmitter to three seconds. Accessories Accessories for two to open the garage door. You may need to do this step up to three times) to flash (after following these instructions, you...
Owner's Manual
Page 123
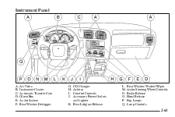
H. J. CD Changer Ashtray Comfort Controls Accessory Power Outlets and Lighter K. Instrument Panel A. B. F. Audio Steering Wheel Controls N. Fog Lamps Q. C. Rear Liftglass Release L. Hood Release P. E. D. Brake Release O. I. Rear Window Washer/Wiper M. Air Vents Instrument Cluster Automatic Transfer Case Glove Box Audio System Rear Window Defogger G. Lamp Controls 2-61
H. J. CD Changer Ashtray Comfort Controls Accessory Power Outlets and Lighter K. Instrument Panel A. B. F. Audio Steering Wheel Controls N. Fog Lamps Q. C. Rear Liftglass Release L. Hood Release P. E. D. Brake Release O. I. Rear Window Washer/Wiper M. Air Vents Instrument Cluster Automatic Transfer Case Glove Box Audio System Rear Window Defogger G. Lamp Controls 2-61
Owner's Manual
Page 128
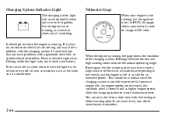
... is not running, as a check to create maximum power. Voltmeter Gage When your battery's state of electrical accessories are driving, you it is running , the gage shows the condition of the charging system. It could drain your... accessories, such as higher engine speeds allow the charging system to show you may occur when a large number of...a generator drive belt, or another electrical problem. When the engine is not able to turn off all unnecessary accessories. 2-66
... is not running, as a check to create maximum power. Voltmeter Gage When your battery's state of electrical accessories are driving, you it is running , the gage shows the condition of the charging system. It could drain your... accessories, such as higher engine speeds allow the charging system to show you may occur when a large number of...a generator drive belt, or another electrical problem. When the engine is not able to turn off all unnecessary accessories. 2-66
Owner's Manual
Page 145
... an initial two-second delay before the clock goes into it counterclockwise to turn the knob clockwise. Your vehicle has a feature called Retained Accessory Power (RAP). See "Retained Accessory Power" in the Index. Playing the Radio PWR-VOL: Press this knob to decrease volume. The knob is off . To increase volume, turn...
... an initial two-second delay before the clock goes into it counterclockwise to turn the knob clockwise. Your vehicle has a feature called Retained Accessory Power (RAP). See "Retained Accessory Power" in the Index. Playing the Radio PWR-VOL: Press this knob to decrease volume. The knob is off . To increase volume, turn...
Owner's Manual
Page 149
... display, the cassette tape player needs to play . The tape symbol on your tape player. This override routine will now play a tape. to RUN or ACCESSORY. 2. CD TAPE: Press this button if you clean the player, press and hold the TAPE AUX button for two seconds, indicating the feature is active...
... display, the cassette tape player needs to play . The tape symbol on your tape player. This override routine will now play a tape. to RUN or ACCESSORY. 2. CD TAPE: Press this button if you clean the player, press and hold the TAPE AUX button for two seconds, indicating the feature is active...
Owner's Manual
Page 159
... with your radio. Write down until --- When THEFTLOCK is designed to discourage theft of your code. 8. Hold them down any reason, you read through 7 to ACCESSORY or RUN. 3. Turn the radio off . 3-22 Press MN and 000 will appear on the display. It works by the feature. THEFTLOCKR is activated, the...
... with your radio. Write down until --- When THEFTLOCK is designed to discourage theft of your code. 8. Hold them down any reason, you read through 7 to ACCESSORY or RUN. 3. Turn the radio off . 3-22 Press MN and 000 will appear on the display. It works by the feature. THEFTLOCKR is activated, the...
Owner's Manual
Page 163
... tape clean timer. To prevent the cleaning cassette from contaminants, direct sunlight and extreme heat. The recommended cleaning method for the cassette to RUN or ACCESSORY. 2. The tape symbol on the display, your tape player for five seconds. If they aren't, they may not operate properly or may appear as the...
... tape clean timer. To prevent the cleaning cassette from contaminants, direct sunlight and extreme heat. The recommended cleaning method for the cassette to RUN or ACCESSORY. 2. The tape symbol on the display, your tape player for five seconds. If they aren't, they may not operate properly or may appear as the...
Owner's Manual
Page 209
If you added any accessories or equipment after your vehicle left the factory, remember to get your vehicle serviced (see "Fuses and Circuit Breakers" in the engine compartment fuse block ...
If you added any accessories or equipment after your vehicle left the factory, remember to get your vehicle serviced (see "Fuses and Circuit Breakers" in the engine compartment fuse block ...
