

Owner's Manual
Page 10
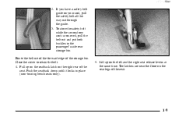
But don't have a seatback reclined if your vehicle is a lever on the lever, lean forward and the seat will go to an upright position. Release the lever to adjust the seatback. Pull up on the inside of the seat to lock the seatback where you want it. yellowblue Reclining Seatbacks There is moving. 1-4 You can adjust the seatback by lifting the lever and leaning back.
But don't have a seatback reclined if your vehicle is a lever on the lever, lean forward and the seat will go to an upright position. Release the lever to adjust the seatback. Pull up on the inside of the seat to lock the seatback where you want it. yellowblue Reclining Seatbacks There is moving. 1-4 You can adjust the seatback by lifting the lever and leaning back.
Owner's Manual
Page 15
... rear legs of the seat. 1-9 The latches are near the floor on your seat, pull the safety belt all the way out through the guide. 3. Lift up on the seatback latch on the left and the right seat release levers at the same time. yellowblue 2. Pull up on the right rear...
... rear legs of the seat. 1-9 The latches are near the floor on your seat, pull the safety belt all the way out through the guide. 3. Lift up on the seatback latch on the left and the right seat release levers at the same time. yellowblue 2. Pull up on the right rear...

Owner's Manual
Page 16
yellowblue Replacing the Rear Seats 6. To fully release the latch, two levels of the vehicle. Then, pull back and lift the seat out of lift effort will be required. Lower the seat into position. Your seat release latch lever is sprung with a two-stage mechanism. Lift up on the rear of the seat to fully release the latch. 1. Make sure the front retainers are hooked onto the anchor pins. 1-10 First, a low effort to overcome the first stage and then a moderate effort to remove the seat assembly from the rear latch pins.
yellowblue Replacing the Rear Seats 6. To fully release the latch, two levels of the vehicle. Then, pull back and lift the seat out of lift effort will be required. Lower the seat into position. Your seat release latch lever is sprung with a two-stage mechanism. Lift up on the rear of the seat to fully release the latch. 1. Make sure the front retainers are hooked onto the anchor pins. 1-10 First, a low effort to overcome the first stage and then a moderate effort to remove the seat assembly from the rear latch pins.

Owner's Manual
Page 75
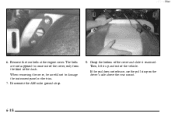
Replace the check assemblies on each door. yellowblue To open the rear doors, push in on the clip and lift the check assembly up off the mounting bracket. See the Caution following "Swing-Out Windows" in the inside of the door. Check to keep the ...
Replace the check assemblies on each door. yellowblue To open the rear doors, push in on the clip and lift the check assembly up off the mounting bracket. See the Caution following "Swing-Out Windows" in the inside of the door. Check to keep the ...
Owner's Manual
Page 83
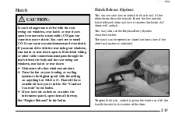
... hatch or rear doors: D Make sure all other doors from the outside air into the hatch release button and turn it , press the button and lift the handle located in the center of the door. 2-13 yellowblue Hatch CAUTION: It can be opened or closed without a key if the door lock...
... hatch or rear doors: D Make sure all other doors from the outside air into the hatch release button and turn it , press the button and lift the handle located in the center of the door. 2-13 yellowblue Hatch CAUTION: It can be opened or closed without a key if the door lock...
Owner's Manual
Page 121
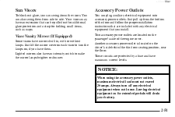
... accessory power outlets are protected by a fuse and have maximum current levels. Visor Vanity Mirror (If Equipped) Some visors have mirrors built in use. Just lift the mirror cover on each visor to make the mirror lamps brighter or dimmer. Always turn the lamps on for holding small items, such as...
... accessory power outlets are protected by a fuse and have maximum current levels. Visor Vanity Mirror (If Equipped) Some visors have mirrors built in use. Just lift the mirror cover on each visor to make the mirror lamps brighter or dimmer. Always turn the lamps on for holding small items, such as...

Owner's Manual
Page 219
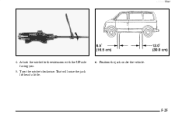
D Always secure the vehicle on a vehicle with separate safety chains when towing it has been lifted by the tow truck. With current trends in automotive styles and design, it is essential that is used... Your vehicle can be towed with damaged parts not fully secured. See "Roadside Assistance" in the Index. 5-7 When using wheel-lift equipment on each side with the All-Wheel Drive option, you need to have your vehicle towed. D Never get under the ... Use only the correct hooks. D Never tow faster than safe or posted speeds. D Never tow with wheel-lift or car-carrier equipment.
D Always secure the vehicle on a vehicle with separate safety chains when towing it has been lifted by the tow truck. With current trends in automotive styles and design, it is essential that is used... Your vehicle can be towed with damaged parts not fully secured. See "Roadside Assistance" in the Index. 5-7 When using wheel-lift equipment on each side with the All-Wheel Drive option, you need to have your vehicle towed. D Never get under the ... Use only the correct hooks. D Never tow faster than safe or posted speeds. D Never tow with wheel-lift or car-carrier equipment.

Owner's Manual
Page 221
... least three minutes while you 're in the Index. 5-9 Just to NEUTRAL (N); If you keep driving with no steam, the problem may decide not to lift the hood but to get an engine overheat warning but see or hear no sign of the vehicle until the engine speed is about 10...
... least three minutes while you 're in the Index. 5-9 Just to NEUTRAL (N); If you keep driving with no steam, the problem may decide not to lift the hood but to get an engine overheat warning but see or hear no sign of the vehicle until the engine speed is about 10...
Owner's Manual
Page 222
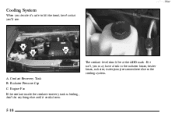
Coolant Recovery Tank B. Engine Fan If the coolant inside the coolant recovery tank is boiling, don't do anything else until it 's safe to lift the hood, here's what you'll see: The coolant level should be at the ADD mark. Radiator Pressure Cap C. yellowblue Cooling System When you decide it cools down. 5-10 A. If it isn't, you may have a leak in the radiator hoses, heater hoses, radiator, water pump or somewhere else in the cooling system.
Coolant Recovery Tank B. Engine Fan If the coolant inside the coolant recovery tank is boiling, don't do anything else until it 's safe to lift the hood, here's what you'll see: The coolant level should be at the ADD mark. Radiator Pressure Cap C. yellowblue Cooling System When you decide it cools down. 5-10 A. If it isn't, you may have a leak in the radiator hoses, heater hoses, radiator, water pump or somewhere else in the cooling system.

Owner's Manual
Page 232
... the nut and washer, then pull the wheel blocks off the bolt. 4. Push down to release the tabs securing the top of the vehicle and lift it away from the side wall and down on the bolt and remove the hooked end from the pouch. 5-20 Remove the wheel blocks by...
... the nut and washer, then pull the wheel blocks off the bolt. 4. Push down to release the tabs securing the top of the vehicle and lift it away from the side wall and down on the bolt and remove the hooked end from the pouch. 5-20 Remove the wheel blocks by...
Owner's Manual
Page 237
Position the jack under the vehicle. 5-25 yellowblue 4. Turn the ratchet clockwise. That will raise the jack lift head a little. 6. Attach the ratchet to the extension with the UP side facing you. 5.
Position the jack under the vehicle. 5-25 yellowblue 4. Turn the ratchet clockwise. That will raise the jack lift head a little. 6. Attach the ratchet to the extension with the UP side facing you. 5.
Owner's Manual
Page 239
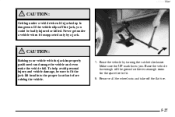
... or killed. Remove all the wheel nuts and take off the ground so there is enough room for the spare tire to fit the jack lift head into the proper location before raising the vehicle. 7. Raise the vehicle by a jack. yellowblue CAUTION: Getting under a vehicle when it is jacked up is...
... or killed. Remove all the wheel nuts and take off the ground so there is enough room for the spare tire to fit the jack lift head into the proper location before raising the vehicle. 7. Raise the vehicle by a jack. yellowblue CAUTION: Getting under a vehicle when it is jacked up is...
Owner's Manual
Page 255
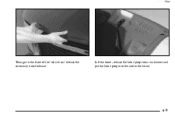
Lift the hood, release the hood prop from its retainer and put the hood prop into the slot in the hood. 6-9 yellowblue Then go to the front of the vehicle and release the secondary hood release.
Lift the hood, release the hood prop from its retainer and put the hood prop into the slot in the hood. 6-9 yellowblue Then go to the front of the vehicle and release the secondary hood release.
Owner's Manual
Page 257
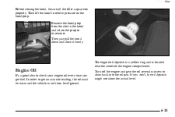
...'t, the oil dipstick might not show the actual level. 6-11 In order to its retainer. yellowblue Before closing the hood, be on level ground. Then lift the hood to drain back into the oil pan. The engine oil dipstick is a yellow ring and is located near the center of the engine...
...'t, the oil dipstick might not show the actual level. 6-11 In order to its retainer. yellowblue Before closing the hood, be on level ground. Then lift the hood to drain back into the oil pan. The engine oil dipstick is a yellow ring and is located near the center of the engine...
Owner's Manual
Page 264
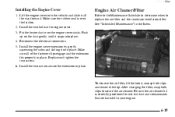
When removing the cover, be careful not to come out of the cover, only from the front of the vehicle. Remove the two bolts at the engine cover. Grasp the bottom of the cover and slide it up and out of the dash. Then, lift it rearward. Disconnect the AM radio ground strap. 8. If the seal does not release, use the pull strap on the driver's side above the rear mount. 6-18 The bolts are not supposed to damage the instrument panel or the trim. 7. yellowblue 6.
When removing the cover, be careful not to come out of the cover, only from the front of the vehicle. Remove the two bolts at the engine cover. Grasp the bottom of the cover and slide it up and out of the dash. Then, lift it rearward. Disconnect the AM radio ground strap. 8. If the seal does not release, use the pull strap on the driver's side above the rear mount. 6-18 The bolts are not supposed to damage the instrument panel or the trim. 7. yellowblue 6.
Owner's Manual
Page 265
... it into the vehicle and slide it all of the fastener clips engage and the extension fits properly in place. To remove the air filter, lift the hood, unsnap both clips to your engine. 6-19 Be sure the air cleaner lid is over the engine cover studs. Put the heater duct... over the latches. 2. Make sure all the way forward. Lift the engine cover into place. Install the two bolts at the engine cover. 3. Engine Air Cleaner/Filter Refer to the Maintenance Schedule to determine when...
... it into the vehicle and slide it all of the fastener clips engage and the extension fits properly in place. To remove the air filter, lift the hood, unsnap both clips to your engine. 6-19 Be sure the air cleaner lid is over the engine cover studs. Put the heater duct... over the latches. 2. Make sure all the way forward. Lift the engine cover into place. Install the two bolts at the engine cover. 3. Engine Air Cleaner/Filter Refer to the Maintenance Schedule to determine when...

Owner's Manual
Page 288
... insert out of replacement blade. 6-42 See "Normal Maintenance Replacement Parts" in the Index for more information. yellowblue 4. To replace your windshield wiper blade inserts, lift the wiper arm away from the bezel. Reverse Steps 1 through 4 to remove the socket from the windshield. 5. Make sure the tabs are locked into position...
... insert out of replacement blade. 6-42 See "Normal Maintenance Replacement Parts" in the Index for more information. yellowblue 4. To replace your windshield wiper blade inserts, lift the wiper arm away from the bezel. Reverse Steps 1 through 4 to remove the socket from the windshield. 5. Make sure the tabs are locked into position...
Owner's Manual
Page 310
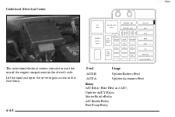
Lift the hood and open the cover to gain access to this fuse block. yellowblue Underhood Electrical Center The underhood electrical center is located toward the rear of the engine compartment on the driver's side. Feed AUX B AUX A Usage Upfitter Battery Feed Upfitter Accessory Feed Relay A/C Relay (Rear Heat and A/C) Upfitter-ACCY Relay Starter Enable Relay A/C Enable Relay Fuel Pump Relay 6-64
Lift the hood and open the cover to gain access to this fuse block. yellowblue Underhood Electrical Center The underhood electrical center is located toward the rear of the engine compartment on the driver's side. Feed AUX B AUX A Usage Upfitter Battery Feed Upfitter Accessory Feed Relay A/C Relay (Rear Heat and A/C) Upfitter-ACCY Relay Starter Enable Relay A/C Enable Relay Fuel Pump Relay 6-64
Owner's Manual
Page 371
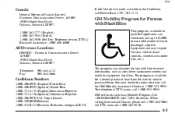
See your vehicle (hand controls, wheelchair/scooter lifts, etc.). When calling from the date of time from outside Canada, please dial 1-905-644-3063. Virgin Islands 1-800-389-0009 Bahamas 1-800-534-0122 ...
See your vehicle (hand controls, wheelchair/scooter lifts, etc.). When calling from the date of time from outside Canada, please dial 1-905-644-3063. Virgin Islands 1-800-389-0009 Bahamas 1-800-534-0122 ...