
Owner's Manual
Page 22
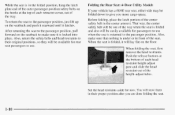
... it is locked into place. You will stow them in their original positions, so they will be available for passengers to the passenger position, just lift up on the seatback and push it rearward until it will be folded down to make sure that nothing is under or in front of...
... it is locked into place. You will stow them in their original positions, so they will be available for passengers to the passenger position, just lift up on the seatback and push it rearward until it will be folded down to make sure that nothing is under or in front of...
Owner's Manual
Page 23
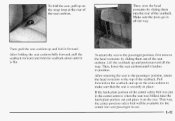
... put in the center armrest when the seat was folded, take the latch plate portion out and place it is securely in all the way. Lift the seatback up and push rearward all the way. That way, the center position safety belt will be available for the center rear seat passenger...
... put in the center armrest when the seat was folded, take the latch plate portion out and place it is securely in all the way. Lift the seatback up and push rearward all the way. That way, the center position safety belt will be available for the center rear seat passenger...
Owner's Manual
Page 25
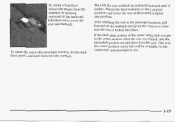
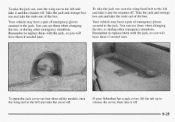
... the center armrest when the seat folded, takethe was latch plate portion out and placeon the seat. Return the head restraints to the passenger position, lift the load floor panels and latch them out to cover the rear seat footwell. To return the seat to their original positions and lower the... seat cushion until it into position. Then lift the rear seatback up sure the seat locked into the seatback. 1-13 To create a load floor, release the panels from the seatback by pushing rearward...
... the center armrest when the seat folded, takethe was latch plate portion out and placeon the seat. Return the head restraints to the passenger position, lift the load floor panels and latch them out to cover the rear seat footwell. To return the seat to their original positions and lower the... seat cushion until it into position. Then lift the rear seatback up sure the seat locked into the seatback. 1-13 To create a load floor, release the panels from the seatback by pushing rearward...
Owner's Manual
Page 26
To release the easy entry second seat, lift up on the top of the vehicle. Tilt the seatback toward the front of the release lever with your foot. A seat that isn't lockedinto place ... third seat. Be sure lock to the seat into place. When you have one. People or in a collision sudden stop. Entry to the Rear Seat (Suburban Second Seat) The right side of the seat down. That makes it easy to get in and out of the seatback forward. There is locked...
To release the easy entry second seat, lift up on the top of the vehicle. Tilt the seatback toward the front of the release lever with your foot. A seat that isn't lockedinto place ... third seat. Be sure lock to the seat into place. When you have one. People or in a collision sudden stop. Entry to the Rear Seat (Suburban Second Seat) The right side of the seat down. That makes it easy to get in and out of the seatback forward. There is locked...
Owner's Manual
Page 28
... the seatback to use. To unlatch the seat from the floor, pull up on the center release handle at the rear of the seat and lift the rear seat Turn the seat sideways and take it down, with the latches at the bottom of the vehicle. 1-16
... the seatback to use. To unlatch the seat from the floor, pull up on the center release handle at the rear of the seat and lift the rear seat Turn the seat sideways and take it down, with the latches at the bottom of the vehicle. 1-16
Owner's Manual
Page 87
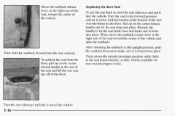
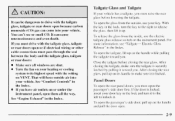
... Index. See "Comfort Controls" in the Index. See "Engine Exhaust" in the Index. turn it to the left to the right t o release the glass, then lift it toward you must open because carbon monoxide (CO) gas can 't see "'Tailgate -- Tailgate Glass and Tailgate I f the door is locked, insert your vehicle. With...
... Index. See "Comfort Controls" in the Index. See "Engine Exhaust" in the Index. turn it to the left to the right t o release the glass, then lift it toward you must open because carbon monoxide (CO) gas can 't see "'Tailgate -- Tailgate Glass and Tailgate I f the door is locked, insert your vehicle. With...
Owner's Manual
Page 110
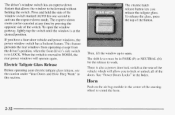
... switch. Electric Tailgate Glass Release Before operating your electric tailgate glass release, see the caution under "Your Doors and How They Work'' in LOCK. Then, lift the window up to work. This feature prevents the rear windows from operating except from the driver's position, when the front driver's side switch is...
... switch. Electric Tailgate Glass Release Before operating your electric tailgate glass release, see the caution under "Your Doors and How They Work'' in LOCK. Then, lift the window up to work. This feature prevents the rear windows from operating except from the driver's position, when the front driver's side switch is...
Owner's Manual
Page 133
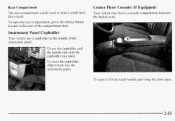
... rear of the instrument panel. Rear Compartment The rear compartment can be used to store asmall item, like a book. To close the cupholder, slide it , lift the latch handle and swing the door open. 2-55 To open it back into the instrument panel. Center Floor Console(If Equipped) Your vehicle may...
... rear of the instrument panel. Rear Compartment The rear compartment can be used to store asmall item, like a book. To close the cupholder, slide it , lift the latch handle and swing the door open. 2-55 To open it back into the instrument panel. Center Floor Console(If Equipped) Your vehicle may...

Owner's Manual
Page 135
... center console storage area. 1 Armrest Storage Compartment (If Equipped) To remove the cassette/compact disc holder, pull the front of the holder toward and then lift up to five compact disc cases and up .
... center console storage area. 1 Armrest Storage Compartment (If Equipped) To remove the cassette/compact disc holder, pull the front of the holder toward and then lift up to five compact disc cases and up .
Owner's Manual
Page 137
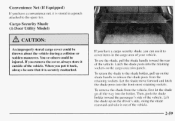
... shade, pull the shade handle toward the passenger's side of the vehicle. Let the shade lnove forward and latch the shade posts into the holder. Lift the shade up on the cargo area trim panels.
... shade, pull the shade handle toward the passenger's side of the vehicle. Let the shade lnove forward and latch the shade posts into the holder. Lift the shade up on the cargo area trim panels.

Owner's Manual
Page 142
... lights. You can swing down , pull the extender out for extra glare coverage at the front and side windows. I (If Equipped) 1 This transmitter allows you lift themirror cover. Some visors have a strap to consolidate the functions of most current transmitters and is down the visors. Your visor may have mirrors with...
... lights. You can swing down , pull the extender out for extra glare coverage at the front and side windows. I (If Equipped) 1 This transmitter allows you lift themirror cover. Some visors have a strap to consolidate the functions of most current transmitters and is down the visors. Your visor may have mirrors with...
Owner's Manual
Page 250
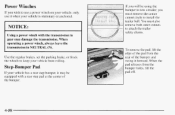
... remove both outer cutouts I NOTICE: Using a power winch with a rear steppad at the center of the pad from the bumper holes, lift the pad off. 4-58 To remove the pad, lift the edge of the bumper. I . . You must remove the center cutout circle to install the trailer ball. If you will be...
... remove both outer cutouts I NOTICE: Using a power winch with a rear steppad at the center of the pad from the bumper holes, lift the pad off. 4-58 To remove the pad, lift the edge of the bumper. I . . You must remove the center cutout circle to install the trailer ball. If you will be...
Owner's Manual
Page 258
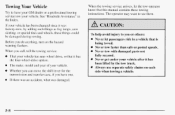
... warning flashers. If your vehicle. Before you have your GM dealer or a professional towing service tow your vehicle has been changed since it has been lifted by adding such things as fog lamps, aero skirting, or special tires and wheels, these towing instructions. See "Roadside Assistance?'i n the Index. The operator may...
... warning flashers. If your vehicle. Before you have your GM dealer or a professional towing service tow your vehicle has been changed since it has been lifted by adding such things as fog lamps, aero skirting, or special tires and wheels, these towing instructions. See "Roadside Assistance?'i n the Index. The operator may...
Owner's Manual
Page 264
... 10 minutes. Just to the highest gear while driving -- Sometimes the engine can drive normally. If you no steam, the problem may decide not to lift the hood but see if the warning stops. If the warning continues, pull over, stop, and park p u r vehicle right away. But then, if you still...
... 10 minutes. Just to the highest gear while driving -- Sometimes the engine can drive normally. If you no steam, the problem may decide not to lift the hood but see if the warning stops. If the warning continues, pull over, stop, and park p u r vehicle right away. But then, if you still...

Owner's Manual
Page 265
Cooling System -- Engine Fan(s) The coolant levelshould be at or above theCOLD mark. 5-15 Keephands, clothing and tools away from any underhood electric fan. Coolant Recovery Tank B. Radiator Pressure Cap C. A. Gasoline Engines When you decide it's safe to lift the hood,here's what you . If the coolant insidethe coolant recovery tank is not running and can injure you ' 11 see: If your vehicle has air conditioning, the auxiliary electric engine cooling fan under the hood can start up even when the engine is boiling, don't do anything else until it cools down.
Cooling System -- Engine Fan(s) The coolant levelshould be at or above theCOLD mark. 5-15 Keephands, clothing and tools away from any underhood electric fan. Coolant Recovery Tank B. Radiator Pressure Cap C. A. Gasoline Engines When you decide it's safe to lift the hood,here's what you . If the coolant insidethe coolant recovery tank is not running and can injure you ' 11 see: If your vehicle has air conditioning, the auxiliary electric engine cooling fan under the hood can start up even when the engine is boiling, don't do anything else until it cools down.
Owner's Manual
Page 275
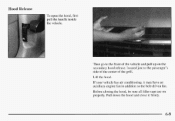
... box out and take the tools out of the box. Your vehicle may have a pair of emergency gloves secured tothe jack. If your Suburban has a jack cover, lift the tab up to the left and take it and the retainer off.Take the jack and storage box out and take the tools...
... box out and take the tools out of the box. Your vehicle may have a pair of emergency gloves secured tothe jack. If your Suburban has a jack cover, lift the tab up to the left and take it and the retainer off.Take the jack and storage box out and take the tools...
Owner's Manual
Page 277
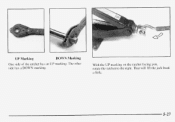
That will lift the jack head a little. $ One side of the ratchet has an UP marking. The other side has a DOWN marking. 1 UP Marking DOWN Marking With the UP marking on the ratchet filcing you rotate the ratchet to the right.
That will lift the jack head a little. $ One side of the ratchet has an UP marking. The other side has a DOWN marking. 1 UP Marking DOWN Marking With the UP marking on the ratchet filcing you rotate the ratchet to the right.
Owner's Manual
Page 279
..., position the jack on the frame behind the flat tire. If' the vehicle slips off the jack,you could be sure to fit the jack lift head into the proper location before raising the vehicle. If the flat tire is on the front of the vehicle, position the jack on the...
..., position the jack on the frame behind the flat tire. If' the vehicle slips off the jack,you could be sure to fit the jack lift head into the proper location before raising the vehicle. If the flat tire is on the front of the vehicle, position the jack on the...
Owner's Manual
Page 301
If your vehicle has air conditioning, it firmly. 6-9 Pull downthe hood and close it may have an auxiliary engine fanin addition to the passenger's side of the center of the vehicleand pull up on properly. Hood Release To open the hood, first pull the handle inside the vehicle. Lift the hood. Before closing the hood, be sure all filler caps are on the secondary hood release, located just to the belt-driven fan. Then go to the front of the grill.
If your vehicle has air conditioning, it firmly. 6-9 Pull downthe hood and close it may have an auxiliary engine fanin addition to the passenger's side of the center of the vehicleand pull up on properly. Hood Release To open the hood, first pull the handle inside the vehicle. Lift the hood. Before closing the hood, be sure all filler caps are on the secondary hood release, located just to the belt-driven fan. Then go to the front of the grill.
Owner's Manual
Page 302
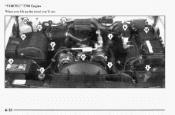
"VORTEC" 5700 Engine When you lift up the hood you'll see: 6-10
"VORTEC" 5700 Engine When you lift up the hood you'll see: 6-10