

Owner's Manual
Page 8
Model Reference This manual covers thesemodels: Regular Cab Pickup Extended Cab Pickup vi
Model Reference This manual covers thesemodels: Regular Cab Pickup Extended Cab Pickup vi
Owner's Manual
Page 14
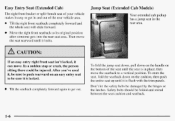
... rear area. Tilt the seatback completely forward again to get in and out of the rear vehicle area. 0 Jump Seat (ExtendedCab Models) Your extended cab pickup has a jump seat in place, then move . Safety belts should be injured. Easy Entry Seat (Extended Cab) The right front bucket or split-bench seat...
... rear area. Tilt the seatback completely forward again to get in and out of the rear vehicle area. 0 Jump Seat (ExtendedCab Models) Your extended cab pickup has a jump seat in place, then move . Safety belts should be injured. Easy Entry Seat (Extended Cab) The right front bucket or split-bench seat...

Owner's Manual
Page 35
Each jump seat has a lap belt with belts lap only. (If your extended cab pickup has the optional side access panel, there's only one reserve seating position.) It's very important for rearseat passengers to buckle up! And they can be ...
Each jump seat has a lap belt with belts lap only. (If your extended cab pickup has the optional side access panel, there's only one reserve seating position.) It's very important for rearseat passengers to buckle up! And they can be ...
Owner's Manual
Page 139
... (Four-wheel Drive with the Manual Shift Transfer CaseOnly) Recreational Vehicle Towing (Except Four-wheel Drive with the Manual Shift Transfer Case) Loading Your Vehicle Pickup Conversion to Chassis Cab Towing a Trailer 4-1
... (Four-wheel Drive with the Manual Shift Transfer CaseOnly) Recreational Vehicle Towing (Except Four-wheel Drive with the Manual Shift Transfer Case) Loading Your Vehicle Pickup Conversion to Chassis Cab Towing a Trailer 4-1

Owner's Manual
Page 184
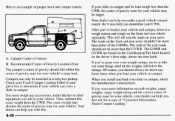
... people you carry inside your vehicle before you buy and install the new equipment. The length of the planks must be inserted in the pickup box depressions. See"Loading Your Vehicle" in the Index. The center of gravity height must be properly marked according to prevent it from... the payload. 2-Tiered Loading By positioning four 2" x 6" wooden planks across the width of the pickup box, you can help you with this upper load platform, be positioned in a zone over the rear axle. Thezone is securely tied down to ...
... people you carry inside your vehicle before you buy and install the new equipment. The length of the planks must be inserted in the pickup box depressions. See"Loading Your Vehicle" in the Index. The center of gravity height must be properly marked according to prevent it from... the payload. 2-Tiered Loading By positioning four 2" x 6" wooden planks across the width of the pickup box, you can help you with this upper load platform, be positioned in a zone over the rear axle. Thezone is securely tied down to ...
Owner's Manual
Page 186
... weight from the CWR. Campers can help you add to determine if your vehicle or camper. Check your Truck-Camper Loading Label in a long box pickup. The GAWR and GVWR are found on the Certificationire label located on the front and rear axles shouldn't be installed in your glove box to...
... weight from the CWR. Campers can help you add to determine if your vehicle or camper. Check your Truck-Camper Loading Label in a long box pickup. The GAWR and GVWR are found on the Certificationire label located on the front and rear axles shouldn't be installed in your glove box to...

Owner's Manual
Page 187
... a Trailer" later in this section. To pull a trailer correctly, follow the advice in costly repairs not covered by your vehicle. Pickup Conversion to pickups. You and your load the right way, and if you pull a trailer. Ask your GM dealer for a advice and information about...towingtrailer with your vehicle with yourvehicle. -- Weigh your trailer attached, so that , as manufactured, there are differences between a chassis caband a pickup with yourvehicle. 4-49 Pull a trailer onlyif you won't go over the GVWR or the GAWR. However, we recommend that conversions of your ...
... a Trailer" later in this section. To pull a trailer correctly, follow the advice in costly repairs not covered by your vehicle. Pickup Conversion to pickups. You and your load the right way, and if you pull a trailer. Ask your GM dealer for a advice and information about...towingtrailer with your vehicle with yourvehicle. -- Weigh your trailer attached, so that , as manufactured, there are differences between a chassis caband a pickup with yourvehicle. 4-49 Pull a trailer onlyif you won't go over the GVWR or the GAWR. However, we recommend that conversions of your ...
Owner's Manual
Page 226
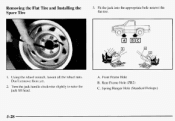
Rear Frame Hole (ZR2) C. Turn the jack handle clockwise slightly to raise the jack lift head. 5-28 Fit the jack into the appropriate hole nearest the flat tire. 1. Front Frame Hole B. Spring Hanger Hole (Standard Pickups) 2. Don't remove them yet. A. Using the wheel wrench, loosen all the wheel nuts. Removing the Flat Tire and Installing the Spare Tire 3.
Rear Frame Hole (ZR2) C. Turn the jack handle clockwise slightly to raise the jack lift head. 5-28 Fit the jack into the appropriate hole nearest the flat tire. 1. Front Frame Hole B. Spring Hanger Hole (Standard Pickups) 2. Don't remove them yet. A. Using the wheel wrench, loosen all the wheel nuts. Removing the Flat Tire and Installing the Spare Tire 3.
Owner's Manual
Page 230
This could damagethe wheel. Store all these in pickup bed. I I NOTICE: Improperly tightened wheelnuts can lead to brake pulsation and rotordamage. Secure the tire in the proper place. If you can cause the wheel ...
This could damagethe wheel. Store all these in pickup bed. I I NOTICE: Improperly tightened wheelnuts can lead to brake pulsation and rotordamage. Secure the tire in the proper place. If you can cause the wheel ...

Owner's Manual
Page 278
... stoplamp in while you turn the socket clockwise until it . Put the socket into the assembly and turn the socket. 5. Remove the screws from the pickup side panel. 4. Push the new bulb into place. 8. Pull the assembly away from the lamp assembly near the tailgate latch. 4. Replace the assembly. Install and...
... stoplamp in while you turn the socket clockwise until it . Put the socket into the assembly and turn the socket. 5. Remove the screws from the pickup side panel. 4. Push the new bulb into place. 8. Pull the assembly away from the lamp assembly near the tailgate latch. 4. Replace the assembly. Install and...
Owner's Manual
Page 397
... Owner Publications. Ordering ...8- 12 P a i n t Spotting. Manual Transmission ...2-32 6-69 Parts. I4 Off-Road Recovery ...4- 11 Oil. Replacement ...4-12 Passing ...4-46 Payload ...Periodic Maintenance Inspections ...7-58 Pickup Conversion to Chassis Cab ...4-49 Power 2-50 Accessory Outlets ...2-5 DoorLocks ...6-63 OptionFuses ...2-47 Remote Control Mirror ...Steering ...4-9 Steering Fluid ...6-28 Windows ...2-35 Pregnancy. Chemical ...6-60...
... Owner Publications. Ordering ...8- 12 P a i n t Spotting. Manual Transmission ...2-32 6-69 Parts. I4 Off-Road Recovery ...4- 11 Oil. Replacement ...4-12 Passing ...4-46 Payload ...Periodic Maintenance Inspections ...7-58 Pickup Conversion to Chassis Cab ...4-49 Power 2-50 Accessory Outlets ...2-5 DoorLocks ...6-63 OptionFuses ...2-47 Remote Control Mirror ...Steering ...4-9 Steering Fluid ...6-28 Windows ...2-35 Pregnancy. Chemical ...6-60...


