

Owner's Manual
Page 11
Reclining Seatbacks (Bucket Seats or 60/40~Bench) To adjust the front seatback, lift the lever on outside of the seat. the and Pull up on the lever the seat will be a knob the on the outer side of the driver and passenger bucket seats. Release the lever to decrease lumbar support. Turn the knob counterclockwise to increase lumbar support and clockwise to lock seatback where you have this feature, there will go toan upright position. 1-3 Manual Lumbar Support (Option) If you want it.
Reclining Seatbacks (Bucket Seats or 60/40~Bench) To adjust the front seatback, lift the lever on outside of the seat. the and Pull up on the lever the seat will be a knob the on the outer side of the driver and passenger bucket seats. Release the lever to decrease lumbar support. Turn the knob counterclockwise to increase lumbar support and clockwise to lock seatback where you have this feature, there will go toan upright position. 1-3 Manual Lumbar Support (Option) If you want it.
Owner's Manual
Page 13
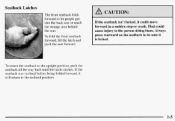
... forward ina sudden stop or crash. Seatback Latches The front seatback folds forward to the person sitting there. A CAUTION: 0 To fold the front seatback forward, lift the latch and, push the seat forward. Always press rearward on the seatback be sure it will return to is locked. If the seatback was...
... forward ina sudden stop or crash. Seatback Latches The front seatback folds forward to the person sitting there. A CAUTION: 0 To fold the front seatback forward, lift the latch and, push the seat forward. Always press rearward on the seatback be sure it will return to is locked. If the seatback was...
Owner's Manual
Page 96
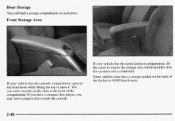
Front StorageArea If your vehicle has this console compartment, squeeze the front lever while lifting the top to expose the storage area which includes slots for cassettes and a coinholder. If you may have a compact disc player, you have a storage pocket ...on each door. Some vehicles may store compact discs inside the console. 2-48 If your vehicle has the center armrest compartment, lift the cover to open it. Door Storage You will find a storage compartment on the back of the compartment. You can storecassettes in the slots in...
Front StorageArea If your vehicle has this console compartment, squeeze the front lever while lifting the top to expose the storage area which includes slots for cassettes and a coinholder. If you may have a compact disc player, you have a storage pocket ...on each door. Some vehicles may store compact discs inside the console. 2-48 If your vehicle has the center armrest compartment, lift the cover to open it. Door Storage You will find a storage compartment on the back of the compartment. You can storecassettes in the slots in...
Owner's Manual
Page 97
... be pulled out for additional glare protection and a strap for holding small items, such as possible, then remove the tray. To remove the front ashtray, lift the release tab as high as maps. If you can swing down and...
... be pulled out for additional glare protection and a strap for holding small items, such as possible, then remove the tray. To remove the front ashtray, lift the release tab as high as maps. If you can swing down and...

Owner's Manual
Page 98
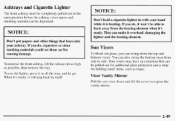
... exceed 25 amps. Always turn on for extended periods drain will your battery. These circuits are located below the cigarette lighter. Just pull down and lift the mirror cover to turn off any electrical equipment you can plug in use. Illuminated Visor Vanity Mirror (If Equipped) Accessory Power Outlets (If Equipped...
... exceed 25 amps. Always turn on for extended periods drain will your battery. These circuits are located below the cigarette lighter. Just pull down and lift the mirror cover to turn off any electrical equipment you can plug in use. Illuminated Visor Vanity Mirror (If Equipped) Accessory Power Outlets (If Equipped...
Owner's Manual
Page 102
... it must be . Each tachometer has a different limit depending on the driver's door to higher You a gear, or lift your vehicle. The shaded red warning range tells you have an automatic transmission, lift your speed in the red range, or engine damage will vary all the time that your vehicle has been...
... it must be . Each tachometer has a different limit depending on the driver's door to higher You a gear, or lift your vehicle. The shaded red warning range tells you have an automatic transmission, lift your speed in the red range, or engine damage will vary all the time that your vehicle has been...

Owner's Manual
Page 207
... position with your vehicle is being towed, have one, should be clamped in the unlock position, press the shift lever button and shift into place. Lift the boot and find the white solenoid lever. 4. The parking brake should be in this .The transmission should be released. When your thumb. 3.
... position with your vehicle is being towed, have one, should be clamped in the unlock position, press the shift lever button and shift into place. Lift the boot and find the white solenoid lever. 4. The parking brake should be in this .The transmission should be released. When your thumb. 3.

Owner's Manual
Page 208
...damage avehicle. To help avoid damage, install a towing dolly and raise the vehicle until adequate clearance is obtained between the ground and/or wheel-lift equipment. NOTICE: Do not tow with the electronic transfer case option.must usea towing dolly underthe rear wheels when towing from vehicle to ground ...-- 35 mph (56 k d h ) , 50 miles (80 km.) Vehicles with four-wheel-drive with sling-type equipmentor fascidfog lamp damage will occur. Use wheel-lift or car-carrier equipment. Additional ramping may be required for car-carrier equipment. Do not attach winch cables or J-hooks to wheel...
...damage avehicle. To help avoid damage, install a towing dolly and raise the vehicle until adequate clearance is obtained between the ground and/or wheel-lift equipment. NOTICE: Do not tow with the electronic transfer case option.must usea towing dolly underthe rear wheels when towing from vehicle to ground ...-- 35 mph (56 k d h ) , 50 miles (80 km.) Vehicles with four-wheel-drive with sling-type equipmentor fascidfog lamp damage will occur. Use wheel-lift or car-carrier equipment. Additional ramping may be required for car-carrier equipment. Do not attach winch cables or J-hooks to wheel...

Owner's Manual
Page 209
... under the front use T-hooksinserted in the T-hookslots. Additional ramping may be required for carrier equipment.Use car safety chains and wheel straps. Use wheel-lift or car-carrier equipment. Damage can occur from vehicle to ground or vehicle to suspension components when using car-carrier equipment. To help avoid damage..., install a towing dolly and raise the vehicle until adequate clearance is obtained between the ground and/or wheel-lift equipment. Do not attach winch cables or J-hooks to wheel...
... under the front use T-hooksinserted in the T-hookslots. Additional ramping may be required for carrier equipment.Use car safety chains and wheel straps. Use wheel-lift or car-carrier equipment. Damage can occur from vehicle to ground or vehicle to suspension components when using car-carrier equipment. To help avoid damage..., install a towing dolly and raise the vehicle until adequate clearance is obtained between the ground and/or wheel-lift equipment. Do not attach winch cables or J-hooks to wheel...
Owner's Manual
Page 211
... an air conditioner, turn offthe engine and get everyoneout o the vehicleuntil it off. Now see or hear no steam, the problem may decide not to lift the hood but see if the warning stops. You may not be safe, driveslower for long periods in a traffic jam, shift to normal idle speed...
... an air conditioner, turn offthe engine and get everyoneout o the vehicleuntil it off. Now see or hear no steam, the problem may decide not to lift the hood but see if the warning stops. You may not be safe, driveslower for long periods in a traffic jam, shift to normal idle speed...
Owner's Manual
Page 212
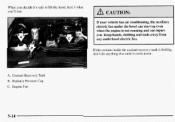
Engine Fan 5-14 Coolant Recovery Tank B. I f the coolant inside the coolant recovery tank is boiling, don't do anything else until it 's safe to lift the hood, here's what you'll see: If your vehicle hasair conditioning, the auxiliary electric fan under the hood can start up even when the engine is not running and can injure you. When you decide it cools down. Keep hands, clothing and tools away from any underhood electric fan. Radiator Pressure Cap C. A.
Engine Fan 5-14 Coolant Recovery Tank B. I f the coolant inside the coolant recovery tank is boiling, don't do anything else until it 's safe to lift the hood, here's what you'll see: If your vehicle hasair conditioning, the auxiliary electric fan under the hood can start up even when the engine is not running and can injure you. When you decide it cools down. Keep hands, clothing and tools away from any underhood electric fan. Radiator Pressure Cap C. A.
Owner's Manual
Page 226
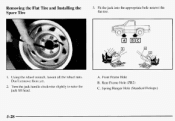
Don't remove them yet. A. Turn the jack handle clockwise slightly to raise the jack lift head. 5-28 Using the wheel wrench, loosen all the wheel nuts. Front Frame Hole B. Spring Hanger Hole (Standard Pickups) 2. Rear Frame Hole (ZR2) C. Removing the Flat Tire and Installing the Spare Tire 3. Fit the jack into the appropriate hole nearest the flat tire. 1.
Don't remove them yet. A. Turn the jack handle clockwise slightly to raise the jack lift head. 5-28 Using the wheel wrench, loosen all the wheel nuts. Front Frame Hole B. Spring Hanger Hole (Standard Pickups) 2. Rear Frame Hole (ZR2) C. Removing the Flat Tire and Installing the Spare Tire 3. Fit the jack into the appropriate hole nearest the flat tire. 1.

Owner's Manual
Page 227
... supported only by turning the jack handle clockwise. Never get under a vehicle when it is enough room for the spare tire to fit the jack lift head into the proper location before raising your vehicle with the jack improperly positioned can damage the vehicle and even make the vehicle fall. Remove...
... supported only by turning the jack handle clockwise. Never get under a vehicle when it is enough room for the spare tire to fit the jack lift head into the proper location before raising your vehicle with the jack improperly positioned can damage the vehicle and even make the vehicle fall. Remove...

Owner's Manual
Page 245
These include liquids like gasoline, oil, coolant,brake fluid, windshield washer and other fluids, and plastic or rubber. Then go to drop or spill things that burn can on when you lift the hood. 6-7 or others You could be burned.Be careful not to the front of the vehicle and release the secondary hood release. 1 A CAUTION: I I- You may have a lamp that comes on hot engine parts and get start a fire. Lift the hood, release the hood prop from its retainer and put the hood prop into the slot in the hood. Things that will burn ontoa hot engine.
These include liquids like gasoline, oil, coolant,brake fluid, windshield washer and other fluids, and plastic or rubber. Then go to drop or spill things that burn can on when you lift the hood. 6-7 or others You could be burned.Be careful not to the front of the vehicle and release the secondary hood release. 1 A CAUTION: I I- You may have a lamp that comes on hot engine parts and get start a fire. Lift the hood, release the hood prop from its retainer and put the hood prop into the slot in the hood. Things that will burn ontoa hot engine.
Owner's Manual
Page 246
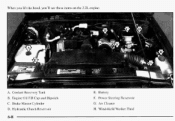
Air Cleaner H. Engine Oil Fill Cap and Dipstick C. When you lift the hood, you'll see these items on the 2.2L engine: A. Hydraulic Clutch Reservoir F. Power Steering Reservoir G. Brake Master Cylinder D. Windshield Washer Fluid 6-8 Battery B. Coolant Recovery Tank E.
Air Cleaner H. Engine Oil Fill Cap and Dipstick C. When you lift the hood, you'll see these items on the 2.2L engine: A. Hydraulic Clutch Reservoir F. Power Steering Reservoir G. Brake Master Cylinder D. Windshield Washer Fluid 6-8 Battery B. Coolant Recovery Tank E.
Owner's Manual
Page 247
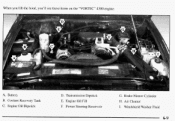
Coolant Recovery Tank D. Engine Oil Fill F. Windshield Washer Fluid C. When you lift the hood, you'll see these items the "VORTEC" 4300 engine: on I . Power Steering Reservoir H. Battery B. Transmission Dipstick G. Brake Master Cylinder E. Air Cleaner I A. Engine Oil Dipstick 6-9
Coolant Recovery Tank D. Engine Oil Fill F. Windshield Washer Fluid C. When you lift the hood, you'll see these items the "VORTEC" 4300 engine: on I . Power Steering Reservoir H. Battery B. Transmission Dipstick G. Brake Master Cylinder E. Air Cleaner I A. Engine Oil Dipstick 6-9
Owner's Manual
Page 248
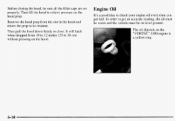
... the hood down firmly to close.It will latch when dropped from the slot in the hood and return the prop to get fuel. Then lift the hood to check your engine oil every time you get an accurate reading, the oil must be warm and the vehicle must be sure...
... the hood down firmly to close.It will latch when dropped from the slot in the hood and return the prop to get fuel. Then lift the hood to check your engine oil every time you get an accurate reading, the oil must be warm and the vehicle must be sure...

Owner's Manual
Page 253
... the cover on the ground, into sewers, or into streams or bodies water. Don't ever disposeof oil by putting it on . Remove the cover and lift out the air filter. If you know that used engine oil contains certain elements that hold the cover in the trash, pouring it in place...
... the cover on the ground, into sewers, or into streams or bodies water. Don't ever disposeof oil by putting it on . Remove the cover and lift out the air filter. If you know that used engine oil contains certain elements that hold the cover in the trash, pouring it in place...

Owner's Manual
Page 279
... under the side of the lens. 2. Connect the ground wire. 8. Vanity Mirror Lamps 1. Press the new bulb into the frame. Connect the electrical connector to lift out the lens. 4. Snap the lens into place. 5. Gently pry the screwdriver down in order to the lamp assembly. 7. Rotate the lens downward. 6. Disconnect the...
... under the side of the lens. 2. Connect the ground wire. 8. Vanity Mirror Lamps 1. Press the new bulb into the frame. Connect the electrical connector to lift out the lens. 4. Snap the lens into place. 5. Gently pry the screwdriver down in order to the lamp assembly. 7. Rotate the lens downward. 6. Disconnect the...

Owner's Manual
Page 280
Arm Assembly C. I NOTICE: I Use care when removing installing a blade or assembly. A. Blade Pivot E. Blade Assembly B. Locking Tab D. Accidental bumping can cause the arm to fall back and strike the windshield. 1. Windshield Wiper Blade Replacement See "Normal Maintenance Replacement Parts" in the Index for the proper type of replacement blade. To remove the old wiper blades, lift the wiper arm until it locks into a vertical position. Hook Slot E Arm Hook 6-42
Arm Assembly C. I NOTICE: I Use care when removing installing a blade or assembly. A. Blade Pivot E. Blade Assembly B. Locking Tab D. Accidental bumping can cause the arm to fall back and strike the windshield. 1. Windshield Wiper Blade Replacement See "Normal Maintenance Replacement Parts" in the Index for the proper type of replacement blade. To remove the old wiper blades, lift the wiper arm until it locks into a vertical position. Hook Slot E Arm Hook 6-42