

Owner's Manual
Page 112
A green arrow on at twice the normal rate, a signal bulb may be burned o u t and other drivers may not see "Fuses" in the direction of the turn or lane ... i 1, 1 To signal a lane change, just raise or lower the lever until you t o signal a turn or a lane change . If a bulb is finished, the lever will flash in the Index). 2-40 If the green arrows don't go on the r L instrument panel will return automatically... Turn ...Lane Change Indicator The turn signal has two upward (for right signal) and two downward (for burned-out bulbs and a blown fuse (see your lane change .
A green arrow on at twice the normal rate, a signal bulb may be burned o u t and other drivers may not see "Fuses" in the direction of the turn or lane ... i 1, 1 To signal a lane change, just raise or lower the lever until you t o signal a turn or a lane change . If a bulb is finished, the lever will flash in the Index). 2-40 If the green arrows don't go on the r L instrument panel will return automatically... Turn ...Lane Change Indicator The turn signal has two upward (for right signal) and two downward (for burned-out bulbs and a blown fuse (see your lane change .
Owner's Manual
Page 233
When towing a trailer, the green arrows on your instrument panel will flash for turns even if the bulbs on your instrument panel will flash whenever you signal a turn or lane change lanes or stop. If you have an automatic transmission you should not ... hooked up and extend the life of your speed to around 45 mph (70 km/h) to engine Overheating. here's how to be sure the trailer bulbs are towing a trailer, it's better not to use DRIVE (3) (or, as you do it: 1.
When towing a trailer, the green arrows on your instrument panel will flash for turns even if the bulbs on your instrument panel will flash whenever you signal a turn or lane change lanes or stop. If you have an automatic transmission you should not ... hooked up and extend the life of your speed to around 45 mph (70 km/h) to engine Overheating. here's how to be sure the trailer bulbs are towing a trailer, it's better not to use DRIVE (3) (or, as you do it: 1.

Owner's Manual
Page 328
Install the retainer to prepare your dealer to learn how to the headlamp and tighten the screws. 6-46 Pull the headlamp out and remove the retainer. 3. Unplug and remove the headlamp. 4. Plug in the new headlamp and put it in place. 5. Contact your vehicle for longer storage periods. Sealed Beam Headlamps 1. Remove the four screws from the headlamp retainer. 2. Bulb Replacement Before you replace any bulbs, be sure that all the lamps are off and the engine isn't running.
Install the retainer to prepare your dealer to learn how to the headlamp and tighten the screws. 6-46 Pull the headlamp out and remove the retainer. 3. Unplug and remove the headlamp. 4. Plug in the new headlamp and put it in place. 5. Contact your vehicle for longer storage periods. Sealed Beam Headlamps 1. Remove the four screws from the headlamp retainer. 2. Bulb Replacement Before you replace any bulbs, be sure that all the lamps are off and the engine isn't running.

Owner's Manual
Page 329
If either comes in contact with the bulb, clean it come in contact with alcoholor a suitable degreaser and wipe the bulb dry. Halogen Bulbs NOTICE: Avoid touching the bulb or letting it with anything damp. Remove the two screws at the top of the radiator support. "4 ? 2. Pull the headlamp lens assembly out. 6-47 Oil from your skin or moisture on the bulb can cause the bulb to explode whenit is turned on. Composite Headlamps 1.
If either comes in contact with the bulb, clean it come in contact with alcoholor a suitable degreaser and wipe the bulb dry. Halogen Bulbs NOTICE: Avoid touching the bulb or letting it with anything damp. Remove the two screws at the top of the radiator support. "4 ? 2. Pull the headlamp lens assembly out. 6-47 Oil from your skin or moisture on the bulb can cause the bulb to explode whenit is turned on. Composite Headlamps 1.
Owner's Manual
Page 330
Remove the lamp assembly by swinging it out from the inside edge of the parking/turn it to the left and remove it out at the outside edge. 6-48 Remove the two screws at the inside edge and sliding it . 5. Unplug the electrical connector. 4. Turn the bulb to the right until it is tight. 6. Plug in the lens assembly and turn signal lamp assembly. 2. Put the headlamp lens assembly back into the vehicle. Put the new bulb in the electrical connector. 7. Install and tighten the two screws. 3. Front Parkingnurn Signal Lamps with Sealed Beam Headlamps I .
Remove the lamp assembly by swinging it out from the inside edge of the parking/turn it to the left and remove it out at the outside edge. 6-48 Remove the two screws at the inside edge and sliding it . 5. Unplug the electrical connector. 4. Turn the bulb to the right until it is tight. 6. Plug in the lens assembly and turn signal lamp assembly. 2. Put the headlamp lens assembly back into the vehicle. Put the new bulb in the electrical connector. 7. Install and tighten the two screws. 3. Front Parkingnurn Signal Lamps with Sealed Beam Headlamps I .

Owner's Manual
Page 331
... it to the left . 6-49 Front Parkingnurn Signal Lamps with Composite Headlamps I . Squeeze the tab on the bulb and turn it to the right until it from the socket . 6. Remove the screws and take out the parkinghurn signal lamp assembly. 2. out of the ...
... it to the left . 6-49 Front Parkingnurn Signal Lamps with Composite Headlamps I . Squeeze the tab on the bulb and turn it to the right until it from the socket . 6. Remove the screws and take out the parkinghurn signal lamp assembly. 2. out of the ...

Owner's Manual
Page 332
... with Sealed Beam and Composite Headlamps 1. Remove the screws and pull out the parkinghrn signal lamp assembly. 2. Put the new bulb in the socket, gently press in gently on the bulb and turn it socket to the right until it . 6-50 Put the parkinghurn signal lamp assembly back into the lamp assembly...
... with Sealed Beam and Composite Headlamps 1. Remove the screws and pull out the parkinghrn signal lamp assembly. 2. Put the new bulb in the socket, gently press in gently on the bulb and turn it socket to the right until it . 6-50 Put the parkinghurn signal lamp assembly back into the lamp assembly...

Owner's Manual
Page 333
Put a new bulb into the side marker assembly and turn it to the right to tighten it is tight. 4. Put the socket back into the socket and push it in until it . 6. Replace the lens and tighten the screws. Roof Marker Lamps I . Remove the screws and lift off the lens. 2. Replace the parkinghrn signal lamp assembly and tighten the screws. 5. Pull the bulb straight out of the socket. 3.
Put a new bulb into the side marker assembly and turn it to the right to tighten it is tight. 4. Put the socket back into the socket and push it in until it . 6. Replace the lens and tighten the screws. Roof Marker Lamps I . Remove the screws and lift off the lens. 2. Replace the parkinghrn signal lamp assembly and tighten the screws. 5. Pull the bulb straight out of the socket. 3.
Owner's Manual
Page 334
Cenfer High Mount Stoplamp(CHMSL) The individual bulbs in the rear lamp assembly access holes..."..., 3. Remove the two black plastic plugs in the CHMSL are not replaceable. Remove the two rear lamp assembly screws inside the fender and pull out the lamp assembly. Open the tailgate or rear doors. 2. You may want to use a magnetic screwdriver when removing the screws. 6-5 2 See your dealer for assistance. Rear Lamps I .
Cenfer High Mount Stoplamp(CHMSL) The individual bulbs in the rear lamp assembly access holes..."..., 3. Remove the two black plastic plugs in the CHMSL are not replaceable. Remove the two rear lamp assembly screws inside the fender and pull out the lamp assembly. Open the tailgate or rear doors. 2. You may want to use a magnetic screwdriver when removing the screws. 6-5 2 See your dealer for assistance. Rear Lamps I .
Owner's Manual
Page 335
... engine components. d. Oxidation Catalytic Converter (Diesel Engines) Your vehicle's oxidation catalytic converter is designed to reduce the particulates in a new bulb and push it i n until it must be replaced with an oxidation converter intended for use leaded fuel. Replace the rear lamp assembly...to reduce the pollutants in your vehicle's exhaust. If you use with diesel engines only. 6-53 Remove the screws from the bulb retainer and take the bulb retainer off of the socket. 6. Way Catalytic Converter (Gasoline Engines) Your vehicle's three-way catalytic converter is tight. 7....
... engine components. d. Oxidation Catalytic Converter (Diesel Engines) Your vehicle's oxidation catalytic converter is designed to reduce the particulates in a new bulb and push it i n until it must be replaced with an oxidation converter intended for use leaded fuel. Replace the rear lamp assembly...to reduce the pollutants in your vehicle's exhaust. If you use with diesel engines only. 6-53 Remove the screws from the bulb retainer and take the bulb retainer off of the socket. 6. Way Catalytic Converter (Gasoline Engines) Your vehicle's three-way catalytic converter is tight. 7....
Owner's Manual
Page 364
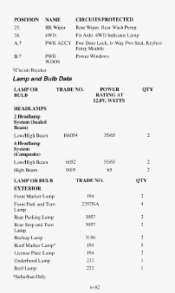
...Frt Axle, 4WD Indicator Lamp PWR ACCY Pwr Door Lock, 6-Way Pwr Seat, Keyless Entry Module PWR WDOS Power Windows ?Circuit Breaker Lamp and Bulb Data LAMP OR BULB HEADLAMPS TRADE NO. POWER RATING AT 12.8V, WATTS 2 Headlamp System (Sealed Beam) Low/High Beam 4 Headlamp System (Composite) Low/High Beam... High Beam H6054 35/65 2 6052 55/65 65 2 2 9005 LAMP OR BULB EXTERIOR Front Marker Lamp Front Park and Turn Lamp Rear Parking Lamp Rear Stop and Turn Lamp Backup Lamp Roof Marker Lamp'% License Plate Lamp...
...Frt Axle, 4WD Indicator Lamp PWR ACCY Pwr Door Lock, 6-Way Pwr Seat, Keyless Entry Module PWR WDOS Power Windows ?Circuit Breaker Lamp and Bulb Data LAMP OR BULB HEADLAMPS TRADE NO. POWER RATING AT 12.8V, WATTS 2 Headlamp System (Sealed Beam) Low/High Beam 4 Headlamp System (Composite) Low/High Beam... High Beam H6054 35/65 2 6052 55/65 65 2 2 9005 LAMP OR BULB EXTERIOR Front Marker Lamp Front Park and Turn Lamp Rear Parking Lamp Rear Stop and Turn Lamp Backup Lamp Roof Marker Lamp'% License Plate Lamp...
Owner's Manual
Page 365
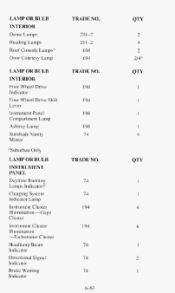
... Directional Signal Indicator Brake W u n i ng Indicator TRADE NO. 74 74 I94 4 194 6 74 74 74 I 2 I 6-83 LAMP OR BULB INTERIOR Four Wheel Drive Indicator Four Wheel Drive Shift Lever Instrunlent Panel Compartment Lamp Ashtray Lamp Sunshade Vanity M i rros '3Suburban Only I94 I94 74 1 1... 4 LAMP OR BULB INSTRUMENT PANEL Daytime Running Lamps Indicator? LAMP OR BULB INTERIOR Dome Lamps Reading Lamps TRADE NO. 21 1-2 21 1-2 2 4 Roof Console Lamps:': Door Courtesy Lamp I48 I94...
... Directional Signal Indicator Brake W u n i ng Indicator TRADE NO. 74 74 I94 4 194 6 74 74 74 I 2 I 6-83 LAMP OR BULB INTERIOR Four Wheel Drive Indicator Four Wheel Drive Shift Lever Instrunlent Panel Compartment Lamp Ashtray Lamp Sunshade Vanity M i rros '3Suburban Only I94 I94 74 1 1... 4 LAMP OR BULB INSTRUMENT PANEL Daytime Running Lamps Indicator? LAMP OR BULB INTERIOR Dome Lamps Reading Lamps TRADE NO. 21 1-2 21 1-2 2 4 Roof Console Lamps:': Door Courtesy Lamp I48 I94...

Owner's Manual
Page 366
LAMP OR BULB INSTRUMENT PANEL SIR (Air Bag) Safety Belt Warning Check Gages Indicator Malfunction Indicator ("Service Engine Soon") Lamp Upshift Indicator Glow Plugs Lamp** Low Coolant Water in Fuel Service ThrottleSoon Lamp*: : I 'k'kDiesel only +Canadian Vehicles only 'I'KADE NO. 74 74 74 74 74 74 74 74 74 6-84
LAMP OR BULB INSTRUMENT PANEL SIR (Air Bag) Safety Belt Warning Check Gages Indicator Malfunction Indicator ("Service Engine Soon") Lamp Upshift Indicator Glow Plugs Lamp** Low Coolant Water in Fuel Service ThrottleSoon Lamp*: : I 'k'kDiesel only +Canadian Vehicles only 'I'KADE NO. 74 74 74 74 74 74 74 74 74 6-84
Owner's Manual
Page 480
Bulb Replacement Center High Mounted Stop Lamp (CHMSL) ...Composite Headlamps ...Front Park Turn Signal Lamps with Composite ...Front Park Turn Signal Lamps with AUTO TONE System ......
Bulb Replacement Center High Mounted Stop Lamp (CHMSL) ...Composite Headlamps ...Front Park Turn Signal Lamps with Composite ...Front Park Turn Signal Lamps with AUTO TONE System ......

Owner's Manual
Page 483
... Pressure Gage ...2-80 Speedometer ...2-68 Tachometer ...2-69 Tamper Resistant Odometer ...2-68 Trip Odometer ...2-68 2-81 Voltmeter ... H Halogen Bulbs (See "Bulb Replacement") Hazard Warning Flashers ...5-1 Head Restraints (See "Seats") Headlamps and Vehicle Lighting ...+ ...2-48 Re.placement (See "Bulb Replacement") High Beam Indicator Light (See "Lights") High-Low Beamchanger ...2-38 2-46 Reminder ...Heatercontrols ...3-1 RearHeater ...3-5 Heater...
... Pressure Gage ...2-80 Speedometer ...2-68 Tachometer ...2-69 Tamper Resistant Odometer ...2-68 Trip Odometer ...2-68 2-81 Voltmeter ... H Halogen Bulbs (See "Bulb Replacement") Hazard Warning Flashers ...5-1 Head Restraints (See "Seats") Headlamps and Vehicle Lighting ...+ ...2-48 Re.placement (See "Bulb Replacement") High Beam Indicator Light (See "Lights") High-Low Beamchanger ...2-38 2-46 Reminder ...Heatercontrols ...3-1 RearHeater ...3-5 Heater...

Owner's Manual
Page 484
... Certificatioflire (See "CertificatiodI'ire Label") Lamps 2-82 Center High Mounted Stop Lamp (CHMSL) ...Daytime Running Lamps ...2-49 Dome ...2-50 Headlights (See "Headlamps") 6-82 Lamp and Bulb Data ...Reading ...2-50 Replacement (See "BulbReplacement") Underhood Reel Lamp ...2-51 Lights Air Bag Readiness Light ...2-70 Anti-Lock Brake System Warning Light ...2-72 Brake System...
... Certificatioflire (See "CertificatiodI'ire Label") Lamps 2-82 Center High Mounted Stop Lamp (CHMSL) ...Daytime Running Lamps ...2-49 Dome ...2-50 Headlights (See "Headlamps") 6-82 Lamp and Bulb Data ...Reading ...2-50 Replacement (See "BulbReplacement") Underhood Reel Lamp ...2-51 Lights Air Bag Readiness Light ...2-70 Anti-Lock Brake System Warning Light ...2-72 Brake System...


