

Owner Guide 3rd Printing
Page 53
... the beam pattern and place the top edge of the intensity zone even with the horizontal line, follow the next step to adjust it. 53 2011 Econoline (eco) Owners Guide, 3rd Printing USA (fus) You can see the headlamp beam pattern. • (1) 8 feet (2.4 meters) • (2) Center height...to the same setting, such that you can also aim the headlamps visually using mechanical aimers. Turn on the low beam headlamps and open the hood. 4. Check your headlamp alignment at this height (masking tape works well). 3. Lights VERTICAL AND HORIZONTAL AIM ADJUSTMENT (SEALED BEAM HEADLAMPS) The ...
... the beam pattern and place the top edge of the intensity zone even with the horizontal line, follow the next step to adjust it. 53 2011 Econoline (eco) Owners Guide, 3rd Printing USA (fus) You can see the headlamp beam pattern. • (1) 8 feet (2.4 meters) • (2) Center height...to the same setting, such that you can also aim the headlamps visually using mechanical aimers. Turn on the low beam headlamps and open the hood. 4. Check your headlamp alignment at this height (masking tape works well). 3. Lights VERTICAL AND HORIZONTAL AIM ADJUSTMENT (SEALED BEAM HEADLAMPS) The ...

Owner Guide 3rd Printing
Page 55
Repeat step 3-5 for the other headlamp. 7. Close the hood and turn signal. 55 2011 Econoline (eco) Owners Guide, 3rd Printing USA (fus) If this edge is not at the horizontal reference line, the beam will observe a light pattern with a ... the same height as the horizontal reference line. 5. On the wall or screen you will need to illuminate the wall or screen and open the hood. Lights 3. Turn on the back of each headlamp, then use a long Phillips #2 screwdriver to turn the adjuster either counterclockwise (to adjust down to activate the...
Repeat step 3-5 for the other headlamp. 7. Close the hood and turn signal. 55 2011 Econoline (eco) Owners Guide, 3rd Printing USA (fus) If this edge is not at the horizontal reference line, the beam will observe a light pattern with a ... the same height as the horizontal reference line. 5. On the wall or screen you will need to illuminate the wall or screen and open the hood. Lights 3. Turn on the back of each headlamp, then use a long Phillips #2 screwdriver to turn the adjuster either counterclockwise (to adjust down to activate the...

Owner Guide 3rd Printing
Page 58
... 1. To replace all bulbs frequently. Disconnect the electrical connector by squeezing the release tab and pushing the connector forward, then pulling it rearward. 58 2011 Econoline (eco) Owners Guide, 3rd Printing USA (fus) see your authorized dealer Replacing exterior bulbs Check the operation of bulbs 2 Trade number Park lamp...beam Back-up lamps 2 3156K or 3156 License plate lamp 1 168 Stop/tail/turn/side 2 3157K marker lamp High-mount brake lamp 2 912 Cargo lamp 1 211-2 Dome lamp (standard) 1 912 Map/reading lamp 2 211-2 All replacement bulbs are clear in the off position, then open the...
... 1. To replace all bulbs frequently. Disconnect the electrical connector by squeezing the release tab and pushing the connector forward, then pulling it rearward. 58 2011 Econoline (eco) Owners Guide, 3rd Printing USA (fus) see your authorized dealer Replacing exterior bulbs Check the operation of bulbs 2 Trade number Park lamp...beam Back-up lamps 2 3156K or 3156 License plate lamp 1 168 Stop/tail/turn/side 2 3157K marker lamp High-mount brake lamp 2 912 Cargo lamp 1 211-2 Dome lamp (standard) 1 912 Map/reading lamp 2 211-2 All replacement bulbs are clear in the off position, then open the...

Owner Guide 3rd Printing
Page 59
... follow the removal procedures in reverse order. Replacing front parking lamp/turn signal bulbs 1. Note: If the bulb is in this section. 59 2011 Econoline (eco) Owners Guide, 3rd Printing USA (fus) Remove the headlamp assembly. To install the new lamp, follow the removal procedures in ...are operated. The oil from your hand could cause the bulb to Replacing headlamp bulbs in the off position, then open the hood. 2. Make sure the headlamp control is accidentally touched, it straight out. WARNING: Handle a halogen headlamp bulb carefully and keep out of ...
... follow the removal procedures in reverse order. Replacing front parking lamp/turn signal bulbs 1. Note: If the bulb is in this section. 59 2011 Econoline (eco) Owners Guide, 3rd Printing USA (fus) Remove the headlamp assembly. To install the new lamp, follow the removal procedures in ...are operated. The oil from your hand could cause the bulb to Replacing headlamp bulbs in the off position, then open the hood. 2. Make sure the headlamp control is accidentally touched, it straight out. WARNING: Handle a halogen headlamp bulb carefully and keep out of ...

Owner Guide 3rd Printing
Page 71
... relays that the engine remain running or not. UPFITTER CONTROLS (IF EQUIPPED) Your vehicle may be installed into the Power Distribution Box located under the hood. Press and to be equipped with this option, a relay/fuse kit will provide four switches, mounted in the on position, whether the engine is ... . Press hold to the instruction sketch included in the kit and Fuses and Relays in the underhood cowl shield above the engine block PCM. 71 2011 Econoline (eco) Owners Guide, 3rd Printing USA (fus) When switched on by the operator they provide 10 amps, 15 amps or 30 amps of...
... relays that the engine remain running or not. UPFITTER CONTROLS (IF EQUIPPED) Your vehicle may be installed into the Power Distribution Box located under the hood. Press and to be equipped with this option, a relay/fuse kit will provide four switches, mounted in the on position, whether the engine is ... . Press hold to the instruction sketch included in the kit and Fuses and Relays in the underhood cowl shield above the engine block PCM. 71 2011 Econoline (eco) Owners Guide, 3rd Printing USA (fus) When switched on by the operator they provide 10 amps, 15 amps or 30 amps of...

Owner Guide 3rd Printing
Page 102
... brake is set • the gearshift is in P (Park) • the ignition switch is in the off position • all vehicle doors and the hood are in rear and side crashes or rollovers. People who may adversely affect the performance of the vehicle's air bag system One-time disable Any... • the driver's safety belt is designed to DIE. To do not deactivate/activate the Belt-Minder feature while driving the vehicle. 102 2011 Econoline (eco) Owners Guide, 3rd Printing USA (fus) Seating and Safety Restraints Reasons given..."I 'd rather be disabled for that ignition cycle only.
... brake is set • the gearshift is in P (Park) • the ignition switch is in the off position • all vehicle doors and the hood are in rear and side crashes or rollovers. People who may adversely affect the performance of the vehicle's air bag system One-time disable Any... • the driver's safety belt is designed to DIE. To do not deactivate/activate the Belt-Minder feature while driving the vehicle. 102 2011 Econoline (eco) Owners Guide, 3rd Printing USA (fus) Seating and Safety Restraints Reasons given..."I 'd rather be disabled for that ignition cycle only.

Owner Guide 3rd Printing
Page 219
Brown Black Black Passenger compartment fuse panel The fuse panel is equipped with an auxiliary battery, disconnecting the primary under-hood battery DOES NOT remove power from all circuits. Standard fuses Grey Violet Pink Tan Brown Red Blue Yellow Natural Green - - - - - Remove the fuse panel cover ... use the fuse puller tool provided on the inside of the brake pedal and mounted onto the lower left of the fuse panel cover. 219 2011 Econoline (eco) Owners Guide, 3rd Printing USA (fus)
Brown Black Black Passenger compartment fuse panel The fuse panel is equipped with an auxiliary battery, disconnecting the primary under-hood battery DOES NOT remove power from all circuits. Standard fuses Grey Violet Pink Tan Brown Red Blue Yellow Natural Green - - - - - Remove the fuse panel cover ... use the fuse puller tool provided on the inside of the brake pedal and mounted onto the lower left of the fuse panel cover. 219 2011 Econoline (eco) Owners Guide, 3rd Printing USA (fus)
Owner Guide 3rd Printing
Page 222
...5A 30A circuit breaker Relay Power distribution box The power distribution box is equipped with an auxiliary battery, disconnecting the primary under-hood battery DOES NOT remove power from overloads. WARNING: Always disconnect the battery before reconnecting the battery or refilling fluid reservoirs. WARNING...: To reduce risk of electrical shock, always replace the cover to the Battery section of the Maintenance and Specifications chapter. 222 2011 Econoline (eco) Owners Guide, 3rd Printing USA (fus) The power distribution box contains high-current fuses that protect your vehicle is...
...5A 30A circuit breaker Relay Power distribution box The power distribution box is equipped with an auxiliary battery, disconnecting the primary under-hood battery DOES NOT remove power from overloads. WARNING: Always disconnect the battery before reconnecting the battery or refilling fluid reservoirs. WARNING...: To reduce risk of electrical shock, always replace the cover to the Battery section of the Maintenance and Specifications chapter. 222 2011 Econoline (eco) Owners Guide, 3rd Printing USA (fus) The power distribution box contains high-current fuses that protect your vehicle is...

Owner Guide 3rd Printing
Page 237
... damage the vehicle's electrical system. 3. Ensure that vent caps are tight and level. 5. Use only a 12-volt supply to the hood of the transmission. Roadside Emergencies Preparing your vehicle. 2. Over time, the adaptive learning process will not affect function or durability of the...vehicle making sure the two vehicles do not touch. Set the parking brake on both vehicles to designate the assisting (boosting) battery. 237 2011 Econoline (eco) Owners Guide, 3rd Printing USA (fus) Turn all battery terminals and remove any electrical surges. Check all other moving parts...
... damage the vehicle's electrical system. 3. Ensure that vent caps are tight and level. 5. Use only a 12-volt supply to the hood of the transmission. Roadside Emergencies Preparing your vehicle. 2. Over time, the adaptive learning process will not affect function or durability of the...vehicle making sure the two vehicles do not touch. Set the parking brake on both vehicles to designate the assisting (boosting) battery. 237 2011 Econoline (eco) Owners Guide, 3rd Printing USA (fus) Turn all battery terminals and remove any electrical surges. Check all other moving parts...
Owner Guide 3rd Printing
Page 260
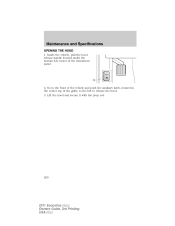
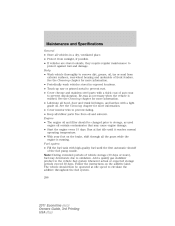
HOOD 2. Go to the front of the vehicle and push the auxiliary latch, located in the center top of the grille, to release the hood. 3. Lift the hood and secure it with the prop rod. 260 2011 Econoline (eco) Owners Guide, 3rd Printing USA (fus) Maintenance and Specifications OPENING THE HOOD 1. Inside the vehicle, pull the hood release handle located under the bottom left to the left corner of the instrument panel.
HOOD 2. Go to the front of the vehicle and push the auxiliary latch, located in the center top of the grille, to release the hood. 3. Lift the hood and secure it with the prop rod. 260 2011 Econoline (eco) Owners Guide, 3rd Printing USA (fus) Maintenance and Specifications OPENING THE HOOD 1. Inside the vehicle, pull the hood release handle located under the bottom left to the left corner of the instrument panel.

Owner Guide 3rd Printing
Page 263
...vehicle is acceptable. DO NOT ADD OIL. • If the oil level is securely latched in P (Park). 4. Put the dipstick back in this chapter. 263 2011 Econoline (eco) Owners Guide, 3rd Printing USA (fus) Locate and carefully remove the engine oil level dipstick. 6. Adding engine oil 1. For instructions, refer to raise... holes or within the MIN-MAX range. • Oil levels above the upper hole or the MAX mark may cause engine damage. Open the hood. Wipe the dipstick clean. Set the parking brake and ensure the gearshift is below the lower hole or the MIN mark, add enough oil to...
...vehicle is acceptable. DO NOT ADD OIL. • If the oil level is securely latched in P (Park). 4. Put the dipstick back in this chapter. 263 2011 Econoline (eco) Owners Guide, 3rd Printing USA (fus) Locate and carefully remove the engine oil level dipstick. 6. Adding engine oil 1. For instructions, refer to raise... holes or within the MIN-MAX range. • Oil levels above the upper hole or the MAX mark may cause engine damage. Open the hood. Wipe the dipstick clean. Set the parking brake and ensure the gearshift is below the lower hole or the MIN mark, add enough oil to...
Owner Guide 3rd Printing
Page 296
...may cause engine damage. • Start the engine every 15 days. Run at idle speed to circulate the additive throughout the fuel system. 296 2011 Econoline (eco) Owners Guide, 3rd Printing USA (fus) Note: During extended periods of vehicle storage (30 days or more information. • ...Fuel system • Fill the fuel tank with a light grade oil. Add a quality gas stabilizer product to prevent fading. • Keep all hood, door and trunk lid hinges, and latches with high-quality fuel until it reaches normal operating temperature. • With your foot on the additive...
...may cause engine damage. • Start the engine every 15 days. Run at idle speed to circulate the additive throughout the fuel system. 296 2011 Econoline (eco) Owners Guide, 3rd Printing USA (fus) Note: During extended periods of vehicle storage (30 days or more information. • ...Fuel system • Fill the fuel tank with a light grade oil. Add a quality gas stabilizer product to prevent fading. • Keep all hood, door and trunk lid hinges, and latches with high-quality fuel until it reaches normal operating temperature. • With your foot on the additive...

Owner Guide 3rd Printing
Page 297
... cables to ensure battery charge is maintained for quick starting. Miscellaneous • Make sure all linkages, cables, levers and pins under the hood for any foreign material that may have collected during storage. • Check tire pressures and set tire inflation per the Tire Label. &#...8226; If storing your vehicle to remove any deterioration. • Check under vehicle are fully released. Confirm there are at recommended levels. 297 2011 Econoline (eco) Owners Guide, 3rd Printing USA (fus) Brakes • Make sure brakes and parking brake are covered with grease to lubricate ...
... cables to ensure battery charge is maintained for quick starting. Miscellaneous • Make sure all linkages, cables, levers and pins under the hood for any foreign material that may have collected during storage. • Check tire pressures and set tire inflation per the Tire Label. &#...8226; If storing your vehicle to remove any deterioration. • Check under vehicle are fully released. Confirm there are at recommended levels. 297 2011 Econoline (eco) Owners Guide, 3rd Printing USA (fus) Brakes • Make sure brakes and parking brake are covered with grease to lubricate ...

Owner Guide 3rd Printing
Page 308
...of mobile communications systems - For maximum vehicle performance, keep the following information in the vehicle. 308 2011 Econoline (eco) Owners Guide, 3rd Printing USA (fus) Consult your Ford dealer for specific weight information. • The Federal Communications Commission (FCC) and Canadian Radio Telecommunications ...comply with FCC or CRTC regulations and should not locate the Amateur Radio Antennas in the area of the driver's side hood. • Electrical or electronic accessories or components that are equipped with other electrical systems in mind when adding accessories or...
...of mobile communications systems - For maximum vehicle performance, keep the following information in the vehicle. 308 2011 Econoline (eco) Owners Guide, 3rd Printing USA (fus) Consult your Ford dealer for specific weight information. • The Federal Communications Commission (FCC) and Canadian Radio Telecommunications ...comply with FCC or CRTC regulations and should not locate the Amateur Radio Antennas in the area of the driver's side hood. • Electrical or electronic accessories or components that are equipped with other electrical systems in mind when adding accessories or...
Owner Guide 3rd Printing
Page 336
..., 281 filter, specifications ...274, 298 fuel pump shut-off ...51 Head restraints ...86 Heating heater only system ...48, 50 heating and air conditioning system ...49 Hood ...260 I Ignition ...186, 303 Illuminated visor mirror ...64 Infant seats (see Fuel economy) ...281 Gauges ...19 H Hazard flashers ...216 Headlamps ...51 aiming ...54 336 bulb..., 281 cap ...277 capacity ...299 choosing the right fuel ...278 detergent in fuel ...279 filling your vehicle ...236 K Keyless entry system autolock ...73 Keys ...84 2011 Econoline (eco) Owners Guide, 3rd Printing USA (fus)
..., 281 filter, specifications ...274, 298 fuel pump shut-off ...51 Head restraints ...86 Heating heater only system ...48, 50 heating and air conditioning system ...49 Hood ...260 I Ignition ...186, 303 Illuminated visor mirror ...64 Infant seats (see Fuel economy) ...281 Gauges ...19 H Hazard flashers ...216 Headlamps ...51 aiming ...54 336 bulb..., 281 cap ...277 capacity ...299 choosing the right fuel ...278 detergent in fuel ...279 filling your vehicle ...236 K Keyless entry system autolock ...73 Keys ...84 2011 Econoline (eco) Owners Guide, 3rd Printing USA (fus)
