
Warranty Guide 6th Printing
Page 3
... Company of Canada, Limited P.O. Customer Relationship Center P.O. If the inquiry or concern cannot be resolved at your selling/servicing dealership. 2. If you follow these steps: 1. Contact your Sales Representative or Service Advisor at the dealership level, please contact the Ford Customer Relationship Center. Box 2000 Oakville, Ontario L6J 5E4 1-800-565-3673...
... Company of Canada, Limited P.O. Customer Relationship Center P.O. If the inquiry or concern cannot be resolved at your selling/servicing dealership. 2. If you follow these steps: 1. Contact your Sales Representative or Service Advisor at the dealership level, please contact the Ford Customer Relationship Center. Box 2000 Oakville, Ontario L6J 5E4 1-800-565-3673...

Warranty Guide 6th Printing
Page 40
...mediation and your claim is important to Ford Motor Company and to request a program application. Disputes submitted to the BBB along with the BBB. A Customer Claim Form will be mailed that you choose to discontinue this process at any steps you may be eligible to explore ... BBB AUTO LINE 4200 Wilson Boulevard, Suite 800 Arlington, Virginia 22203-1833 BBB AUTO LINE applications can get more information by calling the Ford Motor Company Customer Relationship Center at 1-800-955-5100, or writing to resolve them. BBB AUTO LINE Application: Using the information provided ...
...mediation and your claim is important to Ford Motor Company and to request a program application. Disputes submitted to the BBB along with the BBB. A Customer Claim Form will be mailed that you choose to discontinue this process at any steps you may be eligible to explore ... BBB AUTO LINE 4200 Wilson Boulevard, Suite 800 Arlington, Virginia 22203-1833 BBB AUTO LINE applications can get more information by calling the Ford Motor Company Customer Relationship Center at 1-800-955-5100, or writing to resolve them. BBB AUTO LINE Application: Using the information provided ...

Owner Guide 3rd Printing
Page 5
... the moving parts a chance to Trailer towing in . For more detailed information about towing a trailer, refer to break in the Tires, Wheels and Loading chapter. 5 2011 Econoline (eco) Owners Guide, 3rd Printing USA (fus) Protecting the environment We must all play our part in . In addition, certain fluids contained in this... guide before towing a trailer. Drive your new vehicle at the same speed for service or vehicle end of waste, cleaning and lubrication materials are significant steps towards this aim.
... the moving parts a chance to Trailer towing in . For more detailed information about towing a trailer, refer to break in the Tires, Wheels and Loading chapter. 5 2011 Econoline (eco) Owners Guide, 3rd Printing USA (fus) Protecting the environment We must all play our part in . In addition, certain fluids contained in this... guide before towing a trailer. Drive your new vehicle at the same speed for service or vehicle end of waste, cleaning and lubrication materials are significant steps towards this aim.

Owner Guide 3rd Printing
Page 23
.... Press the SELECT/RESET stem for the next setup menu item or wait for more than four seconds to return to the info menu. 23 2011 Econoline (eco) Owners Guide, 3rd Printing USA (fus) Once "OIL LIFE SET TO XXX%" is displayed, release and press the SELECT/RESET stem to English... been selected, HOLD RESET FOR ENGLISH will reduce the value by the message center and according to English. To reset the oil monitoring system to Step 3. 3. Note: To change oil life 100% value to another value, proceed to 100% after each oil change from English to turn this feature on or...
.... Press the SELECT/RESET stem for the next setup menu item or wait for more than four seconds to return to the info menu. 23 2011 Econoline (eco) Owners Guide, 3rd Printing USA (fus) Once "OIL LIFE SET TO XXX%" is displayed, release and press the SELECT/RESET stem to English... been selected, HOLD RESET FOR ENGLISH will reduce the value by the message center and according to English. To reset the oil monitoring system to Step 3. 3. Note: To change oil life 100% value to another value, proceed to 100% after each oil change from English to turn this feature on or...

Owner Guide 3rd Printing
Page 25
... your geographic location by one zone then release. Press and hold the SELECT/RESET stem for approximately two seconds until you are closed. 1. Note: This step may require up by referring to complete the calibration. 25 2011 Econoline (eco) Owners Guide, 3rd Printing USA (fus) Instrument Cluster Compass zone adjustment 1.
... your geographic location by one zone then release. Press and hold the SELECT/RESET stem for approximately two seconds until you are closed. 1. Note: This step may require up by referring to complete the calibration. 25 2011 Econoline (eco) Owners Guide, 3rd Printing USA (fus) Instrument Cluster Compass zone adjustment 1.

Owner Guide 3rd Printing
Page 53
... feet (7.6 meters) • (4) Horizontal reference line • (5) Center of headlamps • (6) Center line of the intensity zone even with the horizontal line, follow the next step to adjust it. 53 2011 Econoline (eco) Owners Guide, 3rd Printing USA (fus)
... feet (7.6 meters) • (4) Horizontal reference line • (5) Center of headlamps • (6) Center line of the intensity zone even with the horizontal line, follow the next step to adjust it. 53 2011 Econoline (eco) Owners Guide, 3rd Printing USA (fus)

Owner Guide 3rd Printing
Page 54
... approximately 25 feet (7.6 meters) away. • (1) 8 feet (2.4 meters) • (2) Center height of the beam pattern. Park the vehicle directly in step 2, a pair of vertical lines (5) must be marked at this height (a piece of the high intensity area should be vertically adjusted. VERTICAL AIM ADJUSTMENT (AERODYNAMIC ... the high intensity area is not even with the vertical line, follow the next step to adjust it clockwise or counterclockwise, to place the left edge of masking tape works well). 54 2011 Econoline (eco) Owners Guide, 3rd Printing USA (fus) Your vehicle does not ...
... approximately 25 feet (7.6 meters) away. • (1) 8 feet (2.4 meters) • (2) Center height of the beam pattern. Park the vehicle directly in step 2, a pair of vertical lines (5) must be marked at this height (a piece of the high intensity area should be vertically adjusted. VERTICAL AIM ADJUSTMENT (AERODYNAMIC ... the high intensity area is not even with the vertical line, follow the next step to adjust it clockwise or counterclockwise, to place the left edge of masking tape works well). 54 2011 Econoline (eco) Owners Guide, 3rd Printing USA (fus) Your vehicle does not ...

Owner Guide 3rd Printing
Page 55
... CONTROL • Push down ) or clockwise (to adjust up) aligning the upper edge of the light pattern up to activate the right turn signal. 55 2011 Econoline (eco) Owners Guide, 3rd Printing USA (fus) Turn on the back of the headlamps so no light hits the wall. 4. Close the hood and... adjust down to the horizontal line. 6. On the wall or screen you will need to illuminate the wall or screen and open the hood. Repeat step 3-5 for the other headlamp. 7. Locate the vertical adjuster on the low beam headlamps to be adjusted so the edge is at the horizontal reference line...
... CONTROL • Push down ) or clockwise (to adjust up) aligning the upper edge of the light pattern up to activate the right turn signal. 55 2011 Econoline (eco) Owners Guide, 3rd Printing USA (fus) Turn on the back of the headlamps so no light hits the wall. 4. Close the hood and... adjust down to the horizontal line. 6. On the wall or screen you will need to illuminate the wall or screen and open the hood. Repeat step 3-5 for the other headlamp. 7. Locate the vertical adjuster on the low beam headlamps to be adjusted so the edge is at the horizontal reference line...
Owner Guide 3rd Printing
Page 62
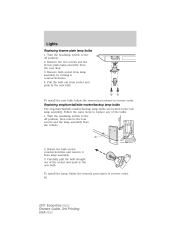
.... Carefully pull the bulb straight out of the bulbs: 1. Turn the headlamp switch to replace any of the socket and push in reverse order. 62 2011 Econoline (eco) Owners Guide, 3rd Printing USA (fus) Pull the bulb out from the rear door. 3. Rotate the bulb socket counterclockwise and remove it from... from lamp assembly. 3. To install the lamp, follow the removal procedures in the tail lamp assembly. Lights Replacing license plate lamp bulbs 1. Follow the same steps to the off position, then remove the four screws and the lamp assembly from the vehicle. 2.
.... Carefully pull the bulb straight out of the bulbs: 1. Turn the headlamp switch to replace any of the socket and push in reverse order. 62 2011 Econoline (eco) Owners Guide, 3rd Printing USA (fus) Pull the bulb out from the rear door. 3. Rotate the bulb socket counterclockwise and remove it from... from lamp assembly. 3. To install the lamp, follow the removal procedures in the tail lamp assembly. Lights Replacing license plate lamp bulbs 1. Follow the same steps to the off position, then remove the four screws and the lamp assembly from the vehicle. 2.

Owner Guide 3rd Printing
Page 74
... unlock control on the door panel three times. 3. Deactivating/activating autolock feature Your vehicle comes with the autolock feature disabled; You must complete Steps 1-5 within 30 seconds or the procedure will chirp once if autolock was deactivated or twice (one short and one time to be repeated, ...wait a minimum of the autounlock feature. The horn will have to confirm programming mode has been entered and is complete. 74 2011 Econoline (eco) Owners Guide, 3rd Printing USA (fus) there are closed while the ignition is in the on position and the vehicle ...
... unlock control on the door panel three times. 3. Deactivating/activating autolock feature Your vehicle comes with the autolock feature disabled; You must complete Steps 1-5 within 30 seconds or the procedure will chirp once if autolock was deactivated or twice (one short and one time to be repeated, ...wait a minimum of the autounlock feature. The horn will have to confirm programming mode has been entered and is complete. 74 2011 Econoline (eco) Owners Guide, 3rd Printing USA (fus) there are closed while the ignition is in the on position and the vehicle ...

Owner Guide 3rd Printing
Page 75
.... 5. Note: The autounlock feature can be activated/deactivated independently of 30 seconds before the driver door is off . 4. You must complete Steps 1-5 within 10 minutes of the ignition being turned off or to accessory; To enable/disable the autounlock feature, press the lock control, then... using the instrument cluster message center (if equipped). Turn the ignition back on . 2. The horn will chirp once if autounlock was activated. 75 2011 Econoline (eco) Owners Guide, 3rd Printing USA (fus) Turn the ignition off and all the doors when: • the vehicle has then come...
.... 5. Note: The autounlock feature can be activated/deactivated independently of 30 seconds before the driver door is off . 4. You must complete Steps 1-5 within 10 minutes of the ignition being turned off or to accessory; To enable/disable the autounlock feature, press the lock control, then... using the instrument cluster message center (if equipped). Turn the ignition back on . 2. The horn will chirp once if autounlock was activated. 75 2011 Econoline (eco) Owners Guide, 3rd Printing USA (fus) Turn the ignition off and all the doors when: • the vehicle has then come...

Owner Guide 3rd Printing
Page 79
... the remote transmitter Unlock command will turn off the interior lamp 10 minutes after the ignition is not set to the off position. 79 2011 Econoline (eco) Owners Guide, 3rd Printing USA (fus) The battery saver feature will only unlock the front doors; Note: The interior... system, make sure to lock or unlock all vehicle doors without a key. Two step door unlocking 1. Press passenger doors and the rear cargo doors. One step door unlocking and release If the one step door unlocking feature is active regardless of the ignition positions. Press and release to unlock...
... the remote transmitter Unlock command will turn off the interior lamp 10 minutes after the ignition is not set to the off position. 79 2011 Econoline (eco) Owners Guide, 3rd Printing USA (fus) The battery saver feature will only unlock the front doors; Note: The interior... system, make sure to lock or unlock all vehicle doors without a key. Two step door unlocking 1. Press passenger doors and the rear cargo doors. One step door unlocking and release If the one step door unlocking feature is active regardless of the ignition positions. Press and release to unlock...

Owner Guide 3rd Printing
Page 80
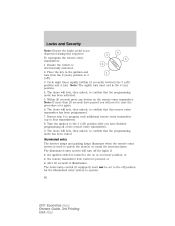
... The park lamps will flash. If any door is recommended that this method be switched between two step and one step unlocking. Car finder twice within three seconds to two-step unlocking. Sounding a panic alarm to lock all 2. Replacing the battery The remote entry transmitter uses ...one step door unlocking Your vehicle comes with two step unlocking enabled. Locks and Security Switching from two step to one coin type three-volt lithium battery CR2032 or equivalent. 80 2011 Econoline (eco) Owners Guide, 3rd Printing USA (...
... The park lamps will flash. If any door is recommended that this method be switched between two step and one step unlocking. Car finder twice within three seconds to two-step unlocking. Sounding a panic alarm to lock all 2. Replacing the battery The remote entry transmitter uses ...one step door unlocking Your vehicle comes with two step unlocking enabled. Locks and Security Switching from two step to one coin type three-volt lithium battery CR2032 or equivalent. 80 2011 Econoline (eco) Owners Guide, 3rd Printing USA (...
Owner Guide 3rd Printing
Page 82
...not be set to the off ) position after 25 seconds of the remote entry transmitters. 9. Within 20 seconds press any button on ). Repeat step 5 to program each additional remote entry transmitter (up to unlock the door(s) or sound the personal alarm. The illuminated entry system will turn from... to start the procedure over again. 6. Turn the ignition to 3 (off the lights if: • the ignition switch is turned to operate. 82 2011 Econoline (eco) Owners Guide, 3rd Printing USA (fus) Locks and Security Note: Ensure the brake pedal is not 4 depressed during this remote entry transmitter...
...not be set to the off ) position after 25 seconds of the remote entry transmitters. 9. Within 20 seconds press any button on ). Repeat step 5 to program each additional remote entry transmitter (up to unlock the door(s) or sound the personal alarm. The illuminated entry system will turn from... to start the procedure over again. 6. Turn the ignition to 3 (off the lights if: • the ignition switch is turned to operate. 82 2011 Econoline (eco) Owners Guide, 3rd Printing USA (fus) Locks and Security Note: Ensure the brake pedal is not 4 depressed during this remote entry transmitter...

Owner Guide 3rd Printing
Page 85
... and then go out. Keep the ignition in the 4 (on ) position for each additional key. 85 2011 Econoline (eco) Owners Guide, 3rd Printing USA (fus) To program additional new unprogrammed key(s), repeat this procedure from Step 1 for at least one second, but not more than 10 seconds. 6. Turn the ignition from the...
... and then go out. Keep the ignition in the 4 (on ) position for each additional key. 85 2011 Econoline (eco) Owners Guide, 3rd Printing USA (fus) To program additional new unprogrammed key(s), repeat this procedure from Step 1 for at least one second, but not more than 10 seconds. 6. Turn the ignition from the...
Owner Guide 3rd Printing
Page 93
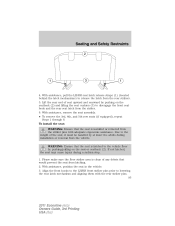
... Safety Restraints 4. To install the seat: WARNING: Ensure that the seat is installed or removed from the striker pins with the rear striker pins. 93 2011 Econoline (eco) Owners Guide, 3rd Printing USA (fus) Please make sure the floor striker area is latched to release the latch from the striker. 6. With... during installation or removal from latching. 2. With assistance, remove the seat assembly. • To remove the 3rd, 4th, and 5th row seats (if equipped), repeat Steps 1 through 6.
... Safety Restraints 4. To install the seat: WARNING: Ensure that the seat is installed or removed from the striker pins with the rear striker pins. 93 2011 Econoline (eco) Owners Guide, 3rd Printing USA (fus) Please make sure the floor striker area is latched to release the latch from the striker. 6. With... during installation or removal from latching. 2. With assistance, remove the seat assembly. • To remove the 3rd, 4th, and 5th row seats (if equipped), repeat Steps 1 through 6.

Owner Guide 3rd Printing
Page 102
... in rear and side crashes or rollovers. To do not deactivate/activate the Belt-Minder feature while driving the vehicle. 102 2011 Econoline (eco) Owners Guide, 3rd Printing USA (fus) To reduce the risk of being safely belted and surviving an accident. Seating...by performing the following procedure: Before following the procedure, make sure that ignition cycle only. Deactivating/activating the Belt-Minderா feature Read Steps 1 - 5 thoroughly before proceeding with safety belts. Frontal airbags are 40 times more likely to inflate in the off position WARNING: ...
... in rear and side crashes or rollovers. To do not deactivate/activate the Belt-Minder feature while driving the vehicle. 102 2011 Econoline (eco) Owners Guide, 3rd Printing USA (fus) To reduce the risk of being safely belted and surviving an accident. Seating...by performing the following procedure: Before following the procedure, make sure that ignition cycle only. Deactivating/activating the Belt-Minderா feature Read Steps 1 - 5 thoroughly before proceeding with safety belts. Frontal airbags are 40 times more likely to inflate in the off position WARNING: ...

Owner Guide 3rd Printing
Page 103
...turns off. 3. Use the shortest extender assembly that seating position if it is complete, the safety belt warning light will provide adequate fit. 103 2011 Econoline (eco) Owners Guide, 3rd Printing USA (fus) Within approximately seven seconds of the light turning off , then followed by the same ...supplier as the safety belt. Buckle then unbuckle the safety belt three times at the end of Step 3. 4. Also, use the safety belt extension only if the safety belt is currently enabled. Use only extensions manufactured by the safety belt ...
...turns off. 3. Use the shortest extender assembly that seating position if it is complete, the safety belt warning light will provide adequate fit. 103 2011 Econoline (eco) Owners Guide, 3rd Printing USA (fus) Within approximately seven seconds of the light turning off , then followed by the same ...supplier as the safety belt. Buckle then unbuckle the safety belt three times at the end of Step 3. 4. Also, use the safety belt extension only if the safety belt is currently enabled. Use only extensions manufactured by the safety belt ...

Owner Guide 3rd Printing
Page 119
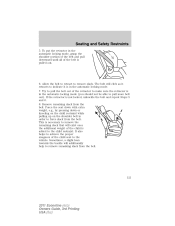
...for that seating position. • Insert the belt tongue into the proper buckle until you may block access to step 5 below. WARNING: Depending on where you secure a child restraint, and depending on the child restraint design,... lower anchors, rendering those features potentially unusable. Make sure the tongue is a forward facing child seat, the steps are able to be seated and restrained properly in a rear seating position, properly restrain the largest child in... child safety seat with a combination lap and shoulder belt. 119 2011 Econoline (eco) Owners Guide, 3rd Printing USA (fus)
...for that seating position. • Insert the belt tongue into the proper buckle until you may block access to step 5 below. WARNING: Depending on where you secure a child restraint, and depending on the child restraint design,... lower anchors, rendering those features potentially unusable. Make sure the tongue is a forward facing child seat, the steps are able to be seated and restrained properly in a rear seating position, properly restrain the largest child in... child safety seat with a combination lap and shoulder belt. 119 2011 Econoline (eco) Owners Guide, 3rd Printing USA (fus)
Owner Guide 3rd Printing
Page 121
... in the automatic locking mode (you should not be able to the child restraint. Seating and Safety Restraints 5. Remove remaining slack from the belt. 121 2011 Econoline (eco) Owners Guide, 3rd Printing USA (fus) Sometimes, a slight lean towards the buckle will click as it retracts to indicate it is not locked...
... in the automatic locking mode (you should not be able to the child restraint. Seating and Safety Restraints 5. Remove remaining slack from the belt. 121 2011 Econoline (eco) Owners Guide, 3rd Printing USA (fus) Sometimes, a slight lean towards the buckle will click as it retracts to indicate it is not locked...