
Owner Guide 2nd Printing
Page 41
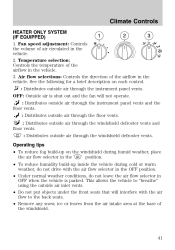
...air inlet vents. • Do not put objects under the front seats that will not operate. : Distributes outside air through the instrument panel vents and the floor vents. : Distributes outside air through the floor vents. : Distributes outside air through the windshield defroster vents and... floor vents. : Distributes outside air through the instrument panel vents. Operating tips • To reduce fog build-up inside the vehicle during humid weather, place position. Climate Controls HEATER ONLY SYSTEM...
...air inlet vents. • Do not put objects under the front seats that will not operate. : Distributes outside air through the instrument panel vents and the floor vents. : Distributes outside air through the floor vents. : Distributes outside air through the windshield defroster vents and... floor vents. : Distributes outside air through the instrument panel vents. Operating tips • To reduce fog build-up inside the vehicle during humid weather, place position. Climate Controls HEATER ONLY SYSTEM...
Owner Guide 2nd Printing
Page 42
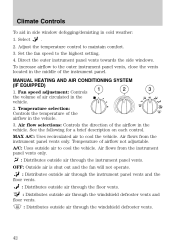
... selection: Controls the temperature of the airflow in the vehicle. Air flow selections: Controls the direction of the instrument panel. MAX A/C: Uses recirculated air to the outer instrument panel vents, close the vents located in the middle of the airflow in the vehicle. 3. Air flows from the...the windshield defroster vents. 42 OFF: Outside air is shut out and the fan will not operate. : Distributes outside air through the instrument panel vents and the floor vents. : Distributes outside air through the floor vents. : Distributes outside air through the windshield defroster vents and ...
... selection: Controls the temperature of the airflow in the vehicle. Air flow selections: Controls the direction of the instrument panel. MAX A/C: Uses recirculated air to the outer instrument panel vents, close the vents located in the middle of the airflow in the vehicle. 3. Air flows from the...the windshield defroster vents. 42 OFF: Outside air is shut out and the fan will not operate. : Distributes outside air through the instrument panel vents and the floor vents. : Distributes outside air through the floor vents. : Distributes outside air through the windshield defroster vents and ...

Owner Guide 2nd Printing
Page 43
... only) to continue to receive cool air from the air intake area at the base of time in the middle of the instrument panel. 43 During extreme high ambient temperatures when idling stationary for extended periods of the windshield. This allows the vehicle to "breathe"...humid weather, place position. Set the highest fan speed. 4. Adjust the temperature control to the outer instrument panel vents, close the vents located in gear, it is parked. Direct the outer instrument panel vents towards the side windows. Select . 2. To increase airflow to maintain comfort. 3. the air...
... only) to continue to receive cool air from the air intake area at the base of time in the middle of the instrument panel. 43 During extreme high ambient temperatures when idling stationary for extended periods of the windshield. This allows the vehicle to "breathe"...humid weather, place position. Set the highest fan speed. 4. Adjust the temperature control to the outer instrument panel vents, close the vents located in gear, it is parked. Direct the outer instrument panel vents towards the side windows. Select . 2. To increase airflow to maintain comfort. 3. the air...
Owner Guide 2nd Printing
Page 44
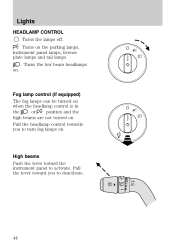
Fog lamp control (if equipped) The fog lamps can be turned on when the headlamp control is in or position and the the high beams are not turned on the parking lamps, instrument panel lamps, license plate lamps and tail lamps. Turns on . Pull the headlamp control towards you to deactivate. 44 High beams Push the lever toward you to activate. Lights HEADLAMP CONTROL Turns the lamps off. Pull the lever toward the instrument panel to turn fog lamps on . Turns the low beam headlamps on .
Fog lamp control (if equipped) The fog lamps can be turned on when the headlamp control is in or position and the the high beams are not turned on the parking lamps, instrument panel lamps, license plate lamps and tail lamps. Turns on . Pull the headlamp control towards you to deactivate. 44 High beams Push the lever toward you to activate. Lights HEADLAMP CONTROL Turns the lamps off. Pull the lever toward the instrument panel to turn fog lamps on . Turns the low beam headlamps on .

Owner Guide 2nd Printing
Page 45
...on with a reduced light output. Lights Flash-to-pass Pull toward you slightly to activate and release to adjust the intensity of the instrument panel and all applicable switches in the vehicle during inclement weather. To activate: • the ignition must be in the on the interior lamps.... 45 WARNING: Always remember to adjust the brightness of the panel lighting. Daytime running lamps (DRL) (if equipped) The daytime running light (DRL) system does not activate your headlamps under these conditions may ...
...on with a reduced light output. Lights Flash-to-pass Pull toward you slightly to activate and release to adjust the intensity of the instrument panel and all applicable switches in the vehicle during inclement weather. To activate: • the ignition must be in the on the interior lamps.... 45 WARNING: Always remember to adjust the brightness of the panel lighting. Daytime running lamps (DRL) (if equipped) The daytime running light (DRL) system does not activate your headlamps under these conditions may ...

Owner Guide 2nd Printing
Page 48
... 48 hours under dry weather conditions. INTERIOR LAMPS Courtesy/reading lamps (if equipped) The courtesy lamp lights when: • any door is opened. • the instrument panel dimmer switch is held up to activate the right turn signal. Lights TURN SIGNAL CONTROL • Push down to activate the left turn signal. •...
... 48 hours under dry weather conditions. INTERIOR LAMPS Courtesy/reading lamps (if equipped) The courtesy lamp lights when: • any door is opened. • the instrument panel dimmer switch is held up to activate the right turn signal. Lights TURN SIGNAL CONTROL • Push down to activate the left turn signal. •...
Owner Guide 2nd Printing
Page 49
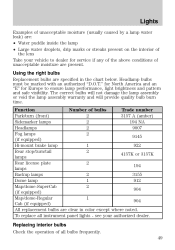
...pattern and safe visibility. Using the right bulbs Replacement bulbs are clear in the chart below. Replacing interior bulbs Check the operation of all instrument panel lights - Lights Examples of unacceptable moisture (usually caused by a lamp water leak) are: • Water puddle inside the lamp •...license plate 2 194 lamps Backup lamps 2 3155 Dome lamp 1 912 Map/dome-SuperCab 2 904 (if equipped) Map/dome-Regular 1 904 Cab (if equipped) All replacement bulbs are specified in color except where noted. Headlamp bulbs must be marked with an authorized "D.O.T." Function Number of ...
...pattern and safe visibility. Using the right bulbs Replacement bulbs are clear in the chart below. Replacing interior bulbs Check the operation of all instrument panel lights - Lights Examples of unacceptable moisture (usually caused by a lamp water leak) are: • Water puddle inside the lamp •...license plate 2 194 lamps Backup lamps 2 3155 Dome lamp 1 912 Map/dome-SuperCab 2 904 (if equipped) Map/dome-Regular 1 904 Cab (if equipped) All replacement bulbs are specified in color except where noted. Headlamp bulbs must be marked with an authorized "D.O.T." Function Number of ...
Owner Guide 2nd Printing
Page 56
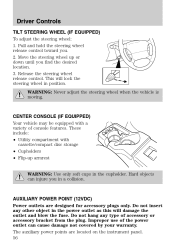
...; Utility compartment with a variety of the power outlet can injure you find the desired location. 3. AUXILIARY POWER POINT (12VDC) Power outlets are located on the instrument panel. 56 Move the steering wheel up armrest WARNING: Use only soft cups in position. Hard objects can cause damage not covered by your warranty. Do...
...; Utility compartment with a variety of the power outlet can injure you find the desired location. 3. AUXILIARY POWER POINT (12VDC) Power outlets are located on the instrument panel. 56 Move the steering wheel up armrest WARNING: Use only soft cups in position. Hard objects can cause damage not covered by your warranty. Do...

Owner Guide 2nd Printing
Page 95
... lit to remind you that the airbag is enabled (may inflate) the right front passenger's frontal airbag anytime the system senses that a person of the instrument panel. The front passenger sensing system is designed to turn off , remove the child restraint from the vehicle and reinstall the restraint following the child restraint...
... lit to remind you that the airbag is enabled (may inflate) the right front passenger's frontal airbag anytime the system senses that a person of the instrument panel. The front passenger sensing system is designed to turn off , remove the child restraint from the vehicle and reinstall the restraint following the child restraint...

Owner Guide 2nd Printing
Page 168
The AdvanceTrac with RSC system automatically enables each time the engine is not on the center of the instrument panel, the "sliding car" icon and a "sliding car off" icon in the the "sliding car off . The AdvanceTrac with RSC system ...immediately. All features of the AdvanceTrac with RSC system (TCS, ESC, and RSC are active and monitor the vehicle from under the instrument panel during this severe condition. • The brake pedal may experience the following: • A slight deceleration of the vehicle • The "sliding car" ...
The AdvanceTrac with RSC system automatically enables each time the engine is not on the center of the instrument panel, the "sliding car" icon and a "sliding car off" icon in the the "sliding car off . The AdvanceTrac with RSC system ...immediately. All features of the AdvanceTrac with RSC system (TCS, ESC, and RSC are active and monitor the vehicle from under the instrument panel during this severe condition. • The brake pedal may experience the following: • A slight deceleration of the vehicle • The "sliding car" ...
Owner Guide 2nd Printing
Page 191
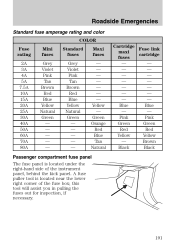
... cartridge fuses Blue Blue - - Pink Pink Green Green Red Red Yellow Yellow - Brown Black Black Passenger compartment fuse panel The fuse panel is located near the lower right corner of the instrument panel, behind the kick panel. Maxi fuses Yellow - A fuse puller tool is located under the right-hand side of the fuse box; Roadside...
... cartridge fuses Blue Blue - - Pink Pink Green Green Red Red Yellow Yellow - Brown Black Black Passenger compartment fuse panel The fuse panel is located near the lower right corner of the instrument panel, behind the kick panel. Maxi fuses Yellow - A fuse puller tool is located under the right-hand side of the fuse box; Roadside...
Owner Guide 2nd Printing
Page 192
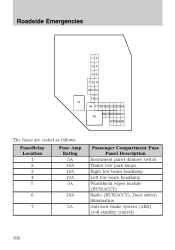
Roadside Emergencies 1 2 3 4 5 6 7 8 9 10 11 12 13 14 15 16 17 18 19 20 21 22 23 24 25 26 27 28 29 30 31 32 33 34 35 The fuses are coded as follows: Fuse/Relay Location 1 2 3 4 5 6 7 Fuse Amp Rating 5A 10A 10A 10A 5A 10A 5A Passenger Compartment Fuse Panel Description Instrument panel dimmer switch Trailer tow park lamps Right low beam headlamp Left low beam headlamp Windshield wiper module (RUN/ACCY) Radio (RUN/ACCY), Door switch illumination Anti-lock brake system (ABS) (roll stability control) 192
Roadside Emergencies 1 2 3 4 5 6 7 8 9 10 11 12 13 14 15 16 17 18 19 20 21 22 23 24 25 26 27 28 29 30 31 32 33 34 35 The fuses are coded as follows: Fuse/Relay Location 1 2 3 4 5 6 7 Fuse Amp Rating 5A 10A 10A 10A 5A 10A 5A Passenger Compartment Fuse Panel Description Instrument panel dimmer switch Trailer tow park lamps Right low beam headlamp Left low beam headlamp Windshield wiper module (RUN/ACCY) Radio (RUN/ACCY), Door switch illumination Anti-lock brake system (ABS) (roll stability control) 192

Owner Guide 2nd Printing
Page 194
... Fuse Amp Rating 15A 20A 5A 20A Passenger Compartment Fuse Panel Description 4x4 module battery feed (B+) Cigar lighter, Diagnostic connector (OBD II) Power mirrors Front park lamps, Rear park lamps, License plate lamps, Dimmer switch, Trailer tow park lamps Brake switch (logic) Instrument cluster battery feed (B+) Power point Power locks 32 33...
... Fuse Amp Rating 15A 20A 5A 20A Passenger Compartment Fuse Panel Description 4x4 module battery feed (B+) Cigar lighter, Diagnostic connector (OBD II) Power mirrors Front park lamps, Rear park lamps, License plate lamps, Dimmer switch, Trailer tow park lamps Brake switch (logic) Instrument cluster battery feed (B+) Power point Power locks 32 33...
Owner Guide 2nd Printing
Page 229
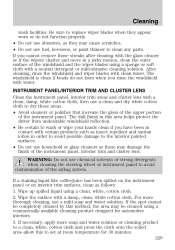
...blades using a clean, white, cotton cloth. 2. After cleaning, rinse the windshield and wiper blades with water. INSTRUMENT PANEL/INTERIOR TRIM AND CLUSTER LENS Clean the instrument panel, interior trim areas and cluster lens with a clean, damp, white cotton cloth, then use chemical solvents or ...at room temperature for automotive interiors. 3. WARNING: Do not use a clean and dry white cotton cloth to avoid contamination of the instrument panel. Cleaning wash facilities. Wipe up spilled liquid using a sponge or soft cloth with certain products such as follows: 1. If necessary,...
...blades using a clean, white, cotton cloth. 2. After cleaning, rinse the windshield and wiper blades with water. INSTRUMENT PANEL/INTERIOR TRIM AND CLUSTER LENS Clean the instrument panel, interior trim areas and cluster lens with a clean, damp, white cotton cloth, then use chemical solvents or ...at room temperature for automotive interiors. 3. WARNING: Do not use a clean and dry white cotton cloth to avoid contamination of the instrument panel. Cleaning wash facilities. Wipe up spilled liquid using a sponge or soft cloth with certain products such as follows: 1. If necessary,...

Owner Guide 2nd Printing
Page 233
.... For vehicles equipped with the engine on 1. For vehicles equipped with the prop rod. 233 OPENING THE HOOD 1. WARNING: To reduce the risk of the instrument panel near the steering column. 2. Lift the hood and support it while the engine is located under the bottom of vehicle damage and/or personal burn...
.... For vehicles equipped with the engine on 1. For vehicles equipped with the prop rod. 233 OPENING THE HOOD 1. WARNING: To reduce the risk of the instrument panel near the steering column. 2. Lift the hood and support it while the engine is located under the bottom of vehicle damage and/or personal burn...
Owner Guide 2nd Printing
Page 275
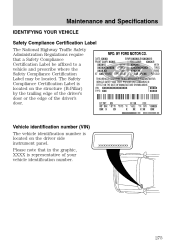
... of the driver's door or the edge of your vehicle identification number. XXXXXXXXXXXXXXXXX 275 The Safety Compliance Certification Label is located on the driver side instrument panel. Please note that a Safety Compliance Certification Label be affixed to a vehicle and prescribe where the Safety Compliance Certification Label may be located. Maintenance and Specifications...
... of the driver's door or the edge of your vehicle identification number. XXXXXXXXXXXXXXXXX 275 The Safety Compliance Certification Label is located on the driver side instrument panel. Please note that a Safety Compliance Certification Label be affixed to a vehicle and prescribe where the Safety Compliance Certification Label may be located. Maintenance and Specifications...
Owner Guide 2nd Printing
Page 283
Index Cleaning your vehicle engine compartment ...227 instrument panel ...229 interior ...230 plastic parts ...228 safety belts ...230 washing ...225 waxing ...226 wheels ...226 wiper blades ...228 Clock adjust AM/FM ...20 AM/FM ... service you need ...218 Ordering additional owner's literature ...223 Utilizing the Mediation/Arbitration Program ...221 D Daytime running lamps (see Speed control) ...59 Customer Assistance ...188 Ford Extended Service Plan ...279 Getting assistance outside the U.S.
Index Cleaning your vehicle engine compartment ...227 instrument panel ...229 interior ...230 plastic parts ...228 safety belts ...230 washing ...225 waxing ...226 wheels ...226 wiper blades ...228 Clock adjust AM/FM ...20 AM/FM ... service you need ...218 Ordering additional owner's literature ...223 Utilizing the Mediation/Arbitration Program ...221 D Daytime running lamps (see Speed control) ...59 Customer Assistance ...188 Ford Extended Service Plan ...279 Getting assistance outside the U.S.
Owner Guide 2nd Printing
Page 284
... off ...44 Heating heating and air conditioning system ...41-42 Hood ...233 I Ignition ...159, 273 Infant seats (see Safety seats) ...105 Inspection/maintenance (I/M) testing ...260 Instrument panel cleaning ...229 cluster ...12 lighting up panel and interior ...45 J Jack ...200 positioning ...200, 206 storage ...200, 203-204 Jump-starting your vehicle ...210 284
... off ...44 Heating heating and air conditioning system ...41-42 Hood ...233 I Ignition ...159, 273 Infant seats (see Safety seats) ...105 Inspection/maintenance (I/M) testing ...260 Instrument panel cleaning ...229 cluster ...12 lighting up panel and interior ...45 J Jack ...200 positioning ...200, 206 storage ...200, 203-204 Jump-starting your vehicle ...210 284

Owner Guide 2nd Printing
Page 285
... positions of the ignition ...159 L Lamps bulb replacement specifications chart ...49 daytime running light ...45 fog lamps ...44 headlamps ...44 headlamps, flash to pass ...45 instrument panel, dimming ...45 interior lamps ...48-49 replacing bulbs ...50 LATCH anchors ...110 Lights, warning and indicator ...12 anti-lock brakes (ABS) ...165 Load limits ...140...
... positions of the ignition ...159 L Lamps bulb replacement specifications chart ...49 daytime running light ...45 fog lamps ...44 headlamps ...44 headlamps, flash to pass ...45 instrument panel, dimming ...45 interior lamps ...48-49 replacing bulbs ...50 LATCH anchors ...110 Lights, warning and indicator ...12 anti-lock brakes (ABS) ...165 Load limits ...140...