
Owner Guide 2nd Printing
Page 47
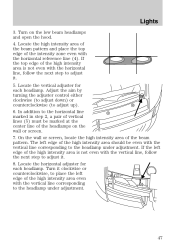
... the vertical line, follow the next step to adjust up). 6. If the top edge of the headlamps on the low beam headlamps and open the hood. 4. Locate the vertical adjuster for each headlamp. On the wall or screen, locate the high intensity area of the intensity zone even with the horizontal...
... the vertical line, follow the next step to adjust up). 6. If the top edge of the headlamps on the low beam headlamps and open the hood. 4. Locate the vertical adjuster for each headlamp. On the wall or screen, locate the high intensity area of the intensity zone even with the horizontal...
Owner Guide 2nd Printing
Page 50
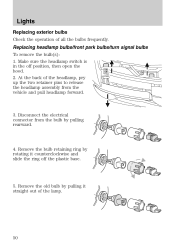
... the two retainer pins to release the headlamp assembly from the bulb by pulling it counterclockwise and slide the ring off position, then open the hood. 2. Replacing headlamp bulbs/front park bulbs/turn signal bulbs To remove the bulb(s): 1. Remove the bulb retaining ring by rotating it straight out of the...
... the two retainer pins to release the headlamp assembly from the bulb by pulling it counterclockwise and slide the ring off position, then open the hood. 2. Replacing headlamp bulbs/front park bulbs/turn signal bulbs To remove the bulb(s): 1. Remove the bulb retaining ring by rotating it straight out of the...
Owner Guide 2nd Printing
Page 51
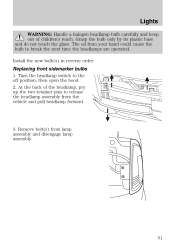
... WARNING: Handle a halogen headlamp bulb carefully and keep out of the headlamp, pry up the two retainer pins to the off position, then open the hood. 2. Replacing front sidemarker bulbs 1. The oil from lamp assembly and disengage lamp assembly. 51 Grasp the bulb only by its plastic base and do not...
... WARNING: Handle a halogen headlamp bulb carefully and keep out of the headlamp, pry up the two retainer pins to the off position, then open the hood. 2. Replacing front sidemarker bulbs 1. The oil from lamp assembly and disengage lamp assembly. 51 Grasp the bulb only by its plastic base and do not...
Owner Guide 2nd Printing
Page 211
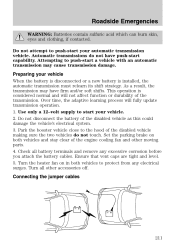
..., the transmission may cause transmission damage. This operation is installed, the automatic transmission must relearn its shift strategy. Park the booster vehicle close to the hood of the engine cooling fan and other accessories off. Set the parking brake on in both vehicles and stay clear of the disabled vehicle making...
..., the transmission may cause transmission damage. This operation is installed, the automatic transmission must relearn its shift strategy. Park the booster vehicle close to the hood of the engine cooling fan and other accessories off. Set the parking brake on in both vehicles and stay clear of the disabled vehicle making...

Owner Guide 2nd Printing
Page 233
Block the wheels. OPENING THE HOOD 1. For vehicles equipped with an automatic transmission, set the parking brake, press and hold the clutch pedal, place the gearshift in N (Neutral), and release the ... with the air cleaner removed and do not remove it with the engine on 1. Lift the hood and support it while the engine is located under the bottom of the hood. 3. Inside the vehicle, pull the hood release handle located under the front center of the instrument panel near the steering column. 2. For...
Block the wheels. OPENING THE HOOD 1. For vehicles equipped with an automatic transmission, set the parking brake, press and hold the clutch pedal, place the gearshift in N (Neutral), and release the ... with the air cleaner removed and do not remove it with the engine on 1. Lift the hood and support it while the engine is located under the bottom of the hood. 3. Inside the vehicle, pull the hood release handle located under the front center of the instrument panel near the steering column. 2. For...
Owner Guide 2nd Printing
Page 238
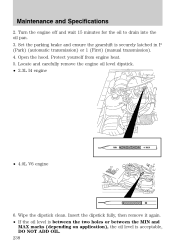
... marks (depending on application), the oil level is securely latched in P (Park) (automatic transmission) or 1 (First) (manual transmission). 4. Protect yourself from engine heat. 5. Open the hood. Wipe the dipstick clean. Maintenance and Specifications 2. Turn the engine off and wait 15 minutes for the oil to drain into the oil pan. 3.
... marks (depending on application), the oil level is securely latched in P (Park) (automatic transmission) or 1 (First) (manual transmission). 4. Protect yourself from engine heat. 5. Open the hood. Wipe the dipstick clean. Maintenance and Specifications 2. Turn the engine off and wait 15 minutes for the oil to drain into the oil pan. 3.
Owner Guide 2nd Printing
Page 278
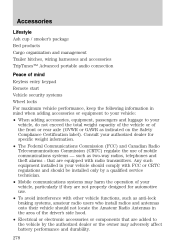
... Keyless entry keypad Remote start Vehicle security systems Wheel locks For maximum vehicle performance, keep the following information in the area of the driver's side hood. • Electrical or electronic accessories or components that are not properly designed for specific weight information. • The Federal Communications Commission (FCC) and Canadian Radio...
... Keyless entry keypad Remote start Vehicle security systems Wheel locks For maximum vehicle performance, keep the following information in the area of the driver's side hood. • Electrical or electronic accessories or components that are not properly designed for specific weight information. • The Federal Communications Commission (FCC) and Canadian Radio...
Owner Guide 2nd Printing
Page 284
... lights ...45 flash to pass ...45 high beam ...44 replacing bulbs ...50 turning on and off ...44 Heating heating and air conditioning system ...41-42 Hood ...233 I Ignition ...159, 273 Infant seats (see Safety seats) ...105 Inspection/maintenance (I/M) testing ...260 Instrument panel cleaning ...229 cluster ...12 lighting up panel and interior...
... lights ...45 flash to pass ...45 high beam ...44 replacing bulbs ...50 turning on and off ...44 Heating heating and air conditioning system ...41-42 Hood ...233 I Ignition ...159, 273 Infant seats (see Safety seats) ...105 Inspection/maintenance (I/M) testing ...260 Instrument panel cleaning ...229 cluster ...12 lighting up panel and interior...