
Owner Guide 2nd Printing
Page 1
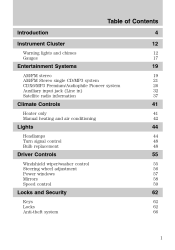
... jack (Line in) Satellite radio information 19 19 21 26 32 37 Climate Controls Heater only Manual heating and air conditioning 41 41 42 Lights Headlamps Turn signal control Bulb replacement 44 44 48 48 Driver Controls Windshield wiper/washer control Steering wheel adjustment Power windows Mirrors Speed control 55 55...
... jack (Line in) Satellite radio information 19 19 21 26 32 37 Climate Controls Heater only Manual heating and air conditioning 41 41 42 Lights Headlamps Turn signal control Bulb replacement 44 44 48 48 Driver Controls Windshield wiper/washer control Steering wheel adjustment Power windows Mirrors Speed control 55 55...
Owner Guide 2nd Printing
Page 16
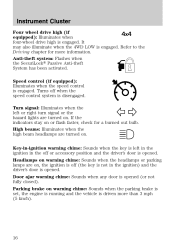
...engaged. Turns off or accessory position and the driver's door is driven more information. Parking brake on . High beams: Illuminates when the high beam headlamps are turned on warning chime: Sounds when the parking brake is set, the engine is running and the vehicle is opened. Turn signal: Illuminates ...when the left in the ignition in the ignition) and the driver's door is disengaged. Headlamps on warning chime: Sounds when the headlamps or parking lamps are turned on , the ignition is off (the key is not in the off when the speed control ...
...engaged. Turns off or accessory position and the driver's door is driven more information. Parking brake on . High beams: Illuminates when the high beam headlamps are turned on warning chime: Sounds when the parking brake is set, the engine is running and the vehicle is opened. Turn signal: Illuminates ...when the left in the ignition in the ignition) and the driver's door is disengaged. Headlamps on warning chime: Sounds when the headlamps or parking lamps are turned on , the ignition is off (the key is not in the off when the speed control ...
Owner Guide 2nd Printing
Page 44
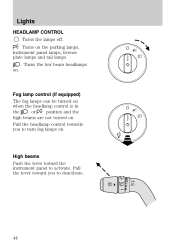
Pull the headlamp control towards you to deactivate. 44 Lights HEADLAMP CONTROL Turns the lamps off. High beams Push the lever toward you to activate. Fog lamp control (if equipped) The fog lamps can be turned on when the headlamp control is in or position and the the high beams are not turned on . Turns the low beam headlamps on . Turns on . Pull the lever toward the instrument panel to turn fog lamps on the parking lamps, instrument panel lamps, license plate lamps and tail lamps.
Pull the headlamp control towards you to deactivate. 44 Lights HEADLAMP CONTROL Turns the lamps off. High beams Push the lever toward you to activate. Fog lamp control (if equipped) The fog lamps can be turned on when the headlamp control is in or position and the the high beams are not turned on . Turns the low beam headlamps on . Turns on . Pull the lever toward the instrument panel to turn fog lamps on the parking lamps, instrument panel lamps, license plate lamps and tail lamps.

Owner Guide 2nd Printing
Page 45
... PANEL DIMMER CONTROL Use to turn on with a reduced light output. To activate: • the ignition must be in the on your headlamps under these conditions. WARNING: Always remember to adjust the brightness of the panel lighting. Move the control to the full upright position, past... detent, to activate your headlamps at dusk or during headlamp and parking lamp operation. Failure to turn on position and • the headlamp system is in the vehicle during inclement weather.
... PANEL DIMMER CONTROL Use to turn on with a reduced light output. To activate: • the ignition must be in the on your headlamps under these conditions. WARNING: Always remember to adjust the brightness of the panel lighting. Move the control to the full upright position, past... detent, to activate your headlamps at dusk or during headlamp and parking lamp operation. Failure to turn on position and • the headlamp system is in the vehicle during inclement weather.
Owner Guide 2nd Printing
Page 46
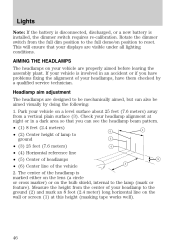
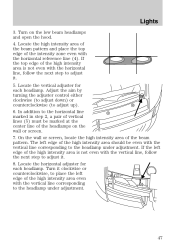
... full dome/on the wall or screen (1) at night or in an accident or if you can also be mechanically aimed, but can see the headlamp beam pattern. • (1) 8 feet (2.4 meters) • (2) Center height of lamp to the lamp (mark or feature). Measure the height from a vertical plain ...is marked either on the lens (a circle or cross marker) or on your vehicle are properly aimed before leaving the assembly plant. Park your headlamp alignment at this height (masking tape works well). 46 Check your vehicle on a level surface about 25 feet (7.6 meters) away from the center...
... full dome/on the wall or screen (1) at night or in an accident or if you can also be mechanically aimed, but can see the headlamp beam pattern. • (1) 8 feet (2.4 meters) • (2) Center height of lamp to the lamp (mark or feature). Measure the height from a vertical plain ...is marked either on the lens (a circle or cross marker) or on your vehicle are properly aimed before leaving the assembly plant. Park your headlamp alignment at this height (masking tape works well). 46 Check your vehicle on a level surface about 25 feet (7.6 meters) away from the center...
Owner Guide 2nd Printing
Page 47
...edge of vertical lines (5) must be even with the vertical line corresponding to adjust it. 8. Lights 3. Locate the vertical adjuster for each headlamp. On the wall or screen, locate the high intensity area of the high intensity area is not even with the horizontal reference line (4). Adjust... (to the horizontal line marked in step 2, a pair of the high intensity area even with the horizontal line, follow the next step to the headlamp under adjustment. 47 In addition to adjust up). 6. Turn on the wall or screen. 7. Turn it . 5. Locate the high intensity area of...
...edge of vertical lines (5) must be even with the vertical line corresponding to adjust it. 8. Lights 3. Locate the vertical adjuster for each headlamp. On the wall or screen, locate the high intensity area of the high intensity area is not even with the horizontal reference line (4). Adjust... (to the horizontal line marked in step 2, a pair of the high intensity area even with the horizontal line, follow the next step to the headlamp under adjustment. 47 In addition to adjust up). 6. Turn on the wall or screen. 7. Turn it . 5. Locate the high intensity area of...
Owner Guide 2nd Printing
Page 49
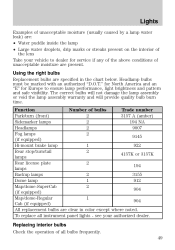
... must be marked with an authorized "D.O.T." Function Number of bulbs Trade number Park/turn (front) 2 3157 A (amber) Sidemarker lamps 2 194 NA Headlamps 2 9007 Fog lamps 2 9145 (if equipped) Hi-mount brake lamp 1 922 Rear stop/turn/tail 2 4157K or 3157K lamps Rear license plate 2 ...194 lamps Backup lamps 2 3155 Dome lamp 1 912 Map/dome-SuperCab 2 904 (if equipped) Map/dome-Regular 1 904 Cab (if equipped) All replacement bulbs are specified in color except where noted. Lights Examples of unacceptable moisture (usually caused by a lamp water leak) are: •...
... must be marked with an authorized "D.O.T." Function Number of bulbs Trade number Park/turn (front) 2 3157 A (amber) Sidemarker lamps 2 194 NA Headlamps 2 9007 Fog lamps 2 9145 (if equipped) Hi-mount brake lamp 1 922 Rear stop/turn/tail 2 4157K or 3157K lamps Rear license plate 2 ...194 lamps Backup lamps 2 3155 Dome lamp 1 912 Map/dome-SuperCab 2 904 (if equipped) Map/dome-Regular 1 904 Cab (if equipped) All replacement bulbs are specified in color except where noted. Lights Examples of unacceptable moisture (usually caused by a lamp water leak) are: •...
Owner Guide 2nd Printing
Page 50
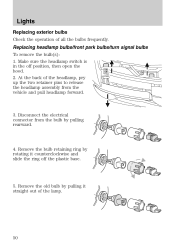
...out of the lamp. 50 Lights Replacing exterior bulbs Check the operation of the headlamp, pry up the two retainer pins to release the headlamp assembly from the bulb by pulling rearward. 4. Make sure the headlamp switch is in the off the plastic base. 5. Disconnect the electrical connector ...from the vehicle and pull headlamp forward. 3. Remove the old bulb by pulling it counterclockwise ...
...out of the lamp. 50 Lights Replacing exterior bulbs Check the operation of the headlamp, pry up the two retainer pins to release the headlamp assembly from the bulb by pulling rearward. 4. Make sure the headlamp switch is in the off the plastic base. 5. Disconnect the electrical connector ...from the vehicle and pull headlamp forward. 3. Remove the old bulb by pulling it counterclockwise ...
Owner Guide 2nd Printing
Page 51
.... 3. The oil from your hand could cause the bulb to release the headlamp assembly from lamp assembly and disengage lamp assembly. 51 At the back of children's reach. Install the new bulb(s) in reverse order. Replacing front sidemarker ...bulbs 1. Grasp the bulb only by its plastic base and do not touch the glass. Turn the headlamp switch to the off position, then open the hood. 2. Lights WARNING: Handle a halogen headlamp bulb carefully and keep out of the headlamp, pry up the two retainer pins to break the next time the...
.... 3. The oil from your hand could cause the bulb to release the headlamp assembly from lamp assembly and disengage lamp assembly. 51 At the back of children's reach. Install the new bulb(s) in reverse order. Replacing front sidemarker ...bulbs 1. Grasp the bulb only by its plastic base and do not touch the glass. Turn the headlamp switch to the off position, then open the hood. 2. Lights WARNING: Handle a halogen headlamp bulb carefully and keep out of the headlamp, pry up the two retainer pins to break the next time the...
Owner Guide 2nd Printing
Page 52
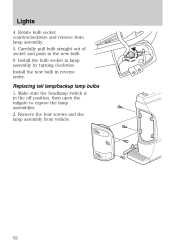
Install the bulb socket in the new bulb. 6. Lights 4. Carefully pull bulb straight out of socket and push in lamp assembly by turning clockwise. Replacing tail lamp/backup lamp bulbs 1. Remove the four screws and the lamp assembly from lamp assembly. 5. Install the new bulb in the off position, then open the tailgate to expose the lamp assemblies. 2. Make sure the headlamp switch is in reverse order. Rotate bulb socket counterclockwise and remove from vehicle. 52
Install the bulb socket in the new bulb. 6. Lights 4. Carefully pull bulb straight out of socket and push in lamp assembly by turning clockwise. Replacing tail lamp/backup lamp bulbs 1. Remove the four screws and the lamp assembly from lamp assembly. 5. Install the new bulb in the off position, then open the tailgate to expose the lamp assemblies. 2. Make sure the headlamp switch is in reverse order. Rotate bulb socket counterclockwise and remove from vehicle. 52
Owner Guide 2nd Printing
Page 53
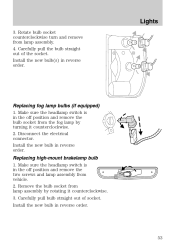
Make sure the headlamp switch is in reverse order. 53 Carefully pull bulb straight out of the socket. Replacing fog lamp bulbs (if equipped) 1. Replacing high-mount brakelamp bulb 1. ... bulb socket counterclockwise turn and remove from the fog lamp by rotating it counterclockwise. 2. Carefully pull the bulb straight out of socket. Make sure the headlamp switch is in the off position and remove the two screws and lamp assembly from lamp assembly by turning it counterclockwise. 3.
Make sure the headlamp switch is in reverse order. 53 Carefully pull bulb straight out of the socket. Replacing fog lamp bulbs (if equipped) 1. Replacing high-mount brakelamp bulb 1. ... bulb socket counterclockwise turn and remove from the fog lamp by rotating it counterclockwise. 2. Carefully pull the bulb straight out of socket. Make sure the headlamp switch is in the off position and remove the two screws and lamp assembly from lamp assembly by turning it counterclockwise. 3.
Owner Guide 2nd Printing
Page 54
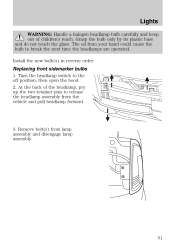
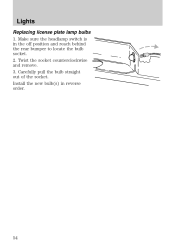
Lights Replacing license plate lamp bulbs 1. Twist the socket counterclockwise and remove. 3. Make sure the headlamp switch is in reverse order. 54 Carefully pull the bulb straight out of the socket. Install the new bulb(s) in the off position and reach behind the rear bumper to locate the bulb socket. 2.
Lights Replacing license plate lamp bulbs 1. Twist the socket counterclockwise and remove. 3. Make sure the headlamp switch is in reverse order. 54 Carefully pull the bulb straight out of the socket. Install the new bulb(s) in the off position and reach behind the rear bumper to locate the bulb socket. 2.
Owner Guide 2nd Printing
Page 155
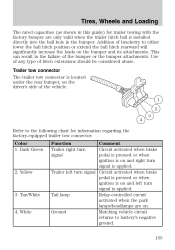
... applied. This can result in the bumper. Trailer left turn signal is applied. Yellow 3. White Tail lamp Relay-controlled circuit activated when the park lamps/headlamps are only valid when the trailer hitch ball is installed directly into the ball hole in the failure of the vehicle. 1 2 4 Refer to the following...
... applied. This can result in the bumper. Trailer left turn signal is applied. Yellow 3. White Tail lamp Relay-controlled circuit activated when the park lamps/headlamps are only valid when the trailer hitch ball is installed directly into the ball hole in the failure of the vehicle. 1 2 4 Refer to the following...

Owner Guide 2nd Printing
Page 160
... speed does not slow down automatically, have your dealer inspect your vehicle immediately. See Guarding against exhaust fumes in other enclosed areas. Make sure the headlamps and electrical accessories are off.
... speed does not slow down automatically, have your dealer inspect your vehicle immediately. See Guarding against exhaust fumes in other enclosed areas. Make sure the headlamps and electrical accessories are off.
Owner Guide 2nd Printing
Page 192
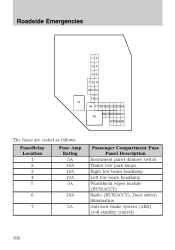
Roadside Emergencies 1 2 3 4 5 6 7 8 9 10 11 12 13 14 15 16 17 18 19 20 21 22 23 24 25 26 27 28 29 30 31 32 33 34 35 The fuses are coded as follows: Fuse/Relay Location 1 2 3 4 5 6 7 Fuse Amp Rating 5A 10A 10A 10A 5A 10A 5A Passenger Compartment Fuse Panel Description Instrument panel dimmer switch Trailer tow park lamps Right low beam headlamp Left low beam headlamp Windshield wiper module (RUN/ACCY) Radio (RUN/ACCY), Door switch illumination Anti-lock brake system (ABS) (roll stability control) 192
Roadside Emergencies 1 2 3 4 5 6 7 8 9 10 11 12 13 14 15 16 17 18 19 20 21 22 23 24 25 26 27 28 29 30 31 32 33 34 35 The fuses are coded as follows: Fuse/Relay Location 1 2 3 4 5 6 7 Fuse Amp Rating 5A 10A 10A 10A 5A 10A 5A Passenger Compartment Fuse Panel Description Instrument panel dimmer switch Trailer tow park lamps Right low beam headlamp Left low beam headlamp Windshield wiper module (RUN/ACCY) Radio (RUN/ACCY), Door switch illumination Anti-lock brake system (ABS) (roll stability control) 192
Owner Guide 2nd Printing
Page 193
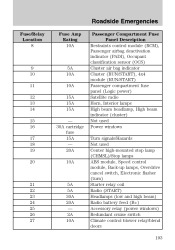
...indicator Cluster (RUN/START), 4x4 module (RUN/START) Passenger compartment fuse panel (Logic power) Satellite radio Horn, Interior lamps High beam headlamp, High beam indicator (cluster) Not used Power windows Turn signals/Hazards Not used Center high-mounted stop lamp (CHMSL)/Stop lamps ABS ...module, Speed control module, Back-up lamps, Overdrive cancel switch, Electronic flasher (turn) Starter relay coil Radio (START) Headlamps (low and high beam) Radio battery feed (B+) Accessory relay (power windows) Redundant cruise switch Climate control blower relay/blend doors 193 9 ...
...indicator Cluster (RUN/START), 4x4 module (RUN/START) Passenger compartment fuse panel (Logic power) Satellite radio Horn, Interior lamps High beam headlamp, High beam indicator (cluster) Not used Power windows Turn signals/Hazards Not used Center high-mounted stop lamp (CHMSL)/Stop lamps ABS ...module, Speed control module, Back-up lamps, Overdrive cancel switch, Electronic flasher (turn) Starter relay coil Radio (START) Headlamps (low and high beam) Radio battery feed (B+) Accessory relay (power windows) Redundant cruise switch Climate control blower relay/blend doors 193 9 ...
Owner Guide 2nd Printing
Page 284
... pump shut-off switch ...190 Fuses ...190-191 G Gas cap (see Fuel cap) ...252 Gas mileage (see Fuel economy) ...255 Gauges ...17 H Hazard flashers ...189 Headlamps ...44 aiming ...46 bulb specifications ...49 daytime running lights ...45 flash to pass ...45 high beam ...44 replacing bulbs ...50 turning on and off ...44...
... pump shut-off switch ...190 Fuses ...190-191 G Gas cap (see Fuel cap) ...252 Gas mileage (see Fuel economy) ...255 Gauges ...17 H Hazard flashers ...189 Headlamps ...44 aiming ...46 bulb specifications ...49 daytime running lights ...45 flash to pass ...45 high beam ...44 replacing bulbs ...50 turning on and off ...44...

Owner Guide 2nd Printing
Page 285
Index K Keys ...62, 67 positions of the ignition ...159 L Lamps bulb replacement specifications chart ...49 daytime running light ...45 fog lamps ...44 headlamps ...44 headlamps, flash to pass ...45 instrument panel, dimming ...45 interior lamps ...48-49 replacing bulbs ...50 LATCH anchors ...110 Lights, warning and indicator ...12 anti-lock ...
Index K Keys ...62, 67 positions of the ignition ...159 L Lamps bulb replacement specifications chart ...49 daytime running light ...45 fog lamps ...44 headlamps ...44 headlamps, flash to pass ...45 instrument panel, dimming ...45 interior lamps ...48-49 replacing bulbs ...50 LATCH anchors ...110 Lights, warning and indicator ...12 anti-lock ...