
Owner Guide 3rd Printing
Page 3
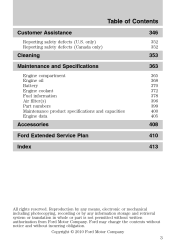
... the contents without notice and without written authorization from Ford Motor Company. Copyright © 2010 Ford Motor Company 3 Table of Contents Customer Assistance Reporting safety defects (U.S. only) Reporting safety defects (Canada only) 346 352 352 Cleaning ... information Air filter(s) Part numbers Maintenance product specifications and capacities Engine data 353 363 365 368 370 372 378 396 399 400 405 Accessories Ford Extended Service Plan Index 408 410 413 All rights reserved. Reproduction by any means, electronic or mechanical including photocopying, recording or by ...
... the contents without notice and without written authorization from Ford Motor Company. Copyright © 2010 Ford Motor Company 3 Table of Contents Customer Assistance Reporting safety defects (U.S. only) Reporting safety defects (Canada only) 346 352 352 Cleaning ... information Air filter(s) Part numbers Maintenance product specifications and capacities Engine data 353 363 365 368 370 372 378 396 399 400 405 Accessories Ford Extended Service Plan Index 408 410 413 All rights reserved. Reproduction by any means, electronic or mechanical including photocopying, recording or by ...
Owner Guide 3rd Printing
Page 18
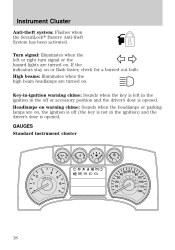
... on warning chime: Sounds when the headlamps or parking lamps are turned on , the ignition is off (the key is not in the off or accessory position and the driver's door is opened . GAUGES Standard instrument cluster 18 Turn signal: Illuminates when the left in the ignition in the ignition) and...
... on warning chime: Sounds when the headlamps or parking lamps are turned on , the ignition is off (the key is not in the off or accessory position and the driver's door is opened . GAUGES Standard instrument cluster 18 Turn signal: Illuminates when the left in the ignition in the ignition) and...
Owner Guide 3rd Printing
Page 27
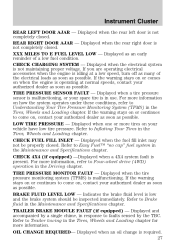
... come on how the system operates under these conditions, refer to faults sensed by a single chime, in the Driving chapter. If you are operating electrical accessories when the engine is not completely closed. BRAKE FLUID LEVEL LOW - Displayed when the rear left door is idling at normal speeds, contact your vehicle...
... come on how the system operates under these conditions, refer to faults sensed by a single chime, in the Driving chapter. If you are operating electrical accessories when the engine is not completely closed. BRAKE FLUID LEVEL LOW - Displayed when the rear left door is idling at normal speeds, contact your vehicle...

Owner Guide 3rd Printing
Page 35
... will appear once and then again when the vehicle is restarted. • Some messages will display the last selected feature if there are operating electrical accessories when the engine is in the Driving chapter. 35 REAR RIGHT DOOR AJAR - Displayed when the rear right door is driven more warning messages. Displayed...
... will appear once and then again when the vehicle is restarted. • Some messages will display the last selected feature if there are operating electrical accessories when the engine is in the Driving chapter. 35 REAR RIGHT DOOR AJAR - Displayed when the rear right door is driven more warning messages. Displayed...
Owner Guide 3rd Printing
Page 40
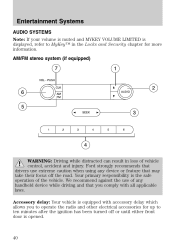
...front door is opened. 40 Your primary responsibility is equipped with accessory delay which allows you comply with all applicable laws. Accessory delay: Your vehicle is the safe operation of vehicle control, accident and injury. Ford strongly recommends that drivers use of any device or feature that... you to operate the radio and other electrical accessories for up to MyKey™ in loss of the vehicle. AM/FM stereo ...
...front door is opened. 40 Your primary responsibility is equipped with accessory delay which allows you comply with all applicable laws. Accessory delay: Your vehicle is the safe operation of vehicle control, accident and injury. Ford strongly recommends that drivers use of any device or feature that... you to operate the radio and other electrical accessories for up to MyKey™ in loss of the vehicle. AM/FM stereo ...

Owner Guide 3rd Printing
Page 43
...OK. DIRECT: Press DIRECT and then manually enter the desired radio station (i.e. 93.9) using any handheld device while driving and that time. Ford strongly recommends that may be used for up /down the frequency band in individual increments. The display will then begin from that you comply...door is a CD6 system (six disc changer). AM/FM: Press repeatedly to increase/decrease volume. With this feature, the radio and other electrical accessories may take their focus off . Use the memory preset numbers (0-9) to ten minutes after the ignition is turned off , the volume will come...
...OK. DIRECT: Press DIRECT and then manually enter the desired radio station (i.e. 93.9) using any handheld device while driving and that time. Ford strongly recommends that may be used for up /down the frequency band in individual increments. The display will then begin from that you comply...door is a CD6 system (six disc changer). AM/FM: Press repeatedly to increase/decrease volume. With this feature, the radio and other electrical accessories may take their focus off . Use the memory preset numbers (0-9) to ten minutes after the ignition is turned off , the volume will come...

Owner Guide 3rd Printing
Page 77
... control is moved to the right position, the lamp will stay on until the lamps come on or when any door is opened or the accessory delay timer expires. 77 The lamps can be turned on or off by sliding the control. • When the control is in the middle ... equipped) Illuminates footwells and cupholders with a choice of the control to cycle through the color choices plus the off position and either the on or accessory position and the headlamps or parking lamps are opened . Press the right side of several colors. Lights Rear courtesy/reading/cargo lamps (if equipped) The...
... control is moved to the right position, the lamp will stay on until the lamps come on or when any door is opened or the accessory delay timer expires. 77 The lamps can be turned on or off by sliding the control. • When the control is in the middle ... equipped) Illuminates footwells and cupholders with a choice of the control to cycle through the color choices plus the off position and either the on or accessory position and the headlamps or parking lamps are opened . Press the right side of several colors. Lights Rear courtesy/reading/cargo lamps (if equipped) The...

Owner Guide 3rd Printing
Page 89
... and hold the 7 and 9 radio preset buttons together for your geographic location by referring to the zone map. 2. For optimum calibration, turn off all electrical accessories (heater/air conditioning, wipers, etc.) and make sure all vehicle doors are shut. 1.
... and hold the 7 and 9 radio preset buttons together for your geographic location by referring to the zone map. 2. For optimum calibration, turn off all electrical accessories (heater/air conditioning, wipers, etc.) and make sure all vehicle doors are shut. 1.
Owner Guide 3rd Printing
Page 90
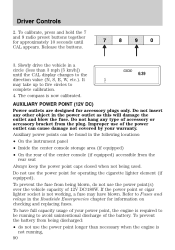
... running to Fuses and relays in the power outlet as this will damage the outlet and blow the fuse. Refer to avoid unintentional discharge of accessory or accessory bracket from being used. To have blown. Do not hang any other object in the Roadside Emergencies chapter for... accessory plugs only. To prevent the battery from the plug. Driver Controls 2. If the power point or cigar lighter socket is now calibrated. It may have ...
... running to Fuses and relays in the power outlet as this will damage the outlet and blow the fuse. Refer to avoid unintentional discharge of accessory or accessory bracket from being used. To have blown. Do not hang any other object in the Roadside Emergencies chapter for... accessory plugs only. To prevent the battery from the plug. Driver Controls 2. If the power point or cigar lighter socket is now calibrated. It may have ...

Owner Guide 3rd Printing
Page 93
.... WARNING: Do not leave children unattended in motion. INTERIOR MIRROR The interior rear view mirror has two pivot points on the overhead console. Accessory delay (if equipped) With accessory delay, the window switches may seriously injure themselves. control to Press and hold the close the window. Driver Controls Power sliding back window...
.... WARNING: Do not leave children unattended in motion. INTERIOR MIRROR The interior rear view mirror has two pivot points on the overhead console. Accessory delay (if equipped) With accessory delay, the window switches may seriously injure themselves. control to Press and hold the close the window. Driver Controls Power sliding back window...

Owner Guide 3rd Printing
Page 105
... Wireless Control System with any garage door opener that upon the sale of the vehicle, the programmed Homelink buttons be turned to the accessory position for Canadian residents. 3. new HomeLink equipped vehicle purchase). Firmly press and hold the just-trained HomeLink button and observe the indicator light...
... Wireless Control System with any garage door opener that upon the sale of the vehicle, the programmed Homelink buttons be turned to the accessory position for Canadian residents. 3. new HomeLink equipped vehicle purchase). Firmly press and hold the just-trained HomeLink button and observe the indicator light...

Owner Guide 3rd Printing
Page 120
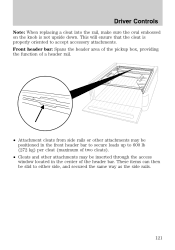
... of the rail. Driver Controls CARGO MANAGEMENT SYSTEM (IF EQUIPPED) The cargo management system consists of the Cargo rail package with the following as optional accessories: • Front header bar (if equipped) • Cross bars (if equipped) • Bed divider (if equipped) • Side mounted tool bins (if equipped) Cargo rail...
... of the rail. Driver Controls CARGO MANAGEMENT SYSTEM (IF EQUIPPED) The cargo management system consists of the Cargo rail package with the following as optional accessories: • Front header bar (if equipped) • Cross bars (if equipped) • Bed divider (if equipped) • Side mounted tool bins (if equipped) Cargo rail...
Owner Guide 3rd Printing
Page 121
... the same way as the side rails. 121 These items can then be positioned in the front header bar to secure loads up to accept accessory attachments.
... the same way as the side rails. 121 These items can then be positioned in the front header bar to secure loads up to accept accessory attachments.
Owner Guide 3rd Printing
Page 122
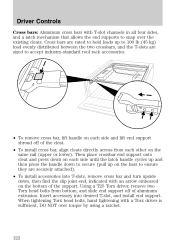
... load evenly distributed between the two crossbars, and the T-slots are sized to ensure they are securely attached). • To install accessories into desired T-slot, and install end support. Insert accessory into T-slots, remove cross bar and turn upside down to secure (pull up on the bars to accept industry-standard roof... rack accessories. • To remove cross bar, lift handle on each side and lift end support shroud off of the cleat. • To install cross bar, align...
... load evenly distributed between the two crossbars, and the T-slots are sized to ensure they are securely attached). • To install accessories into desired T-slot, and install end support. Insert accessory into T-slots, remove cross bar and turn upside down to secure (pull up on the bars to accept industry-standard roof... rack accessories. • To remove cross bar, lift handle on each side and lift end support shroud off of the cleat. • To install cross bar, align...

Owner Guide 3rd Printing
Page 123
... until the latch handle cycles up then press the handle down to secure (pull up to ensure they are securely attached). • To install accessories into desired T-slot and install end support. When tightening Torx head bolts, hand tightening with an arrow embossed on the support. Then place divider ... Controls Bed divider: This panel will keep small items up on the divider to 400 lb (180 kg) in position in the pickup box. Insert accessory into T-slots, remove bed divider, then find the slip joint end, indicated with a Torx driver is sufficient, DO NOT over torque by using a ratchet...
... until the latch handle cycles up then press the handle down to secure (pull up to ensure they are securely attached). • To install accessories into desired T-slot and install end support. When tightening Torx head bolts, hand tightening with an arrow embossed on the support. Then place divider ... Controls Bed divider: This panel will keep small items up on the divider to 400 lb (180 kg) in position in the pickup box. Insert accessory into T-slots, remove bed divider, then find the slip joint end, indicated with a Torx driver is sufficient, DO NOT over torque by using a ratchet...

Owner Guide 3rd Printing
Page 134
...the instrument cluster message center (if equipped). Deactivating/activating autounlock feature Your vehicle comes with the autounlock features activated; Refer to the off or accessory position. Release the 7 • 8. 6. Release the 3 • 4. Autounlock feature The autounlock feature will not autounlock if the ... has been disabled or a chirp followed by using the vehicle's message center, refer to the off or accessory position; Locks and Security Keyless entry keypad procedure 1. Turn the ignition to Message center information in the Instrument ClusterDriver Controls chapter.
...the instrument cluster message center (if equipped). Deactivating/activating autounlock feature Your vehicle comes with the autounlock features activated; Refer to the off or accessory position. Release the 7 • 8. 6. Release the 3 • 4. Autounlock feature The autounlock feature will not autounlock if the ... has been disabled or a chirp followed by using the vehicle's message center, refer to the off or accessory position; Locks and Security Keyless entry keypad procedure 1. Turn the ignition to Message center information in the Instrument ClusterDriver Controls chapter.
Owner Guide 3rd Printing
Page 138
... seconds. Note: The doors will lock again, the horn will chirp once, and the turn lamps will chirp and the turn the ignition to Press accessory or on to confirm that this method be used to activate the alarm. The horn will illuminate if all the doors are closed.. Note: The...
... seconds. Note: The doors will lock again, the horn will chirp once, and the turn lamps will chirp and the turn the ignition to Press accessory or on to confirm that this method be used to activate the alarm. The horn will illuminate if all the doors are closed.. Note: The...

Owner Guide 3rd Printing
Page 193
.... Failure to service, repair, or modify the airbag SRS, its fuses or the seat cover on . • A series of a collision. WARNING: Do not use of accessory seat covers may prevent the deployment of the side airbags and increase the risk of injury in front seat areas that may increase the risk... of personal injury in the event of five beeps will be heard. The use accessory seat covers. WARNING: All occupants of the vehicle should always wear their safety belts even when an airbag SRS is turned on a seat containing an...
.... Failure to service, repair, or modify the airbag SRS, its fuses or the seat cover on . • A series of a collision. WARNING: Do not use of accessory seat covers may prevent the deployment of the side airbags and increase the risk of injury in front seat areas that may increase the risk... of personal injury in the event of five beeps will be heard. The use accessory seat covers. WARNING: All occupants of the vehicle should always wear their safety belts even when an airbag SRS is turned on a seat containing an...

Owner Guide 3rd Printing
Page 214
... anchors for the center seating position unless the child seat manufacturer's instructions permit and specify using anchors spaced at least as far apart as an accessory for many older safety seats. If the safety seat is achieved. Attach the tether strap afterward, if included with rigid LATCH attachments cannot be attached...
... anchors for the center seating position unless the child seat manufacturer's instructions permit and specify using anchors spaced at least as far apart as an accessory for many older safety seats. If the safety seat is achieved. Attach the tether strap afterward, if included with rigid LATCH attachments cannot be attached...
Owner Guide 3rd Printing
Page 271
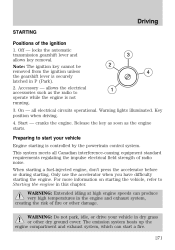
... other damage. The emission system heats up the engine compartment and exhaust system, which can produce very high temperatures in this chapter. allows the electrical accessories such as the engine starts. On - Key position when driving. 4. Only use the accelerator when you have difficulty starting . This system meets all electrical circuits... lights illuminated. WARNING: Extended idling at high engine speeds can start your vehicle in P (Park). 2. locks the automatic transmission gearshift lever and allows key removal. Accessory - Preparing to start a fire. 271
... other damage. The emission system heats up the engine compartment and exhaust system, which can produce very high temperatures in this chapter. allows the electrical accessories such as the engine starts. On - Key position when driving. 4. Only use the accelerator when you have difficulty starting . This system meets all electrical circuits... lights illuminated. WARNING: Extended idling at high engine speeds can start your vehicle in P (Park). 2. locks the automatic transmission gearshift lever and allows key removal. Accessory - Preparing to start a fire. 271