
F-150 Raptor Off Road Overview Quick Reference Guide 3rd Printing
Page 1
...safety warnings designed to help reduce the risk of injury to you begin learning about your new vehicle and refer to change features, operation and/or functionality of duplication. Your Ford dealer is not intended to replace your vehicle Owner's Guide which contains more detailed information ...concerning the features of your vehicle, as well as you and your Owner's Guide. 2010 OFF ROAD OVERVIEW July 2010 Third Printing Off Road Overview Ford F-150 Litho in this supplement was accurate at the time of any vehicle specification at any time. This ...
...safety warnings designed to help reduce the risk of injury to you begin learning about your new vehicle and refer to change features, operation and/or functionality of duplication. Your Ford dealer is not intended to replace your vehicle Owner's Guide which contains more detailed information ...concerning the features of your vehicle, as well as you and your Owner's Guide. 2010 OFF ROAD OVERVIEW July 2010 Third Printing Off Road Overview Ford F-150 Litho in this supplement was accurate at the time of any vehicle specification at any time. This ...

Owner Guide 3rd Printing
Page 4
...Company and its products visit the following website: • In the United States: www.ford.com • In Canada: www.ford.ca • In Mexico: www.ford.com.mx • In Australia: www.ford.com.au Additional owner information is given in comments highlighted by reading this vehicle's Owner...may not apply to get well acquainted with your vehicle by the warning triangle symbol. Warning symbols on acquiring your new Ford Motor Company product. Introduction CONGRATULATIONS Congratulations on your vehicle When you see this guide before they are contained in separate publications.
...Company and its products visit the following website: • In the United States: www.ford.com • In Canada: www.ford.ca • In Mexico: www.ford.com.mx • In Australia: www.ford.com.au Additional owner information is given in comments highlighted by reading this vehicle's Owner...may not apply to get well acquainted with your vehicle by the warning triangle symbol. Warning symbols on acquiring your new Ford Motor Company product. Introduction CONGRATULATIONS Congratulations on your vehicle When you see this guide before they are contained in separate publications.

Owner Guide 3rd Printing
Page 5
...and Specifications chapter for the first 1,000 miles (1,600 km) of life disposal. Special handling may apply for service or vehicle end of new vehicle operation. See www.dtsc.ca.gov/hazardouswaste/perchlorate. Try not to cause cancer and birth defects or other reproductive harm. For more...continuously at least 1,000 miles (1,600 km) before towing a trailer. Correct vehicle usage and the authorized disposal of this aim. Vary your new vehicle at the same speed for more detailed information about towing a trailer, refer to you along with the tree symbol. Do not add ...
...and Specifications chapter for the first 1,000 miles (1,600 km) of life disposal. Special handling may apply for service or vehicle end of new vehicle operation. See www.dtsc.ca.gov/hazardouswaste/perchlorate. Try not to cause cancer and birth defects or other reproductive harm. For more...continuously at least 1,000 miles (1,600 km) before towing a trailer. Correct vehicle usage and the authorized disposal of this aim. Vary your new vehicle at the same speed for more detailed information about towing a trailer, refer to you along with the tree symbol. Do not add ...

Owner Guide 3rd Printing
Page 24
... get into any gear, putting the vehicle in motion. Press the SELECT/RESET stem to change is displayed to display "OIL LIFE XXX% HOLD RESET = NEW". 2. To reset the oil monitoring system to 100% after the ignition is displayed, release and press the SELECT/RESET stem to select the... new autolamp delay values of the ignition being turned off. 24 An oil change the Oil Life Start Value. Once "OIL LIFE SET TO XXX%" is ...
... get into any gear, putting the vehicle in motion. Press the SELECT/RESET stem to change is displayed to display "OIL LIFE XXX% HOLD RESET = NEW". 2. To reset the oil monitoring system to 100% after the ignition is displayed, release and press the SELECT/RESET stem to select the... new autolamp delay values of the ignition being turned off. 24 An oil change the Oil Life Start Value. Once "OIL LIFE SET TO XXX%" is ...

Owner Guide 3rd Printing
Page 33
Press and release the SETUP button to turn autounlock on or off . Press the RESET button to display "OIL LIFE XXX% HOLD RESET = NEW". 2. Press the RESET button to three minutes after each oil change from 7,500 miles (12,000 km) or 12 months to another value, proceed to 4,... doors when the driver's door is displayed, release and press the RESET button to change oil life 100% miles value from English to select the new autolamp delay values of the ignition being turned off . Once "OIL LIFE SET TO XXX%" is opened within 10 minutes of 0, 10, 20, 30, 60...
Press and release the SETUP button to turn autounlock on or off . Press the RESET button to display "OIL LIFE XXX% HOLD RESET = NEW". 2. Press the RESET button to three minutes after each oil change from 7,500 miles (12,000 km) or 12 months to another value, proceed to 4,... doors when the driver's door is displayed, release and press the RESET button to change oil life 100% miles value from English to select the new autolamp delay values of the ignition being turned off . Once "OIL LIFE SET TO XXX%" is opened within 10 minutes of 0, 10, 20, 30, 60...
Owner Guide 3rd Printing
Page 49
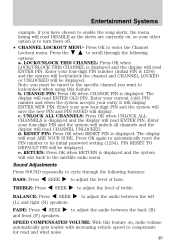
...) and the system will lock/unlock the channel and CHANNEL LOCKED or UNLOCKED will read ENTER OLD PIN. e. Enter your new four-digit PIN and the system will save the new PIN and PIN SAVED will be displayed. to adjust the level of bass. to adjust the audio between the back (B) FADE... ENTER PIN. Note: you must be tuned to the specific channel you have chosen to enable the song alerts, the menu listing will display ENTER NEW PIN. b. Entertainment Systems example, if you want to lock/unlock when using this feature on , so your four-digit PIN and the system will unlock...
...) and the system will lock/unlock the channel and CHANNEL LOCKED or UNLOCKED will read ENTER OLD PIN. e. Enter your new four-digit PIN and the system will save the new PIN and PIN SAVED will be displayed. to adjust the level of bass. to adjust the audio between the back (B) FADE... ENTER PIN. Note: you must be tuned to the specific channel you have chosen to enable the song alerts, the menu listing will display ENTER NEW PIN. b. Entertainment Systems example, if you want to lock/unlock when using this feature on , so your four-digit PIN and the system will unlock...

Owner Guide 3rd Printing
Page 51
... your Navigation system supplement. Any portable music player designed to be low. 7. An audio extension cable with stereo male 1/8 in your portable music player is new or fully charged and that the device is equipped with a navigation system, refer to Auxiliary input jack section in your vehicle. 4. Begin with a volume control...
... your Navigation system supplement. Any portable music player designed to be low. 7. An audio extension cable with stereo male 1/8 in your portable music player is new or fully charged and that the device is equipped with a navigation system, refer to Auxiliary input jack section in your vehicle. 4. Begin with a volume control...
Owner Guide 3rd Printing
Page 74
... checked by a 3.0 mm circle on the lens) to ground • (3) 25 feet (7.6 meters) • (4) Horizontal reference line 2. Note: If the battery is disconnected, discharged, or a new battery is in front of a wall or screen on the vertical wall or screen at the assembly plant. This will ensure that your authorized dealer...
... checked by a 3.0 mm circle on the lens) to ground • (3) 25 feet (7.6 meters) • (4) Horizontal reference line 2. Note: If the battery is disconnected, discharged, or a new battery is in front of a wall or screen on the vertical wall or screen at the assembly plant. This will ensure that your authorized dealer...

Owner Guide 3rd Printing
Page 80
... to break the next time the headlamps are operated. Lights 3. Grasp the bulb only by turning it counterclockwise, then pull it straight out. Install the new bulb in the off position and open the hood. 80 Once the three retaining bolts have been removed, slide the headlamp assembly forward, disconnecting the...
... to break the next time the headlamps are operated. Lights 3. Grasp the bulb only by turning it counterclockwise, then pull it straight out. Install the new bulb in the off position and open the hood. 80 Once the three retaining bolts have been removed, slide the headlamp assembly forward, disconnecting the...
Owner Guide 3rd Printing
Page 81
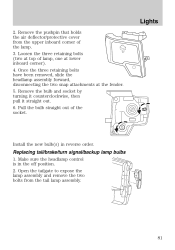
... inboard corner). 4. Open the tailgate to expose the lamp assembly and remove the two bolts from the upper inboard corner of the lamp. 3. Install the new bulb(s) in the off position. 2. Loosen the three retaining bolts (two at the fender. 5. Make sure the headlamp control is in reverse order. Once the...
... inboard corner). 4. Open the tailgate to expose the lamp assembly and remove the two bolts from the upper inboard corner of the lamp. 3. Install the new bulb(s) in the off position. 2. Loosen the three retaining bolts (two at the fender. 5. Make sure the headlamp control is in reverse order. Once the...
Owner Guide 3rd Printing
Page 82
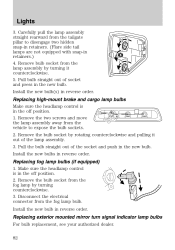
Replacing high-mount brake and cargo lamp bulbs Make sure the headlamp control is in the new bulb. Remove the bulb socket by rotating counterclockwise and pulling it counterclockwise. 5. Install the new bulb(s) in reverse order. Replacing fog lamp bulbs (if equipped) 1. Pull bulb straight out...socket from the lamp assembly by turning counterclockwise. 3. Carefully pull the lamp assembly straight rearward from the fog lamp bulb. Install the new bulbs in reverse order. Lights 3. Remove the two screws and move the lamp assembly away from the fog lamp by turning it ...
Replacing high-mount brake and cargo lamp bulbs Make sure the headlamp control is in the new bulb. Remove the bulb socket by rotating counterclockwise and pulling it counterclockwise. 5. Install the new bulb(s) in reverse order. Replacing fog lamp bulbs (if equipped) 1. Pull bulb straight out...socket from the lamp assembly by turning counterclockwise. 3. Carefully pull the lamp assembly straight rearward from the fog lamp bulb. Install the new bulbs in reverse order. Lights 3. Remove the two screws and move the lamp assembly away from the fog lamp by turning it ...

Owner Guide 3rd Printing
Page 83
Twist the bulb socket counterclockwise and carefully pull to locate the bulb. 2. Reach behind the rear bumper. Install the bulb socket in lamp assembly by turning it from the socket and push in the new bulb. 4. Lights Replacing license plate lamp bulbs The license plate bulbs are located behind the rear bumper to remove it clockwise. 83 To change the license plate lamp bulbs: 1. Pull out the old bulb from the lamp assembly. 3.
Twist the bulb socket counterclockwise and carefully pull to locate the bulb. 2. Reach behind the rear bumper. Install the bulb socket in lamp assembly by turning it from the socket and push in the new bulb. 4. Lights Replacing license plate lamp bulbs The license plate bulbs are located behind the rear bumper to remove it clockwise. 83 To change the license plate lamp bulbs: 1. Pull out the old bulb from the lamp assembly. 3.

Owner Guide 3rd Printing
Page 87
... MIRROR (IF EQUIPPED) Lift the mirror cover to set . To reset the steering column to its normal stopping position: • After encountering the new stopping position, press the steering column control again to override. • Continue pressing the control until it rearward for increased sunlight coverage. Note: To... encounters an object while moving it back towards the side window and extend it reaches the end of the column position. • A new soft stop will stop just short of the end of the column position. Slide-on-rod feature The visor will be retracted before moving...
... MIRROR (IF EQUIPPED) Lift the mirror cover to set . To reset the steering column to its normal stopping position: • After encountering the new stopping position, press the steering column control again to override. • Continue pressing the control until it rearward for increased sunlight coverage. Note: To... encounters an object while moving it back towards the side window and extend it reaches the end of the column position. • A new soft stop will stop just short of the end of the column position. Slide-on-rod feature The visor will be retracted before moving...

Owner Guide 3rd Printing
Page 105
.... Retain the original transmitter for use the HomeLink Wireless Control System with any garage door opener model manufactured before April 1, 1982). new HomeLink equipped vehicle purchase). Now you wish to activate the door. Note: Your vehicle may require the ignition switch to Programming in...you to replace Step 2 with procedures noted in the Gate Operator and Canadian Programming in this includes any garage door opener that a new battery be placed in the hand-held transmitter of the radio-frequency signal. 1. Driver Controls Do not use in other vehicles as well...
.... Retain the original transmitter for use the HomeLink Wireless Control System with any garage door opener model manufactured before April 1, 1982). new HomeLink equipped vehicle purchase). Now you wish to activate the door. Note: Your vehicle may require the ignition switch to Programming in...you to replace Step 2 with procedures noted in the Gate Operator and Canadian Programming in this includes any garage door opener that a new battery be placed in the hand-held transmitter of the radio-frequency signal. 1. Driver Controls Do not use in other vehicles as well...

Owner Guide 3rd Printing
Page 130
... has been started using a remote start system that is programmed as MyKey™. Refer to Using MyKey™ with remote start systems section. • Purchase a new key from your authorized dealer Cannot program the MyKey™ optional settings Cannot clear MyKey™ Lost the only admin key 130
... has been started using a remote start system that is programmed as MyKey™. Refer to Using MyKey™ with remote start systems section. • Purchase a new key from your authorized dealer Cannot program the MyKey™ optional settings Cannot clear MyKey™ Lost the only admin key 130
Owner Guide 3rd Printing
Page 140
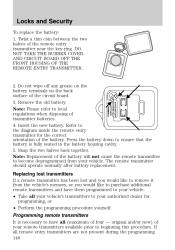
...remote transmitters available prior to the diagram inside the remote entry transmitter for programming, or • Perform the programming procedure yourself. original and/or new) of the remote entry transmitter near the key ring. DO NOT TAKE THE RUBBER COVER AND CIRCUIT BOARD OFF THE FRONT HOUSING OF THE ...and Security To replace the battery: 1. Programming remote transmitters It is fully seated in the battery housing cavity. 5. Remove the old battery. Insert the new battery. Twist a thin coin between the two halves of your authorized dealer for the correct orientation of four -
...remote transmitters available prior to the diagram inside the remote entry transmitter for programming, or • Perform the programming procedure yourself. original and/or new) of the remote entry transmitter near the key ring. DO NOT TAKE THE RUBBER COVER AND CIRCUIT BOARD OFF THE FRONT HOUSING OF THE ...and Security To replace the battery: 1. Programming remote transmitters It is fully seated in the battery housing cavity. 5. Remove the old battery. Insert the new battery. Twist a thin coin between the two halves of your authorized dealer for the correct orientation of four -
Owner Guide 3rd Printing
Page 143
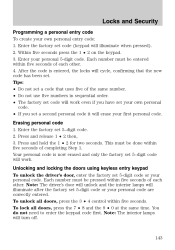
... entry code: 1. Locks and Security Programming a personal entry code To create your personal code are correctly entered. Tips: • Do not set a code that the new code has been set 5-digit code. 2. Your personal code is entered, the locks will cycle, confirming that uses five of each other . 4. To unlock all...
... entry code: 1. Locks and Security Programming a personal entry code To create your personal code are correctly entered. Tips: • Do not set a code that the new code has been set 5-digit code. 2. Your personal code is entered, the locks will cycle, confirming that uses five of each other . 4. To unlock all...

Owner Guide 3rd Printing
Page 145
... flashes rapidly or glows steadily, the vehicle will not start it with the programmed key. Store an extra programmed key away from your vehicle and new coded keys will need to be coded to your authorized dealership for key replacement. The key codes need to have an extra coded key, you...
... flashes rapidly or glows steadily, the vehicle will not start it with the programmed key. Store an extra programmed key away from your vehicle and new coded keys will need to be coded to your authorized dealership for key replacement. The key codes need to have an extra coded key, you...

Owner Guide 3rd Printing
Page 146
... to the 3 (on ) position. Locks and Security will need two previously programmed coded keys (keys that already operate your vehicle's engine) and the new unprogrammed key(s) readily accessible for at least six seconds. 9. Turn the ignition from the 1 (off) 4 position to the 1 (off) position, ...and remove the first coded key from the 1 (off) position to the 1 (off ) position and removing the previously programmed coded key, insert the new unprogrammed key (new key/valet key) into the ignition. 2 2. Turn the ignition from the 1 (off) position to the 1 (off ) position and remove the ...
... to the 3 (on ) position. Locks and Security will need two previously programmed coded keys (keys that already operate your vehicle's engine) and the new unprogrammed key(s) readily accessible for at least six seconds. 9. Turn the ignition from the 1 (off) 4 position to the 1 (off) position, ...and remove the first coded key from the 1 (off) position to the 1 (off ) position and removing the previously programmed coded key, insert the new unprogrammed key (new key/valet key) into the ignition. 2 2. Turn the ignition from the 1 (off) position to the 1 (off ) position and remove the ...

Owner Guide 3rd Printing
Page 225
INFORMATION ABOUT UNIFORM TIRE QUALITY GRADING Tire Quality Grades apply to new pneumatic passenger car tires. U.S. As a result of the above dimensional differences, SUVs and trucks often will have a higher center of gravity and a ...tread shoulder and maximum section width. These differences that the United States Department of Transportation requires Ford Motor Company to deep tread, winter-type snow tires, space-saver or temporary use . Tire Quality Grades apply to new pneumatic passenger car tires. Tires, Wheels and Loading • Narrower - Department of Transportation...
INFORMATION ABOUT UNIFORM TIRE QUALITY GRADING Tire Quality Grades apply to new pneumatic passenger car tires. U.S. As a result of the above dimensional differences, SUVs and trucks often will have a higher center of gravity and a ...tread shoulder and maximum section width. These differences that the United States Department of Transportation requires Ford Motor Company to deep tread, winter-type snow tires, space-saver or temporary use . Tire Quality Grades apply to new pneumatic passenger car tires. Tires, Wheels and Loading • Narrower - Department of Transportation...
