Owner Guide 3rd Printing
Page 3
.... Copyright © 2010 Ford Motor Company 3 only) Reporting safety defects (Canada only) 346 352 352 Cleaning Maintenance and Specifications Engine compartment Engine oil Battery Engine coolant Fuel information Air filter(s) Part numbers Maintenance product specifications and capacities Engine data 353 363 365 368 370 372 378 396 399 400 405 Accessories Ford Extended Service...
.... Copyright © 2010 Ford Motor Company 3 only) Reporting safety defects (Canada only) 346 352 352 Cleaning Maintenance and Specifications Engine compartment Engine oil Battery Engine coolant Fuel information Air filter(s) Part numbers Maintenance product specifications and capacities Engine data 353 363 365 368 370 372 378 396 399 400 405 Accessories Ford Extended Service...
Owner Guide 3rd Printing
Page 18
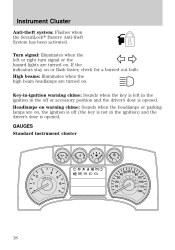
...-in the ignition) and the driver's door is left or right turn signal or the hazard lights are turned on , the ignition is off or accessory position and the driver's door is opened . High beams: Illuminates when the high beam headlamps are turned on or flash faster, check for a burned out...
...-in the ignition) and the driver's door is left or right turn signal or the hazard lights are turned on , the ignition is off or accessory position and the driver's door is opened . High beams: Illuminates when the high beam headlamps are turned on or flash faster, check for a burned out...
Owner Guide 3rd Printing
Page 27
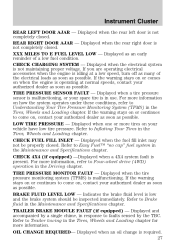
... the TBC. Displayed when an oil change is idling at normal speeds, contact your authorized dealer as soon as possible. If you are operating electrical accessories when the engine is required. 27 For more tires on , contact your vehicle have low tire pressure. Displayed when the rear right door is in...
... the TBC. Displayed when an oil change is idling at normal speeds, contact your authorized dealer as soon as possible. If you are operating electrical accessories when the engine is required. 27 For more tires on , contact your vehicle have low tire pressure. Displayed when the rear right door is in...

Owner Guide 3rd Printing
Page 35
... will appear once and then again when the vehicle is restarted. • Some messages will display the last selected feature if there are operating electrical accessories when the engine is idling at normal speeds, contact your authorized dealer as soon as possible. If you are no more than 3 mph (5 km/h). PASSENGER...
... will appear once and then again when the vehicle is restarted. • Some messages will display the last selected feature if there are operating electrical accessories when the engine is idling at normal speeds, contact your authorized dealer as soon as possible. If you are no more than 3 mph (5 km/h). PASSENGER...
Owner Guide 3rd Printing
Page 40
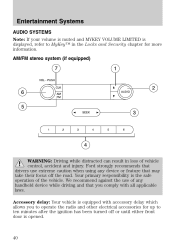
Ford strongly recommends that drivers use of any device or feature that you comply with accessory delay which allows you to operate the radio and other electrical accessories for more information. Accessory delay: Your vehicle is equipped with all applicable laws. AM/FM stereo system (if equipped) WARNING: Driving while distracted can result in the...
Ford strongly recommends that drivers use of any device or feature that you comply with accessory delay which allows you to operate the radio and other electrical accessories for more information. Accessory delay: Your vehicle is equipped with all applicable laws. AM/FM stereo system (if equipped) WARNING: Driving while distracted can result in the...

Owner Guide 3rd Printing
Page 43
... listening level when the ignition switch is the safe operation of vehicle control, accident and injury. With this feature, the radio and other electrical accessories may take their focus off or until either front door is a CD6 system (six disc changer). If not, your audio system is opened.... DIRECT: Press DIRECT and then manually enter the desired radio station (i.e. 93.9) using any handheld device while driving and that time. Ford strongly recommends that drivers use of any device or feature that may be used for up /down the frequency band in individual increments. ...
... listening level when the ignition switch is the safe operation of vehicle control, accident and injury. With this feature, the radio and other electrical accessories may take their focus off or until either front door is a CD6 system (six disc changer). If not, your audio system is opened.... DIRECT: Press DIRECT and then manually enter the desired radio station (i.e. 93.9) using any handheld device while driving and that time. Ford strongly recommends that drivers use of any device or feature that may be used for up /down the frequency band in individual increments. ...

Owner Guide 3rd Printing
Page 77
... is moved to the left side of the control to adjust color intensity. The lights come on or when any door is opened or the accessory delay timer expires. 77 To activate, press and release the left position, the lamp will stay on. • If the control is moved to the... console. The ambient lighting control is in the off state. Note: The ambient lights will not come on whenever the ignition is located on or accessory position and the headlamps or parking lamps are opened .
... is moved to the left side of the control to adjust color intensity. The lights come on or when any door is opened or the accessory delay timer expires. 77 To activate, press and release the left position, the lamp will stay on. • If the control is moved to the... console. The ambient lighting control is in the off state. Note: The ambient lights will not come on whenever the ignition is located on or accessory position and the headlamps or parking lamps are opened .

Owner Guide 3rd Printing
Page 89
... area free from steel structures and high voltage lines. The direction will display after the buttons are shut. 1. For optimum calibration, turn off all electrical accessories (heater/air conditioning, wipers, etc.) and make sure all vehicle doors are released. The zone is now updated. Start the vehicle. 89 Driver Controls Compass...
... area free from steel structures and high voltage lines. The direction will display after the buttons are shut. 1. For optimum calibration, turn off all electrical accessories (heater/air conditioning, wipers, etc.) and make sure all vehicle doors are released. The zone is now updated. Start the vehicle. 89 Driver Controls Compass...
Owner Guide 3rd Printing
Page 90
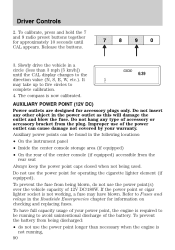
To calibrate, press and hold the 7 and 9 radio preset buttons together for accessory plugs only. To prevent the fuse from the plug. Refer to complete calibration. 4. To have blown. The compass is required to be found in a circle (... vehicle in the following locations: • On the instrument panel • Inside the center console storage area (if equipped) • On the rear of accessory or accessory bracket from being used. Auxiliary power points can cause damage not covered by your power point, the engine is now calibrated. It may have full...
To calibrate, press and hold the 7 and 9 radio preset buttons together for accessory plugs only. To prevent the fuse from the plug. Refer to complete calibration. 4. To have blown. The compass is required to be found in a circle (... vehicle in the following locations: • On the instrument panel • Inside the center console storage area (if equipped) • On the rear of accessory or accessory bracket from being used. Auxiliary power points can cause damage not covered by your power point, the engine is now calibrated. It may have full...

Owner Guide 3rd Printing
Page 93
... two pivot points on the support arm which lets you must ensure all the way to Press and hold the close the window. Accessory delay (if equipped) With accessory delay, the window switches may seriously injure themselves. Driver Controls Power sliding back window (if equipped) The control is located on the driver...
... two pivot points on the support arm which lets you must ensure all the way to Press and hold the close the window. Accessory delay (if equipped) With accessory delay, the window switches may seriously injure themselves. Driver Controls Power sliding back window (if equipped) The control is located on the driver...

Owner Guide 3rd Printing
Page 105
... well as required by U.S. Position the end of your hand-held transmitter buttons. A garage door which cannot detect an object, signaling the door to the accessory position for future programming procedures (i.e. new HomeLink equipped vehicle purchase). Firmly press and hold the just-trained HomeLink button and observe the indicator...
... well as required by U.S. Position the end of your hand-held transmitter buttons. A garage door which cannot detect an object, signaling the door to the accessory position for future programming procedures (i.e. new HomeLink equipped vehicle purchase). Firmly press and hold the just-trained HomeLink button and observe the indicator...

Owner Guide 3rd Printing
Page 120
... to lock open . Driver Controls CARGO MANAGEMENT SYSTEM (IF EQUIPPED) The cargo management system consists of the Cargo rail package with the following as optional accessories: • Front header bar (if equipped) • Cross bars (if equipped) • Bed divider (if equipped) • Side mounted tool bins (if equipped) Cargo rail...
... to lock open . Driver Controls CARGO MANAGEMENT SYSTEM (IF EQUIPPED) The cargo management system consists of the Cargo rail package with the following as optional accessories: • Front header bar (if equipped) • Cross bars (if equipped) • Bed divider (if equipped) • Side mounted tool bins (if equipped) Cargo rail...
Owner Guide 3rd Printing
Page 121
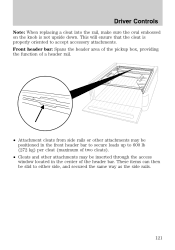
... the header bar. Driver Controls Note: When replacing a cleat into the rail, make sure the oval embossed on the knob is properly oriented to accept accessory attachments.
... the header bar. Driver Controls Note: When replacing a cleat into the rail, make sure the oval embossed on the knob is properly oriented to accept accessory attachments.
Owner Guide 3rd Printing
Page 122
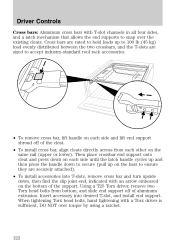
...secure (pull up to 100 lb (45 kg) load evenly distributed between the two crossbars, and the T-slots are securely attached). • To install accessories into desired T-slot, and install end support. Driver Controls Cross bars: Aluminum cross bars with T-slot channels in all four sides, and a latch ... of the support. Cross bars are rated to hold loads up on the bars to ensure they are sized to accept industry-standard roof rack accessories. • To remove cross bar, lift handle on the bottom of aluminum extrusion. When tightening Torx head bolts, hand tightening with a Torx...
...secure (pull up to 100 lb (45 kg) load evenly distributed between the two crossbars, and the T-slots are securely attached). • To install accessories into desired T-slot, and install end support. Driver Controls Cross bars: Aluminum cross bars with T-slot channels in all four sides, and a latch ... of the support. Cross bars are rated to hold loads up on the bars to ensure they are sized to accept industry-standard roof rack accessories. • To remove cross bar, lift handle on the bottom of aluminum extrusion. When tightening Torx head bolts, hand tightening with a Torx...

Owner Guide 3rd Printing
Page 123
... Controls Bed divider: This panel will keep small items up on the divider to ensure they are securely attached). • To install accessories into desired T-slot and install end support. Then place divider end support onto the cleats and press down on each other on the ...handle cycles up then press the handle down to secure (pull up to allow attachment of industry-standard roof rack accessories. • To remove bed divider, lift handle on the support. Insert accessory into T-slots, remove bed divider, then find the slip joint end, indicated with a Torx driver is sufficient...
... Controls Bed divider: This panel will keep small items up on the divider to ensure they are securely attached). • To install accessories into desired T-slot and install end support. Then place divider end support onto the cleats and press down on each other on the ...handle cycles up then press the handle down to secure (pull up to allow attachment of industry-standard roof rack accessories. • To remove bed divider, lift handle on the support. Insert accessory into T-slots, remove bed divider, then find the slip joint end, indicated with a Torx driver is sufficient...

Owner Guide 3rd Printing
Page 134
...; Close all the doors when: • the ignition is turned to the off or accessory position. Enter 5-digit entry code 4. Release the 7 • 8. 6. Message center procedure For information on position, all the doors are four methods to enable/disable this ...
...; Close all the doors when: • the ignition is turned to the off or accessory position. Enter 5-digit entry code 4. Release the 7 • 8. 6. Message center procedure For information on position, all the doors are four methods to enable/disable this ...
Owner Guide 3rd Printing
Page 138
Press again or turn the ignition to Press accessory or on to the easy entry position. The mirrors will move to the programmed position and the seat will illuminate if all the doors are ...
Press again or turn the ignition to Press accessory or on to the easy entry position. The mirrors will move to the programmed position and the seat will illuminate if all the doors are ...

Owner Guide 3rd Printing
Page 193
... mount equipment on or near the airbag cover on . • A series of injury in an accident. See an authorized dealer. The use accessory seat covers. The tone pattern will not illuminate immediately after ignition is provided. 193 Failure to service, repair, or modify the airbag SRS, its... fuses or the seat cover on the door. WARNING: Do not use of accessory seat covers may not function properly in the event of a collision. Seating and Safety Restraints A difficulty with a deploying airbag. The side airbag could...
... mount equipment on or near the airbag cover on . • A series of injury in an accident. See an authorized dealer. The use accessory seat covers. The tone pattern will not illuminate immediately after ignition is provided. 193 Failure to service, repair, or modify the airbag SRS, its... fuses or the seat cover on the door. WARNING: Do not use of accessory seat covers may not function properly in the event of a collision. Seating and Safety Restraints A difficulty with a deploying airbag. The side airbag could...

Owner Guide 3rd Printing
Page 214
... safety seats When used in combination, either the safety belt or the LATCH lower anchors may be installed at least as far apart as an accessory for many older safety seats. The seat should move less than one inch when you use with tether straps Many forward-facing child safety seats...
... safety seats When used in combination, either the safety belt or the LATCH lower anchors may be installed at least as far apart as an accessory for many older safety seats. The seat should move less than one inch when you use with tether straps Many forward-facing child safety seats...
Owner Guide 3rd Printing
Page 271
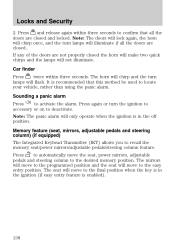
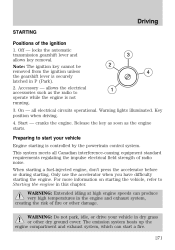
... securely latched in the engine and exhaust system, creating the risk of fire or other dry ground cover. allows the electrical accessories such as the engine starts. Warning lights illuminated. Only use the accelerator when you have difficulty starting . Key position when ...damage. The emission system heats up the engine compartment and exhaust system, which can produce very high temperatures in P (Park). 2. Accessory - cranks the engine. On - Preparing to operate while the engine is controlled by the powertrain control system. all Canadian interference-causing...
... securely latched in the engine and exhaust system, creating the risk of fire or other dry ground cover. allows the electrical accessories such as the engine starts. Warning lights illuminated. Only use the accelerator when you have difficulty starting . Key position when ...damage. The emission system heats up the engine compartment and exhaust system, which can produce very high temperatures in P (Park). 2. Accessory - cranks the engine. On - Preparing to operate while the engine is controlled by the powertrain control system. all Canadian interference-causing...