
Owner Guide 3rd Printing
Page 66
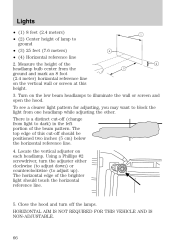
...lamp to adjust up). Measure the height of the brighter light should be positioned two inches (5 cm) below the horizontal reference line. 4. The horizontal edge of the headlamp bulb center from the ground and mark an 8 foot (2.4 meter) horizontal reference line on the vertical wall or screen at this cut... 5. Turn on each headlamp. To see a clearer light pattern for adjusting, you may want to illuminate the wall or screen and open the hood. The top edge of the beam pattern. Locate the vertical adjuster on the low beam headlamps to block the light from light to dark) in the left...
...lamp to adjust up). Measure the height of the brighter light should be positioned two inches (5 cm) below the horizontal reference line. 4. The horizontal edge of the headlamp bulb center from the ground and mark an 8 foot (2.4 meter) horizontal reference line on the vertical wall or screen at this cut... 5. Turn on each headlamp. To see a clearer light pattern for adjusting, you may want to illuminate the wall or screen and open the hood. The top edge of the beam pattern. Locate the vertical adjuster on the low beam headlamps to block the light from light to dark) in the left...
Owner Guide 3rd Printing
Page 70
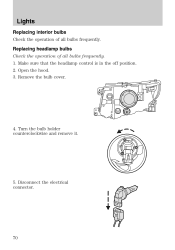
Open the hood. 3. Make sure that the headlamp control is in the off position. 2. Lights Replacing interior bulbs Check the operation of all bulbs frequently. Remove the bulb cover. 4. Disconnect the electrical connector. 70 Turn the bulb holder counterclockwise and remove it. 5. Replacing headlamp bulbs Check the operation of all bulbs frequently. 1.
Open the hood. 3. Make sure that the headlamp control is in the off position. 2. Lights Replacing interior bulbs Check the operation of all bulbs frequently. Remove the bulb cover. 4. Disconnect the electrical connector. 70 Turn the bulb holder counterclockwise and remove it. 5. Replacing headlamp bulbs Check the operation of all bulbs frequently. 1.
Owner Guide 3rd Printing
Page 71
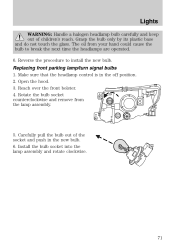
... the procedure to break the next time the headlamps are operated. 6. Install the bulb socket into the lamp assembly and rotate clockwise. 71 Open the hood. 3. Lights WARNING: Handle a halogen headlamp bulb carefully and keep out of the socket and push in the off position. 2.
... the procedure to break the next time the headlamps are operated. 6. Install the bulb socket into the lamp assembly and rotate clockwise. 71 Open the hood. 3. Lights WARNING: Handle a halogen headlamp bulb carefully and keep out of the socket and push in the off position. 2.
Owner Guide 3rd Printing
Page 257
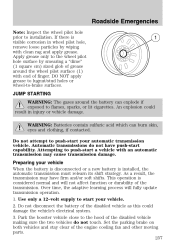
... update transmission operation. 1. Park the booster vehicle close to push-start a vehicle with an automatic transmission may have push-start your vehicle. 2. Attempting to the hood of the disabled vehicle making sure the two vehicles do not have firm and/or soft shifts. Over time, the adaptive learning process will not...
... update transmission operation. 1. Park the booster vehicle close to push-start a vehicle with an automatic transmission may have push-start your vehicle. 2. Attempting to the hood of the disabled vehicle making sure the two vehicles do not have firm and/or soft shifts. Over time, the adaptive learning process will not...
Owner Guide 3rd Printing
Page 279
Lift the hood and support it with the prop rod. 279 Maintenance and Specifications OPENING THE HOOD 1. Inside the vehicle, pull the hood release handle located under the front center of the instrument panel near the steering column. 2. Go to the front of the vehicle and release the secondary hood latch that is located under the bottom of the hood. 3.
Lift the hood and support it with the prop rod. 279 Maintenance and Specifications OPENING THE HOOD 1. Inside the vehicle, pull the hood release handle located under the front center of the instrument panel near the steering column. 2. Go to the front of the vehicle and release the secondary hood latch that is located under the bottom of the hood. 3.
Owner Guide 3rd Printing
Page 283
DO NOT ADD OIL. • If the oil level is acceptable. Wipe the dipstick clean. Protect yourself from engine heat. 5. Maintenance and Specifications 4. Locate and carefully remove the engine oil level dipstick. 6. Open the hood. Insert the dipstick fully, then remove it again. • If the oil level is within this range, the oil level is below this mark, engine oil must be added to raise the level within the normal operating range. 283
DO NOT ADD OIL. • If the oil level is acceptable. Wipe the dipstick clean. Protect yourself from engine heat. 5. Maintenance and Specifications 4. Locate and carefully remove the engine oil level dipstick. 6. Open the hood. Insert the dipstick fully, then remove it again. • If the oil level is within this range, the oil level is below this mark, engine oil must be added to raise the level within the normal operating range. 283
Owner Guide 3rd Printing
Page 310
... Capacity Motorcraft High Performance DOT 3 Motor Vehicle Brake Fluid PM-1-C / WSS-M6C62-A or WSS-M6C65-A1 XL-6 / ESR-M13P4-A Silicone Spray Lubricant Ford part name Ford part number / Ford specification - - Multi-Purpose Grease XG-4 or XL-5 / ESB-M1C93-B MAINTENANCE PRODUCT SPECIFICATIONS AND CAPACITIES Item Brake fluid Between MIN and MAX on reservoir...
... Capacity Motorcraft High Performance DOT 3 Motor Vehicle Brake Fluid PM-1-C / WSS-M6C62-A or WSS-M6C65-A1 XL-6 / ESR-M13P4-A Silicone Spray Lubricant Ford part name Ford part number / Ford specification - - Multi-Purpose Grease XG-4 or XL-5 / ESB-M1C93-B MAINTENANCE PRODUCT SPECIFICATIONS AND CAPACITIES Item Brake fluid Between MIN and MAX on reservoir...
Owner Guide 3rd Printing
Page 317
... in your vehicle should comply with FCC or CRTC regulations and should not locate the Amateur Radio Antennas in the area of the driver's side hood. • Electrical or electronic accessories or components that are not properly designed for specific weight information. • The Federal Communications Commission (FCC) and Canadian Radio...
... in your vehicle should comply with FCC or CRTC regulations and should not locate the Amateur Radio Antennas in the area of the driver's side hood. • Electrical or electronic accessories or components that are not properly designed for specific weight information. • The Federal Communications Commission (FCC) and Canadian Radio...
Owner Guide 3rd Printing
Page 323
... ...64 high beam ...64 replacing bulbs ...70 turning on and off ...63 Heating heating and air conditioning system ...56, 58 Homelink wireless control system ...87 Hood ...279 How to get going ...27 I Ignition ...214, 313 Illuminated visor mirror ...76 Infant seats (see Safety seats) ...167 Inspection/maintenance (I/M) testing ...304 Instrument panel...
... ...64 high beam ...64 replacing bulbs ...70 turning on and off ...63 Heating heating and air conditioning system ...56, 58 Homelink wireless control system ...87 Hood ...279 How to get going ...27 I Ignition ...214, 313 Illuminated visor mirror ...76 Infant seats (see Safety seats) ...167 Inspection/maintenance (I/M) testing ...304 Instrument panel...