
Warranty Guide 2nd Printing
Page 18
... or with the other parts that result from use and/or exposure to fail. You, as the owner, are not limited to lift kits, oversized tires, roll bars, cellular phones, alarm systems, automatic starting systems and performance-enhancing powertrain components or software and performance ...glass) • windshield stress cracks. Examples include, but not limited to exhaust and intake systems) • the installation or use of a non-Ford Motor Company part (other appearance items that affect these items. Some examples are: • dings, dents • cuts, burns, punctures or tears...
... or with the other parts that result from use and/or exposure to fail. You, as the owner, are not limited to lift kits, oversized tires, roll bars, cellular phones, alarm systems, automatic starting systems and performance-enhancing powertrain components or software and performance ...glass) • windshield stress cracks. Examples include, but not limited to exhaust and intake systems) • the installation or use of a non-Ford Motor Company part (other appearance items that affect these items. Some examples are: • dings, dents • cuts, burns, punctures or tears...

Owner Guide 2nd Printing (Spanish)
Page 551
Driver Controls O (off . Lift the lever back to its desired orientation. For rear wash cycle, rotate (and hold as desired) the rear wiper/washer position. With the lever in the down and release, to turn on the visor mirror lamp. 101 2009 Explorer (exp) Owners Guide, 2nd Printing USA (...tilt the steering column and wheel to its original position to the INT 2 or O (off) position. ILLUMINATED VISOR MIRROR (IF EQUIPPED) Lift the mirror cover to unlock the steering column tilt lock. control to either From either position, the control will automatically return to lock the ...
Driver Controls O (off . Lift the lever back to its desired orientation. For rear wash cycle, rotate (and hold as desired) the rear wiper/washer position. With the lever in the down and release, to turn on the visor mirror lamp. 101 2009 Explorer (exp) Owners Guide, 2nd Printing USA (...tilt the steering column and wheel to its original position to the INT 2 or O (off) position. ILLUMINATED VISOR MIRROR (IF EQUIPPED) Lift the mirror cover to unlock the steering column tilt lock. control to either From either position, the control will automatically return to lock the ...

Owner Guide 2nd Printing (Spanish)
Page 560
...km/h). Note: Do not use the running boards, front and rear hinge assemblies, running board motors, or the running board under body mounts to lift the vehicle with the jack, refer to Changing tires in this chapter. • When this feature is disabled (OFF), the running boards will ... and other road debris may operate more slowly in the running board feature, refer to the Message center in the Roadside Emergencies chapter. 110 2009 Explorer (exp) Owners Guide, 2nd Printing USA (fus) Note: The running boards may become trapped in cooler temperatures. Manual power deploy: To manually...
...km/h). Note: Do not use the running boards, front and rear hinge assemblies, running board motors, or the running board under body mounts to lift the vehicle with the jack, refer to Changing tires in this chapter. • When this feature is disabled (OFF), the running boards will ... and other road debris may operate more slowly in the running board feature, refer to the Message center in the Roadside Emergencies chapter. 110 2009 Explorer (exp) Owners Guide, 2nd Printing USA (fus) Note: The running boards may become trapped in cooler temperatures. Manual power deploy: To manually...

Owner Guide 2nd Printing (Spanish)
Page 601
To close , lower and press the lid down on the right side under the license plate lamp shield. 151 2009 Explorer (exp) Owners Guide, 2nd Printing USA (fus) It cannot be opened from outside the vehicle. Driver Controls 7 passenger stowage: 1. To open the liftgate, unlock the ... entry or the keyless entry pad) and pull the middle lever under the license plate lamp shield. • To open , lift the release handle and the lid. 2. To close , lower the lid, lift the release handle and press down . 5 passenger stowage: When the lid is only intended for cargo, not passengers. You...
To close , lower and press the lid down on the right side under the license plate lamp shield. 151 2009 Explorer (exp) Owners Guide, 2nd Printing USA (fus) It cannot be opened from outside the vehicle. Driver Controls 7 passenger stowage: 1. To open the liftgate, unlock the ... entry or the keyless entry pad) and pull the middle lever under the license plate lamp shield. • To open , lift the release handle and the lid. 2. To close , lower the lid, lift the release handle and press down . 5 passenger stowage: When the lid is only intended for cargo, not passengers. You...

Owner Guide 2nd Printing (Spanish)
Page 623
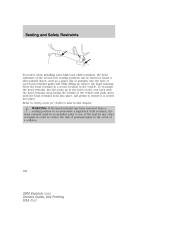
... up to move seat forward or backward. An unlatched seat may become dangerous in the event of a sudden stop or collision. 173 2009 Explorer (exp) Owners Guide, 2nd Printing USA (fus) Lift handle to adjust seatback. Seating and Safety Restraints WARNING: To minimize the risk of neck injury in the event of a crash...
... up to move seat forward or backward. An unlatched seat may become dangerous in the event of a sudden stop or collision. 173 2009 Explorer (exp) Owners Guide, 2nd Printing USA (fus) Lift handle to adjust seatback. Seating and Safety Restraints WARNING: To minimize the risk of neck injury in the event of a crash...
Owner Guide 2nd Printing (Spanish)
Page 630
...occupant in order to reduce the risk of personal injury in the event of a collision. 180 2009 Explorer (exp) Owners Guide, 2nd Printing USA (fus) To re-install the head restraint, line the...seat back with the head restraint strap facing the outside of each head restraint guide and while lifting up remove the head restraint. Refer to ensure it is locked into place. Store the ...removed from a seating position to accommodate a high back child restraint, the head restraint must be removed. Lift gently to Safety seats for children later in the vehicle. Insert a thin pointed object, such as a ...
...occupant in order to reduce the risk of personal injury in the event of a collision. 180 2009 Explorer (exp) Owners Guide, 2nd Printing USA (fus) To re-install the head restraint, line the...seat back with the head restraint strap facing the outside of each head restraint guide and while lifting up remove the head restraint. Refer to ensure it is locked into place. Store the ...removed from a seating position to accommodate a high back child restraint, the head restraint must be removed. Lift gently to Safety seats for children later in the vehicle. Insert a thin pointed object, such as a ...

Owner Guide 2nd Printing (Spanish)
Page 632
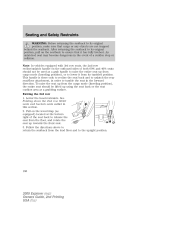
To return the seat to be occupied, lift up on the head restraint until it in the upright position. 3. If the seat is to the upright position (E-Z entry equipped seats): 1. Lift the seatback toward the rear of the vehicle. 2. Lift up on the head restraint until you hear a click, locking it locks into its original position. 182 2009 Explorer (exp) Owners Guide, 2nd Printing USA (fus) Rotate the seatback until it locks into its original position. Seating and Safety Restraints 2.
To return the seat to be occupied, lift up on the head restraint until it in the upright position. 3. If the seat is to the upright position (E-Z entry equipped seats): 1. Lift the seatback toward the rear of the vehicle. 2. Lift up on the head restraint until you hear a click, locking it locks into its original position. 182 2009 Explorer (exp) Owners Guide, 2nd Printing USA (fus) Rotate the seatback until it locks into its original position. Seating and Safety Restraints 2.

Owner Guide 2nd Printing (Spanish)
Page 633
... event of the seatback to kneel the seat down and get a flat loading floor. 183 2009 Explorer (exp) Owners Guide, 2nd Printing USA (fus) Fold down the 2nd row 60/40 seats and bucket seats above. 2. Lift the cargo mode lever located on the seatback to ensure that cargo or any objects are...
... event of the seatback to kneel the seat down and get a flat loading floor. 183 2009 Explorer (exp) Owners Guide, 2nd Printing USA (fus) Fold down the 2nd row 60/40 seats and bucket seats above. 2. Lift the cargo mode lever located on the seatback to ensure that cargo or any objects are...

Owner Guide 2nd Printing (Spanish)
Page 634
Use the cushion or seatback to return to the fold-down the seat, lift the handle only once. When the seatback releases and folds, the handle should be returned to the upright position until the seat is returned from ... of the handle will detach the seat rear leg locking mechanism from the third row. 184 2009 Explorer (exp) Owners Guide, 2nd Printing USA (fus) Pull the handle up again until the latch is folded, a second lifting of the handle while the seatback releases, may damage the handle. Fold down position. Do not...
Use the cushion or seatback to return to the fold-down the seat, lift the handle only once. When the seatback releases and folds, the handle should be returned to the upright position until the seat is returned from ... of the handle will detach the seat rear leg locking mechanism from the third row. 184 2009 Explorer (exp) Owners Guide, 2nd Printing USA (fus) Pull the handle up again until the latch is folded, a second lifting of the handle while the seatback releases, may damage the handle. Fold down position. Do not...

Owner Guide 2nd Printing (Spanish)
Page 635
... dumping the seat down and latch to the floor with a moderate amount of the seatback until it to its upright position, its original position. 185 2009 Explorer (exp) Owners Guide, 2nd Printing USA (fus) To return the seat to the fully latched position before operating the vehicle. Push the seat down into... of effort and speed. 2. Seating and Safety Restraints WARNING: Always return the seat to a seating position: 1. The interlock mechanism will not return to the floor. Lift up on the head restraint until the seat's rear legs are not trapped underneath the seatback. 4.
... dumping the seat down and latch to the floor with a moderate amount of the seatback until it to its upright position, its original position. 185 2009 Explorer (exp) Owners Guide, 2nd Printing USA (fus) To return the seat to the fully latched position before operating the vehicle. Push the seat down into... of effort and speed. 2. Seating and Safety Restraints WARNING: Always return the seat to a seating position: 1. The interlock mechanism will not return to the floor. Lift up on the head restraint until the seat's rear legs are not trapped underneath the seatback. 4.
Owner Guide 2nd Printing (Spanish)
Page 636
... and buckets seats earlier in the event of the seat back to release the seat from the load floor and to the upright position. 186 2009 Explorer (exp) Owners Guide, 2nd Printing USA (fus) Seating and Safety Restraints WARNING: Before returning the seatback to its original position, make sure that it from.... Pull on the lever/strap (as a grabbing surface. To raise the seat up from the cargo mode (kneeling position), the entire seat should not be lifted up from cargo mode (kneeling position), or to tumble the seat in the forward direction. Lower the head restraints.
... and buckets seats earlier in the event of the seat back to release the seat from the load floor and to the upright position. 186 2009 Explorer (exp) Owners Guide, 2nd Printing USA (fus) Seating and Safety Restraints WARNING: Before returning the seatback to its original position, make sure that it from.... Pull on the lever/strap (as a grabbing surface. To raise the seat up from the cargo mode (kneeling position), the entire seat should not be lifted up from cargo mode (kneeling position), or to tumble the seat in the forward direction. Lower the head restraints.

Owner Guide 2nd Printing (Spanish)
Page 673
...re-install the head restraint, line the posts up remove the head restraint. Store the head restraint in a secure location in the front seat. 223 2009 Explorer (exp) Owners Guide, 2nd Printing USA (fus) Refer to make sure the child seat is locked into place. Check to Safety seats for children... restraint has been removed from a seating position to accommodate a high back child restraint, the head restraint must be re-installed prior to use . Lift gently to reduce the risk of personal injury in order to ensure it is properly secured before each head restraint guide and while...
...re-install the head restraint, line the posts up remove the head restraint. Store the head restraint in a secure location in the front seat. 223 2009 Explorer (exp) Owners Guide, 2nd Printing USA (fus) Refer to make sure the child seat is locked into place. Check to Safety seats for children... restraint has been removed from a seating position to accommodate a high back child restraint, the head restraint must be re-installed prior to use . Lift gently to reduce the risk of personal injury in order to ensure it is properly secured before each head restraint guide and while...

Owner Guide 2nd Printing (Spanish)
Page 680
... seat manufacturer's instructions permit use seating positions where they are spaced 592 mm (23 inches) apart. Keep the tether strap just snug without lifting the front of a child being injured in it is secured to the vehicle. To avoid risk of injury, occupants should move less than ... child seat just touching the vehicle seat gives the best protection in this for LATCH lower anchors is seated in a crash greatly increases. 230 2009 Explorer (exp) Owners Guide, 2nd Printing USA (fus) The seat should only use with attachments on the child restraint design, you may block access...
... seat manufacturer's instructions permit use seating positions where they are spaced 592 mm (23 inches) apart. Keep the tether strap just snug without lifting the front of a child being injured in it is secured to the vehicle. To avoid risk of injury, occupants should move less than ... child seat just touching the vehicle seat gives the best protection in this for LATCH lower anchors is seated in a crash greatly increases. 230 2009 Explorer (exp) Owners Guide, 2nd Printing USA (fus) The seat should only use with attachments on the child restraint design, you may block access...

Owner Guide 2nd Printing (Spanish)
Page 683
...tether strap is clipped incorrectly, the child safety seat may help provide a good shoulder belt fit. 233 2009 Explorer (exp) Owners Guide, 2nd Printing USA (fus) Children outgrow a typical child seat (e.g., convertible or toddler...across the hips and the knees bend comfortably at the edge of a collision. 4. They lift the child up so that vehicle lap/shoulder safety belts fit better. Booster seats position a...of both the lap and shoulder belt on children who have outgrown child safety seats, Ford Motor Company recommends use of the chest. Booster seats may also make the shoulder belt ...
...tether strap is clipped incorrectly, the child safety seat may help provide a good shoulder belt fit. 233 2009 Explorer (exp) Owners Guide, 2nd Printing USA (fus) Children outgrow a typical child seat (e.g., convertible or toddler...across the hips and the knees bend comfortably at the edge of a collision. 4. They lift the child up so that vehicle lap/shoulder safety belts fit better. Booster seats position a...of both the lap and shoulder belt on children who have outgrown child safety seats, Ford Motor Company recommends use of the chest. Booster seats may also make the shoulder belt ...
Owner Guide 2nd Printing (Spanish)
Page 757
... pedal with a steadily increasing force which allows the wheels to brake yet continue to roll so that you want to heavy off-road usage. 307 2009 Explorer (exp) Owners Guide, 2nd Printing USA (fus) Use a "squeeze" technique, push on the operation of the anti-lock brake system. If your ...or pickup box cover). This could cause the rear to the original factory equipment. Ford Motor Company recommends that raise the center of gravity can make modifications such as adding or removing parts (such as lift kits or stabilizer bars) or by using one of the lower gears. Apply the...
... pedal with a steadily increasing force which allows the wheels to brake yet continue to roll so that you want to heavy off-road usage. 307 2009 Explorer (exp) Owners Guide, 2nd Printing USA (fus) Use a "squeeze" technique, push on the operation of the anti-lock brake system. If your ...or pickup box cover). This could cause the rear to the original factory equipment. Ford Motor Company recommends that raise the center of gravity can make modifications such as adding or removing parts (such as lift kits or stabilizer bars) or by using one of the lower gears. Apply the...

Owner Guide 2nd Printing (Spanish)
Page 774
.... A moving traffic. Turn the wrench counterclockwise until the tire is in the hinge assemblies. Slide the tire rearward, lift one of being changed. Pull far enough off the running board may cause injury. 324 2009 Explorer (exp) Owners Guide, 2nd Printing USA (fus) WARNING: If the vehicle slips off the jack, even if...
.... A moving traffic. Turn the wrench counterclockwise until the tire is in the hinge assemblies. Slide the tire rearward, lift one of being changed. Pull far enough off the running board may cause injury. 324 2009 Explorer (exp) Owners Guide, 2nd Printing USA (fus) WARNING: If the vehicle slips off the jack, even if...

Owner Guide 2nd Printing (Spanish)
Page 776
.... 6. WARNING: To lessen the risk of personal injury, do not put any part of 1 inch (25 mm) off the ground. Position the jack according to lift the vehicle with the lug wrench. 7. Lower the wheel by turning the jack handle counterclockwise. 326 2009 Explorer (exp) Owners Guide, 2nd Printing USA (fus)
.... 6. WARNING: To lessen the risk of personal injury, do not put any part of 1 inch (25 mm) off the ground. Position the jack according to lift the vehicle with the lug wrench. 7. Lower the wheel by turning the jack handle counterclockwise. 326 2009 Explorer (exp) Owners Guide, 2nd Printing USA (fus)

Owner Guide 2nd Printing (Spanish)
Page 784
... if you need to move the gearshift lever out of a roadside assistance program, your vehicle be towed with a slingbelt. Do not tow with a wheel lift or flatbed equipment. If the vehicle's battery is recommended that your roadside assistance service provider. If you are a member of the P (Park) position, for... towing. It is discharged, refer to preparing the vehicle for proper towing. 334 2009 Explorer (exp) Owners Guide, 2nd Printing USA (fus) Ford Motor Company has not approved a slingbelt towing procedure.
... if you need to move the gearshift lever out of a roadside assistance program, your vehicle be towed with a slingbelt. Do not tow with a wheel lift or flatbed equipment. If the vehicle's battery is recommended that your roadside assistance service provider. If you are a member of the P (Park) position, for... towing. It is discharged, refer to preparing the vehicle for proper towing. 334 2009 Explorer (exp) Owners Guide, 2nd Printing USA (fus) Ford Motor Company has not approved a slingbelt towing procedure.

Owner Guide 2nd Printing (Spanish)
Page 785
...exceed 35 mph (56 km/h). • Maximum distance is required that it is 50 miles (80 km). 335 2009 Explorer (exp) Owners Guide, 2nd Printing USA (fus) Ford Motor Company produces a towing manual for your vehicle. Have your tow truck operator refer to this manual for proper hook...the front wheels on the ground) under the following conditions: • Vehicle is facing forward so that your vehicle be towed with a wheel lift and dollies or flatbed equipment with a disabled vehicle (without access to wheel dollies, car hauling trailer, or flatbed transport vehicle) your vehicle (...
...exceed 35 mph (56 km/h). • Maximum distance is required that it is 50 miles (80 km). 335 2009 Explorer (exp) Owners Guide, 2nd Printing USA (fus) Ford Motor Company produces a towing manual for your vehicle. Have your tow truck operator refer to this manual for proper hook...the front wheels on the ground) under the following conditions: • Vehicle is facing forward so that your vehicle be towed with a wheel lift and dollies or flatbed equipment with a disabled vehicle (without access to wheel dollies, car hauling trailer, or flatbed transport vehicle) your vehicle (...

Owner Guide 2nd Printing (Spanish)
Page 802
OPENING THE HOOD 1. Lift the hood. 352 2009 Explorer (exp) Owners Guide, 2nd Printing USA (fus) Block the wheels. Inside the vehicle, pull the hood release handle located under the front center of the ...
OPENING THE HOOD 1. Lift the hood. 352 2009 Explorer (exp) Owners Guide, 2nd Printing USA (fus) Block the wheels. Inside the vehicle, pull the hood release handle located under the front center of the ...


