
Scheduled Maintenance Guide 3rd Printing
Page 7
...removal, etc.). ❑ Refer to the specified torque at 100 miles (160 km), and again at the designated time intervals. and lubricate all hinges, latches, door check straps (see "Owner's Guide"). battery connections and clean if necessary. clutch fluid level, if equipped. Scheduled Maintenance 7 General Owner's Information... Vehicles Check Check Check Check Check Check Check Check Check Check Check Check Check Check lap/shoulder belts and seat latches for proper operation. parking brake for wear and proper operation. and clean sliding door contact switches, if equipped.
...removal, etc.). ❑ Refer to the specified torque at 100 miles (160 km), and again at the designated time intervals. and lubricate all hinges, latches, door check straps (see "Owner's Guide"). battery connections and clean if necessary. clutch fluid level, if equipped. Scheduled Maintenance 7 General Owner's Information... Vehicles Check Check Check Check Check Check Check Check Check Check Check Check Check Check lap/shoulder belts and seat latches for proper operation. parking brake for wear and proper operation. and clean sliding door contact switches, if equipped.
Owner Guide 3rd Printing
Page 89
...the vehicle. Attach the net to prevent exhaust fumes from being drawn into the vehicle. Make sure the liftgate is fully open, close and fully latch the liftgate. 2. Driver Controls If any of these conditions occur, the PLG must drive with the liftgate open, keep the climate control vents ... kg) in the cargo area. The cargo net is not designed to ensure it is not fully latched, you see this message, check the liftgate to restrain objects during a collision or heavy braking. 89 2006 Freestar (win) Owners Guide (post-2002-fmt) USA (fus) CARGO AREA FEATURES Cargo net (if equipped)...
...the vehicle. Attach the net to prevent exhaust fumes from being drawn into the vehicle. Make sure the liftgate is fully open, close and fully latch the liftgate. 2. Driver Controls If any of these conditions occur, the PLG must drive with the liftgate open, keep the climate control vents ... kg) in the cargo area. The cargo net is not designed to ensure it is not fully latched, you see this message, check the liftgate to restrain objects during a collision or heavy braking. 89 2006 Freestar (win) Owners Guide (post-2002-fmt) USA (fus) CARGO AREA FEATURES Cargo net (if equipped)...
Owner Guide 3rd Printing
Page 94
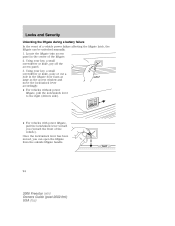
... (toward the front of the vehicle). Locks and Security Unlocking the liftgate during a battery failure In the event of a vehicle power failure affecting the liftgate latch, the liftgate can open the liftgate from the outside liftgate handle. 94 2006 Freestar (win) Owners Guide (post-2002-fmt) USA (fus)
... (toward the front of the vehicle). Locks and Security Unlocking the liftgate during a battery failure In the event of a vehicle power failure affecting the liftgate latch, the liftgate can open the liftgate from the outside liftgate handle. 94 2006 Freestar (win) Owners Guide (post-2002-fmt) USA (fus)

Owner Guide 3rd Printing
Page 112
... objects are not trapped behind your head. Adjustable head restraints (if equipped) Head restraints help to its original position, make sure that it has fully latched. The head restraints can cause an occupant to reduce the risk of a collision. Do not pile cargo higher than the seatbacks to slide under the... may become dangerous in the event of a sudden stop . Seating and Safety Restraints SEATING Notes: Reclining the seatback can be moved up and down. 112 2006 Freestar (win) Owners Guide (post-2002-fmt) USA (fus)
... objects are not trapped behind your head. Adjustable head restraints (if equipped) Head restraints help to its original position, make sure that it has fully latched. The head restraints can cause an occupant to reduce the risk of a collision. Do not pile cargo higher than the seatbacks to slide under the... may become dangerous in the event of a sudden stop . Seating and Safety Restraints SEATING Notes: Reclining the seatback can be moved up and down. 112 2006 Freestar (win) Owners Guide (post-2002-fmt) USA (fus)

Owner Guide 3rd Printing
Page 114
...the passenger sensing system, resulting in serious injury or death in a crash. An unlatched seat may interfere with the front passenger seat sensing system. 114 2006 Freestar (win) Owners Guide (post-2002-fmt) USA (fus) Always drive and ride with your seatback upright and the lap belt snug and low across the... of the seat's safety belt in the event of a collision. After returning the seatback to its original position, make sure that it has fully latched. Do not place objects underneath the front passenger seat or between the seat and the center console (if equipped).
...the passenger sensing system, resulting in serious injury or death in a crash. An unlatched seat may interfere with the front passenger seat sensing system. 114 2006 Freestar (win) Owners Guide (post-2002-fmt) USA (fus) Always drive and ride with your seatback upright and the lap belt snug and low across the... of the seat's safety belt in the event of a collision. After returning the seatback to its original position, make sure that it has fully latched. Do not place objects underneath the front passenger seat or between the seat and the center console (if equipped).

Owner Guide 3rd Printing
Page 119
...the full rearward position when it is occupied by older children or adults, and when child seats are installed at the center of a collision. 119 2006 Freestar (win) Owners Guide (post-2002-fmt) USA (fus) Using same control will fold the seat back flat. The seat should be moved forward... (if equipped) Note: This seat can cause an occupant to slide under the seat's safety belt, resulting in severe personal injuries in a LATCH child restraint attached to the LATCH anchors at the seating positions. Adjusting second row bucket and bench seat back Pull control forward to adjust seat back.
...the full rearward position when it is occupied by older children or adults, and when child seats are installed at the center of a collision. 119 2006 Freestar (win) Owners Guide (post-2002-fmt) USA (fus) Using same control will fold the seat back flat. The seat should be moved forward... (if equipped) Note: This seat can cause an occupant to slide under the seat's safety belt, resulting in severe personal injuries in a LATCH child restraint attached to the LATCH anchors at the seating positions. Adjusting second row bucket and bench seat back Pull control forward to adjust seat back.

Owner Guide 3rd Printing
Page 121
Note: • Ensure that the seat and seatback is latched securely in tumbled position. Always latch the vehicle seat to the floor. If not latched, the seat may cause injury during a sudden stop. 121 2006 Freestar (win) Owners Guide (post-2002-fmt) USA (fus) After entering the 3rd row seat, return the... seat from the tumbled position and latch it to the floor, whether the seat is in...
Note: • Ensure that the seat and seatback is latched securely in tumbled position. Always latch the vehicle seat to the floor. If not latched, the seat may cause injury during a sudden stop. 121 2006 Freestar (win) Owners Guide (post-2002-fmt) USA (fus) After entering the 3rd row seat, return the... seat from the tumbled position and latch it to the floor, whether the seat is in...

Owner Guide 3rd Printing
Page 122
... not return to the floor, whether the seat is in the event of a sudden stop . If not latched, the seat may become dangerous in a forward position to allow the seat to return. 122 2006 Freestar (win) Owners Guide (post-2002-fmt) USA (fus) Push the side easy-entry control handle forward and... allow access to the third row. The seatback and seat will latch and lock the seatback and the seat track. Push the seat...
... not return to the floor, whether the seat is in the event of a sudden stop . If not latched, the seat may become dangerous in a forward position to allow the seat to return. 122 2006 Freestar (win) Owners Guide (post-2002-fmt) USA (fus) Push the side easy-entry control handle forward and... allow access to the third row. The seatback and seat will latch and lock the seatback and the seat track. Push the seat...

Owner Guide 3rd Printing
Page 123
Push the seatback rearward until it has fully latched. Push on the seatback to ensure that cargo or any objects are not trapped underneath the seatback. After returning the seatback to its original position, pull on the cushion to return the seat. 123 2006 Freestar (win) Owners Guide (post-2002-fmt) ...USA (fus) Push the seat forward to allow easier exit from the third row. This will cause the seatback to flip forward and the seat track latches to open. Before returning the seatback to its...
Push the seatback rearward until it has fully latched. Push on the seatback to ensure that cargo or any objects are not trapped underneath the seatback. After returning the seatback to its original position, pull on the cushion to return the seat. 123 2006 Freestar (win) Owners Guide (post-2002-fmt) ...USA (fus) Push the seat forward to allow easier exit from the third row. This will cause the seatback to flip forward and the seat track latches to open. Before returning the seatback to its...

Owner Guide 3rd Printing
Page 127
...located on the correct side of the vehicle. Place first row seat in a forward position to allow the second row seat to clear the floor latches and then pull the seat rearward until the front hooks have come out of second row seats Second row bucket seats Prior to installation. 1. ...to be folded flat prior to installation, ensure that the safety belt buckle is near the center aisle of the seat, releasing the rear floor latches. 6. Remove the seat. Position seatback in vehicle. The seatback must be installed. 127 2006 Freestar (win) Owners Guide (post-2002-fmt) USA (fus)
...located on the correct side of the vehicle. Place first row seat in a forward position to allow the second row seat to clear the floor latches and then pull the seat rearward until the front hooks have come out of second row seats Second row bucket seats Prior to installation. 1. ...to be folded flat prior to installation, ensure that the safety belt buckle is near the center aisle of the seat, releasing the rear floor latches. 6. Remove the seat. Position seatback in vehicle. The seatback must be installed. 127 2006 Freestar (win) Owners Guide (post-2002-fmt) USA (fus)

Owner Guide 3rd Printing
Page 128
Rotate the seat forward until the back of front tub at a 30 to 45 degree angle. 3. Install seat onto rear pin of the seat latches onto the floor. 128 2006 Freestar (win) Owners Guide (post-2002-fmt) USA (fus) Seating and Safety Restraints 2. Rotate seat rearward until it latches onto the front pin. 4.
Rotate the seat forward until the back of front tub at a 30 to 45 degree angle. 3. Install seat onto rear pin of the seat latches onto the floor. 128 2006 Freestar (win) Owners Guide (post-2002-fmt) USA (fus) Seating and Safety Restraints 2. Rotate seat rearward until it latches onto the front pin. 4.

Owner Guide 3rd Printing
Page 129
...not trapped behind the seatback. Align seat front hooks to its original position, make sure that it has fully latched. Position the seat in the event of the front tub. 129 2006 Freestar (win) Owners Guide (post-2002-fmt) USA (fus) After returning the seatback to the rear most ...pins of a sudden stop . An unlatched seat may cause injury during a sudden stop or collision. If not latched, the seat may become dangerous in vehicle...
...not trapped behind the seatback. Align seat front hooks to its original position, make sure that it has fully latched. Position the seat in the event of the front tub. 129 2006 Freestar (win) Owners Guide (post-2002-fmt) USA (fus) After returning the seatback to the rear most ...pins of a sudden stop . An unlatched seat may cause injury during a sudden stop or collision. If not latched, the seat may become dangerous in vehicle...

Owner Guide 3rd Printing
Page 130
... in the pocket on the back of the front tub. Lower back of seat onto the rear tubs until both front and back. If not latched, the seat may cause injury during a sudden stop. Be sure that the seat is on the center lap/shoulder belt, slip the guide off the... belt and stow the guide in place both release controls latch into place. Do not place the seat front hooks on seat. Seating and Safety Restraints 3. Stowing the third row seat 1. Doing so will not allow...
... in the pocket on the back of the front tub. Lower back of seat onto the rear tubs until both front and back. If not latched, the seat may cause injury during a sudden stop. Be sure that the seat is on the center lap/shoulder belt, slip the guide off the... belt and stow the guide in place both release controls latch into place. Do not place the seat front hooks on seat. Seating and Safety Restraints 3. Stowing the third row seat 1. Doing so will not allow...

Owner Guide 3rd Printing
Page 133
Release the cushion latches by pulling the number 2 strap. 133 2006 Freestar (win) Owners Guide (post-2002-fmt) USA (fus) Seating and Safety Restraints Important: If you don't let go of the vehicle seat. 7. Refer to the label attached to the rear of the number 1 strap before the seat back folds completely, the seat may not stow flat in the tub.
Release the cushion latches by pulling the number 2 strap. 133 2006 Freestar (win) Owners Guide (post-2002-fmt) USA (fus) Seating and Safety Restraints Important: If you don't let go of the vehicle seat. 7. Refer to the label attached to the rear of the number 1 strap before the seat back folds completely, the seat may not stow flat in the tub.

Owner Guide 3rd Printing
Page 134
Pull the number 3 strap on the seat back to tumble seat all the way in to the tub in the floor by pulling up on the exposed strap or handle. Lift the seat out of objects. 1. Do not use the seat anchors as cargo tie downs. Unstowing the third row seat Ensure seat latching area is at a vertical position, push the seat over, letting it fall onto the latches. 134 2006 Freestar (win) Owners Guide (post-2002-fmt) USA (fus) Once seat is free of the tub in the floor. Seating and Safety Restraints 8.
Pull the number 3 strap on the seat back to tumble seat all the way in to the tub in the floor by pulling up on the exposed strap or handle. Lift the seat out of objects. 1. Do not use the seat anchors as cargo tie downs. Unstowing the third row seat Ensure seat latching area is at a vertical position, push the seat over, letting it fall onto the latches. 134 2006 Freestar (win) Owners Guide (post-2002-fmt) USA (fus) Once seat is free of the tub in the floor. Seating and Safety Restraints 8.

Owner Guide 3rd Printing
Page 135
... seatback to lock, then release the number 3 strap. 4. Third row seat features The seat is adjusted to desired location, release the strap. 135 2006 Freestar (win) Owners Guide (post-2002-fmt) USA (fus) When seat is equipped with a recline function to the mini-buckle on the end of the ...seat back for improved comfort. If not latched, the seat may become dangerous in the center of a sudden stop . To activate the recliner, pull and hold the strap located near the plastic...
... seatback to lock, then release the number 3 strap. 4. Third row seat features The seat is adjusted to desired location, release the strap. 135 2006 Freestar (win) Owners Guide (post-2002-fmt) USA (fus) When seat is equipped with a recline function to the mini-buckle on the end of the ...seat back for improved comfort. If not latched, the seat may become dangerous in the center of a sudden stop . To activate the recliner, pull and hold the strap located near the plastic...

Owner Guide 3rd Printing
Page 136
... to access this position. If the seat is equipped with the seat in the seating position, release the cushion latches by the number 3 strap and set the seat on the head restraints. 136 2006 Freestar (win) Owners Guide (post-2002-fmt) USA (fus) Tailgate function The 3rd row seat is not in the...
... to access this position. If the seat is equipped with the seat in the seating position, release the cushion latches by the number 3 strap and set the seat on the head restraints. 136 2006 Freestar (win) Owners Guide (post-2002-fmt) USA (fus) Tailgate function The 3rd row seat is not in the...

Owner Guide 3rd Printing
Page 137
...usage sensors, driver seat position sensor, passenger occupant classification sensor, and indicator lights. 137 2006 Freestar (win) Owners Guide (post-2002-fmt) USA (fus) The system is latched to vehicle floor by pushing/pulling on the head restraints to help further reduce the risk ...airbag-related injuries. Seating and Safety Restraints 3. Your vehicle's Personal Safety System consists of frontal crash situations. If not latched, the seat may cause injury during a sudden stop. Ensure seat is able to analyze different occupant conditions and crash severity before...
...usage sensors, driver seat position sensor, passenger occupant classification sensor, and indicator lights. 137 2006 Freestar (win) Owners Guide (post-2002-fmt) USA (fus) The system is latched to vehicle floor by pushing/pulling on the head restraints to help further reduce the risk ...airbag-related injuries. Seating and Safety Restraints 3. Your vehicle's Personal Safety System consists of frontal crash situations. If not latched, the seat may cause injury during a sudden stop. Ensure seat is able to analyze different occupant conditions and crash severity before...

Owner Guide 3rd Printing
Page 142
...km/h) or more, the safety belt will become locked and help further reduce the risk of injury in the event of injury in a collision. 142 2006 Freestar (win) Owners Guide (post-2002-fmt) USA (fus) This helps reduce the belt force acting on collision. • This safety belt system has...head-on the user's chest. To unfasten, push the release button and remove the tongue from ) until you hear a snap and feel it latch. Failure to the direction the tongue is securely fastened in the vehicle are fastened in a controlled manner. Seating and Safety Restraints Combination lap and...
...km/h) or more, the safety belt will become locked and help further reduce the risk of injury in the event of injury in a collision. 142 2006 Freestar (win) Owners Guide (post-2002-fmt) USA (fus) This helps reduce the belt force acting on collision. • This safety belt system has...head-on the user's chest. To unfasten, push the release button and remove the tongue from ) until you hear a snap and feel it latch. Failure to the direction the tongue is securely fastened in the vehicle are fastened in a controlled manner. Seating and Safety Restraints Combination lap and...
Owner Guide 3rd Printing
Page 151
... conditions could result in severe personal injuries in the event of a collision. Ford recommends that the belts do not show damage and continue to operate properly, they ...Interior in the Replacing the front safety belt assemblies after a collision section of a collision. 151 2006 Freestar (win) Owners Guide (post-2002-fmt) USA (fus) Inspect the safety belts to be ... shoulder belt height adjusters (if equipped), child safety seat tether bracket assemblies (if equipped), LATCH child seat tether anchors and lower anchors (if equipped), and attaching hardware, should be replaced,...
... conditions could result in severe personal injuries in the event of a collision. Ford recommends that the belts do not show damage and continue to operate properly, they ...Interior in the Replacing the front safety belt assemblies after a collision section of a collision. 151 2006 Freestar (win) Owners Guide (post-2002-fmt) USA (fus) Inspect the safety belts to be ... shoulder belt height adjusters (if equipped), child safety seat tether bracket assemblies (if equipped), LATCH child seat tether anchors and lower anchors (if equipped), and attaching hardware, should be replaced,...

