
Owner's Manual
Page 104
... the wall or screen you will need to be adjusted so the edge is not at the same height as the horizontal reference line. 104 2005 Expedition (exd) Owners Guide (post-2002-fmt) USA (fus) Turn on a level surface, approximately 25 feet (7.6 meters) away. • (1) 8 feet (2.4 meters) • (2) Center ...prevent the interior lights from the center of a wall or screen on the low beam headlamps to illuminate the wall or screen and open the hood. Cover one of the instrument panel and all applicable switches in front of your headlamp (indicated by a 3.0 mm circle on the lens) to...
... the wall or screen you will need to be adjusted so the edge is not at the same height as the horizontal reference line. 104 2005 Expedition (exd) Owners Guide (post-2002-fmt) USA (fus) Turn on a level surface, approximately 25 feet (7.6 meters) away. • (1) 8 feet (2.4 meters) • (2) Center ...prevent the interior lights from the center of a wall or screen on the low beam headlamps to illuminate the wall or screen and open the hood. Cover one of the instrument panel and all applicable switches in front of your headlamp (indicated by a 3.0 mm circle on the lens) to...
Owner's Manual
Page 105
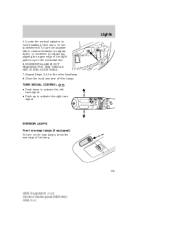
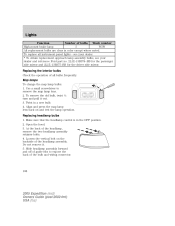
HORIZONTAL AIM IS NOT REQUIRED FOR THIS VEHICLE AND IS NON-ADJUSTABLE. 7. Close the hood and turn signal. OFF INT2 INT1 OFF INTERIOR LAMPS Front row map lamps (if equipped) To turn on each headlamp, then use a 10 mm socket/... the right turn off the lamps. TURN SIGNAL CONTROL • Push down ) or clockwise (to adjust up) aligning the upper edge of the lamp. 105 2005 Expedition (exd) Owners Guide (post-2002-fmt) USA (fus) Repeat Steps 3-5 for the other headlamp. 8. Lights 5. Locate the vertical adjuster on the map lamps, press the...
HORIZONTAL AIM IS NOT REQUIRED FOR THIS VEHICLE AND IS NON-ADJUSTABLE. 7. Close the hood and turn signal. OFF INT2 INT1 OFF INTERIOR LAMPS Front row map lamps (if equipped) To turn on each headlamp, then use a 10 mm socket/... the right turn off the lamps. TURN SIGNAL CONTROL • Push down ) or clockwise (to adjust up) aligning the upper edge of the lamp. 105 2005 Expedition (exd) Owners Guide (post-2002-fmt) USA (fus) Repeat Steps 3-5 for the other headlamp. 8. Lights 5. Locate the vertical adjuster on the map lamps, press the...
Owner's Manual
Page 108
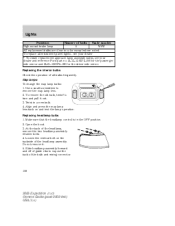
...is in a new bulb. 4. Do not remove it out. 3. Twist in the OFF position. 2. Open the hood. 3. Map lamps To change the map lamp bulbs: 1. Align and press the map lamp lens back on the backside... noted. see your dealer * To obtain replacement approach lamp assembly bulbs, see your dealer and reference Ford part no. 2L1Z-13B374-BB for the passenger side mirror and 2L1Z-13B375-BB for the driver side...Slide headlamp assembly forward and off of the bulb and wiring connector. 108 2005 Expedition (exd) Owners Guide (post-2002-fmt) USA (fus) Loosen the vertical bolt on and test the lamp ...
...is in a new bulb. 4. Do not remove it out. 3. Twist in the OFF position. 2. Open the hood. 3. Map lamps To change the map lamp bulbs: 1. Align and press the map lamp lens back on the backside... noted. see your dealer * To obtain replacement approach lamp assembly bulbs, see your dealer and reference Ford part no. 2L1Z-13B374-BB for the passenger side mirror and 2L1Z-13B375-BB for the driver side...Slide headlamp assembly forward and off of the bulb and wiring connector. 108 2005 Expedition (exd) Owners Guide (post-2002-fmt) USA (fus) Loosen the vertical bolt on and test the lamp ...

Owner's Manual
Page 109
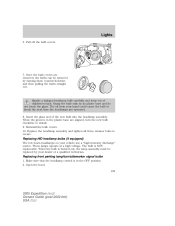
... the new bulb into the headlamp assembly. Replacing HID headlamp bulbs (if equipped) The low beam headlamps on your dealer or a qualified technician. Open the hood. 109 2005 Expedition (exd) Owners Guide (post-2002-fmt) USA (fus) Pull off the bulb covers. 7. Replacing front parking lamp/turn the new bulb clockwise to secure...
... the new bulb into the headlamp assembly. Replacing HID headlamp bulbs (if equipped) The low beam headlamps on your dealer or a qualified technician. Open the hood. 109 2005 Expedition (exd) Owners Guide (post-2002-fmt) USA (fus) Pull off the bulb covers. 7. Replacing front parking lamp/turn the new bulb clockwise to secure...

Owner's Manual
Page 300
Roadside Emergencies may have firm and/or soft shifts. Park the booster vehicle close to the hood of the discharged battery. Turn the heater fan on both vehicles to the positive (+) terminal of the disabled vehicle making sure ... cables. Do not disconnect the battery of the transmission. Connecting the jumper cables 1. Use only a 12-volt supply to designate the assisting (boosting) battery. 300 2005 Expedition (exd) Owners Guide (post-2002-fmt) USA (fus) - - + + Note: In the illustrations, lightning bolts are tight and level. 5. Check all other moving ...
Roadside Emergencies may have firm and/or soft shifts. Park the booster vehicle close to the hood of the discharged battery. Turn the heater fan on both vehicles to the positive (+) terminal of the disabled vehicle making sure ... cables. Do not disconnect the battery of the transmission. Connecting the jumper cables 1. Use only a 12-volt supply to designate the assisting (boosting) battery. 300 2005 Expedition (exd) Owners Guide (post-2002-fmt) USA (fus) - - + + Note: In the illustrations, lightning bolts are tight and level. 5. Check all other moving ...

Owner's Manual
Page 324
Lift the hood until the lift cylinders hold it open. 324 2005 Expedition (exd) Owners Guide (post-2002-fmt) USA (fus) Inside the vehicle, pull the hood release handle located under the front center of the instrument panel. 2. Maintenance and Specifications OPENING THE HOOD 1. Go to the front of the vehicle and release the auxiliary latch that is located under the bottom of the hood. 3.
Lift the hood until the lift cylinders hold it open. 324 2005 Expedition (exd) Owners Guide (post-2002-fmt) USA (fus) Inside the vehicle, pull the hood release handle located under the front center of the instrument panel. 2. Maintenance and Specifications OPENING THE HOOD 1. Go to the front of the vehicle and release the auxiliary latch that is located under the bottom of the hood. 3.

Owner's Manual
Page 327
Locate and carefully remove the engine oil level indicator (dipstick). 6. Wipe the indicator clean. Protect yourself from engine heat. 5. DO NOT ADD OIL. • If the oil level is below this mark, engine oil must be added to raise the level within this range, the oil level is within the normal operating range. 327 2005 Expedition (exd) Owners Guide (post-2002-fmt) USA (fus) Open the hood. Insert the indicator fully, then remove it again. • If the oil level is acceptable. Maintenance and Specifications 4.
Locate and carefully remove the engine oil level indicator (dipstick). 6. Wipe the indicator clean. Protect yourself from engine heat. 5. DO NOT ADD OIL. • If the oil level is below this mark, engine oil must be added to raise the level within this range, the oil level is within the normal operating range. 327 2005 Expedition (exd) Owners Guide (post-2002-fmt) USA (fus) Open the hood. Insert the indicator fully, then remove it again. • If the oil level is acceptable. Maintenance and Specifications 4.
Owner's Manual
Page 365
... vehicle should not locate the Amateur Radio Antennas in the area of the driver's side hood. • Electrical or electronic accessories or components that are added to the vehicle by the dealer or the owner may adversely affect battery performance and durability. 365 2005 Expedition (exd) Owners Guide (post-2002-fmt) USA (fus)
... vehicle should not locate the Amateur Radio Antennas in the area of the driver's side hood. • Electrical or electronic accessories or components that are added to the vehicle by the dealer or the owner may adversely affect battery performance and durability. 365 2005 Expedition (exd) Owners Guide (post-2002-fmt) USA (fus)
Owner's Manual
Page 368
... ...103 high beam ...103 replacing bulbs ...108 turning on and off ...102 Heating heating and air conditioning system ...92, 96 Homelink wireless control system ...129 Hood ...324 I Ignition ...256, 359 Infant seats (see Safety seats) ...202 2005 Expedition (exd) Owners Guide (post-2002-fmt) USA (fus)
... ...103 high beam ...103 replacing bulbs ...108 turning on and off ...102 Heating heating and air conditioning system ...92, 96 Homelink wireless control system ...129 Hood ...324 I Ignition ...256, 359 Infant seats (see Safety seats) ...202 2005 Expedition (exd) Owners Guide (post-2002-fmt) USA (fus)

Owner Guide 3rd Printing (Spanish)
Page 514
..., approximately 25 feet (7.6 meters) away. • (1) 8 feet (2.4 meters) • (2) Center height of lamp to illuminate the wall or screen and open the hood. Cover one of the headlamps so no light hits the wall. 4. Move the control to the full down position, past detent, to the ground and... prevent the interior lights from illuminating when the doors are opened. If this edge is at the same height as the horizontal reference line. 104 2005 Expedition (exd) Owners Guide (post-2002-fmt) USA (fus) Measure the height from the center of your headlamp (indicated by a 3.0 mm circle on...
..., approximately 25 feet (7.6 meters) away. • (1) 8 feet (2.4 meters) • (2) Center height of lamp to illuminate the wall or screen and open the hood. Cover one of the headlamps so no light hits the wall. 4. Move the control to the full down position, past detent, to the ground and... prevent the interior lights from illuminating when the doors are opened. If this edge is at the same height as the horizontal reference line. 104 2005 Expedition (exd) Owners Guide (post-2002-fmt) USA (fus) Measure the height from the center of your headlamp (indicated by a 3.0 mm circle on...

Owner Guide 3rd Printing (Spanish)
Page 515
Close the hood and turn on each headlamp, then use a 10 mm socket/wrench to turn the adjuster either counterclockwise (to adjust down to activate the left turn ... adjuster on the map lamps, press the rear edge of the light pattern up to adjust up) aligning the upper edge of the lamp. 105 2005 Expedition (exd) Owners Guide (post-2002-fmt) USA (fus) Lights 5.
Close the hood and turn on each headlamp, then use a 10 mm socket/wrench to turn the adjuster either counterclockwise (to adjust down to activate the left turn ... adjuster on the map lamps, press the rear edge of the light pattern up to adjust up) aligning the upper edge of the lamp. 105 2005 Expedition (exd) Owners Guide (post-2002-fmt) USA (fus) Lights 5.
Owner Guide 3rd Printing (Spanish)
Page 518
... the interior bulbs Check the operation of the bulb and wiring connector. 108 2005 Expedition (exd) Owners Guide (post-2002-fmt) USA (fus) Use a small...in color except where noted. To remove the old bulb, twist 1⁄4 turn and pull it . 5. Open the hood. 3. Make sure that the headlamp control is in a new bulb. 4. Lights Function Number of the headlamp, remove ... bulbs frequently. see your dealer * To obtain replacement approach lamp assembly bulbs, see your dealer and reference Ford part no. 2L1Z-13B374-BB for the passenger side mirror and 2L1Z-13B375-BB for the driver side mirror...
... the interior bulbs Check the operation of the bulb and wiring connector. 108 2005 Expedition (exd) Owners Guide (post-2002-fmt) USA (fus) Use a small...in color except where noted. To remove the old bulb, twist 1⁄4 turn and pull it . 5. Open the hood. 3. Make sure that the headlamp control is in a new bulb. 4. Lights Function Number of the headlamp, remove ... bulbs frequently. see your dealer * To obtain replacement approach lamp assembly bulbs, see your dealer and reference Ford part no. 2L1Z-13B374-BB for the passenger side mirror and 2L1Z-13B375-BB for the driver side mirror...
Owner Guide 3rd Printing (Spanish)
Page 519
... break the next time the headlamps are removed, the bulbs can be replaced by its plastic base and do not touch the glass. Open the hood. 109 2005 Expedition (exd) Owners Guide (post-2002-fmt) USA (fus) When the grooves in the OFF position. 2. The oil from your vehicle use a "high intensity discharge...
... break the next time the headlamps are removed, the bulbs can be replaced by its plastic base and do not touch the glass. Open the hood. 109 2005 Expedition (exd) Owners Guide (post-2002-fmt) USA (fus) When the grooves in the OFF position. 2. The oil from your vehicle use a "high intensity discharge...

Owner Guide 3rd Printing (Spanish)
Page 710
...or durability of the engine cooling fan and other accessories off. Park the booster vehicle close to designate the assisting (boosting) battery. 300 2005 Expedition (exd) Owners Guide (post-2002-fmt) USA (fus) - - + + Check all other moving parts. 4. Ensure that vent caps are used to the... hood of the disabled vehicle as this could damage the vehicle's electrical system. 3. Connecting the jumper cables 1. Note: In the illustrations, lightning bolts are ...
...or durability of the engine cooling fan and other accessories off. Park the booster vehicle close to designate the assisting (boosting) battery. 300 2005 Expedition (exd) Owners Guide (post-2002-fmt) USA (fus) - - + + Check all other moving parts. 4. Ensure that vent caps are used to the... hood of the disabled vehicle as this could damage the vehicle's electrical system. 3. Connecting the jumper cables 1. Note: In the illustrations, lightning bolts are ...

Owner Guide 3rd Printing (Spanish)
Page 734
Maintenance and Specifications OPENING THE HOOD 1. Inside the vehicle, pull the hood release handle located under the front center of the instrument panel. 2. Go to the front of the vehicle and release the auxiliary latch that is located under the bottom of the hood. 3. Lift the hood until the lift cylinders hold it open. 324 2005 Expedition (exd) Owners Guide (post-2002-fmt) USA (fus)
Maintenance and Specifications OPENING THE HOOD 1. Inside the vehicle, pull the hood release handle located under the front center of the instrument panel. 2. Go to the front of the vehicle and release the auxiliary latch that is located under the bottom of the hood. 3. Lift the hood until the lift cylinders hold it open. 324 2005 Expedition (exd) Owners Guide (post-2002-fmt) USA (fus)

Owner Guide 3rd Printing (Spanish)
Page 737
Wipe the indicator clean. Locate and carefully remove the engine oil level indicator (dipstick). 6. Open the hood. DO NOT ADD OIL. • If the oil level is below this mark, engine oil must be added to raise the level within this range, the oil level is within the normal operating range. 327 2005 Expedition (exd) Owners Guide (post-2002-fmt) USA (fus) Protect yourself from engine heat. 5. Insert the indicator fully, then remove it again. • If the oil level is acceptable. Maintenance and Specifications 4.
Wipe the indicator clean. Locate and carefully remove the engine oil level indicator (dipstick). 6. Open the hood. DO NOT ADD OIL. • If the oil level is below this mark, engine oil must be added to raise the level within this range, the oil level is within the normal operating range. 327 2005 Expedition (exd) Owners Guide (post-2002-fmt) USA (fus) Protect yourself from engine heat. 5. Insert the indicator fully, then remove it again. • If the oil level is acceptable. Maintenance and Specifications 4.

Owner Guide 3rd Printing (Spanish)
Page 775
... vehicle should not locate the Amateur Radio Antennas in the area of the driver's side hood. • Electrical or electronic accessories or components that are added to the vehicle by the dealer or the owner may adversely affect battery performance and durability. 365 2005 Expedition (exd) Owners Guide (post-2002-fmt) USA (fus)
... vehicle should not locate the Amateur Radio Antennas in the area of the driver's side hood. • Electrical or electronic accessories or components that are added to the vehicle by the dealer or the owner may adversely affect battery performance and durability. 365 2005 Expedition (exd) Owners Guide (post-2002-fmt) USA (fus)

Owner Guide 3rd Printing (Spanish)
Page 778
... ...103 high beam ...103 replacing bulbs ...108 turning on and off ...102 Heating heating and air conditioning system ...92, 96 Homelink wireless control system ...129 Hood ...324 I Ignition ...256, 359 Infant seats (see Safety seats) ...202 2005 Expedition (exd) Owners Guide (post-2002-fmt) USA (fus)
... ...103 high beam ...103 replacing bulbs ...108 turning on and off ...102 Heating heating and air conditioning system ...92, 96 Homelink wireless control system ...129 Hood ...324 I Ignition ...256, 359 Infant seats (see Safety seats) ...202 2005 Expedition (exd) Owners Guide (post-2002-fmt) USA (fus)

Quick Reference Guide 1st Printing
Page 9
...To turn off , press the OFF button, or depress the brake pedal to adjust the accelerator and brake pedal toward you . Lift the hood until the lift cylinders hold the rocker control to disengage. 14 Power Adjustable Foot Pedals 11 Gearshift/Overdrive Control Overdrive is in operation, the ...be required. The rear defrost indicator will return to 4L. Rear Window Defroster Press to play. When in the P (Park) position. 15 Hood Release Pull the hood release handle toward you or away from A4WD to 4H, move the control to a previously set a speed, press SET +. To shift ...
...To turn off , press the OFF button, or depress the brake pedal to adjust the accelerator and brake pedal toward you . Lift the hood until the lift cylinders hold the rocker control to disengage. 14 Power Adjustable Foot Pedals 11 Gearshift/Overdrive Control Overdrive is in operation, the ...be required. The rear defrost indicator will return to 4L. Rear Window Defroster Press to play. When in the P (Park) position. 15 Hood Release Pull the hood release handle toward you or away from A4WD to 4H, move the control to a previously set a speed, press SET +. To shift ...

Quick Reference Guide 1st Printing
Page 10
3 Turn Signal and Wiper/Washer Control Headlamp and Panel Dimmer Control 1 2 Service Engine Soon Lamp 4 ABS Warning Lamp Hazard Flasher Control 5 Hood 15 Release 13 Speed Control 14 Power Adjustable Foot Pedals
3 Turn Signal and Wiper/Washer Control Headlamp and Panel Dimmer Control 1 2 Service Engine Soon Lamp 4 ABS Warning Lamp Hazard Flasher Control 5 Hood 15 Release 13 Speed Control 14 Power Adjustable Foot Pedals


