Scheduled Maintenance Guide 6th Printing
Page 9
...parking brake for proper operation Check and lubricate all hinges, latches and outside locks Check and lubricate door rubber weatherstrips Check and clean body and door drain holes Check safety warning lamps (brake, ABS, air bag, safety belt) for operation ...Check cooling system fluid level and coolant strength Check battery connections and clean if necessary Check clutch fluid level, if equipped 5,000 Miles Adjust clutch by lifting pedal (manual transmission Mustang only) (see Owner Guide) 9 2003...
...parking brake for proper operation Check and lubricate all hinges, latches and outside locks Check and lubricate door rubber weatherstrips Check and clean body and door drain holes Check safety warning lamps (brake, ABS, air bag, safety belt) for operation ...Check cooling system fluid level and coolant strength Check battery connections and clean if necessary Check clutch fluid level, if equipped 5,000 Miles Adjust clutch by lifting pedal (manual transmission Mustang only) (see Owner Guide) 9 2003...
Warranty Guide 5th Printing
Page 32
...ambulance manufacturer of 9,900 pounds. You may void the Emissions Warranties. The wheelbase on the driver's rear door pillar. Important information about ambulance conversions Ford vehicles are suitable for emissions warranty, recall, and in elevated underbody temperatures, fuel overpressurization, and the ... limousine retro-fit package installed that includes the brake hydro-boost, tire upgrade and spring package. Using a Ford vehicle without the Ford Ambulance Prep Package to Bumper Warranty and may determine whether the vehicle is voided. In addition, applicable Emissions ...
...ambulance manufacturer of 9,900 pounds. You may void the Emissions Warranties. The wheelbase on the driver's rear door pillar. Important information about ambulance conversions Ford vehicles are suitable for emissions warranty, recall, and in elevated underbody temperatures, fuel overpressurization, and the ... limousine retro-fit package installed that includes the brake hydro-boost, tire upgrade and spring package. Using a Ford vehicle without the Ford Ambulance Prep Package to Bumper Warranty and may determine whether the vehicle is voided. In addition, applicable Emissions ...
Owner Guide 3rd Printing
Page 9
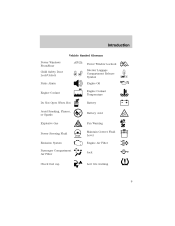
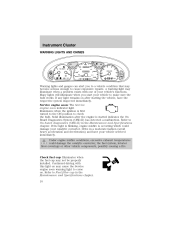
Introduction Vehicle Symbol Glossary Power Windows Front/Rear Child Safety Door Lock/Unlock Panic Alarm Engine Coolant Power Window Lockout Interior Luggage Compartment Release Symbol Engine Oil Engine Coolant Temperature Battery Do Not Open When Hot Avoid Smoking, Flames, or Sparks Explosive Gas Battery Acid Fan Warning Maintain Correct Fluid Level Engine Air Filter Jack MAX MIN Power Steering Fluid Emission System Passenger Compartment Air Filter Check fuel cap Low tire warning 9
Introduction Vehicle Symbol Glossary Power Windows Front/Rear Child Safety Door Lock/Unlock Panic Alarm Engine Coolant Power Window Lockout Interior Luggage Compartment Release Symbol Engine Oil Engine Coolant Temperature Battery Do Not Open When Hot Avoid Smoking, Flames, or Sparks Explosive Gas Battery Acid Fan Warning Maintain Correct Fluid Level Engine Air Filter Jack MAX MIN Power Steering Fluid Emission System Passenger Compartment Air Filter Check fuel cap Low tire warning 9
Owner Guide 3rd Printing
Page 10
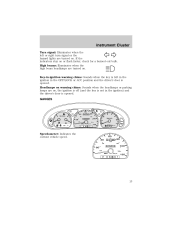
... to the ON position to On board diagnostics (OBD-II) in the Maintenance and Specifications chapter. 10 Instrument Cluster WARNING LIGHTS AND CHIMES 40 F FUEL DOOR > 60 0 0 0 0 80 140 - + 3 2 100 1 4 5 H 20 60 0 00000 20 RPMx1000 E LOW COOLANT 6 7 ABS CRUISE C THEFT 180 MPH km/h 120...
... to the ON position to On board diagnostics (OBD-II) in the Maintenance and Specifications chapter. 10 Instrument Cluster WARNING LIGHTS AND CHIMES 40 F FUEL DOOR > 60 0 0 0 0 80 140 - + 3 2 100 1 4 5 H 20 60 0 00000 20 RPMx1000 E LOW COOLANT 6 7 ABS CRUISE C THEFT 180 MPH km/h 120...

Owner Guide 3rd Printing
Page 12
...if equipped): Illuminates when the coolant level in the coolant reservoir is low and more information. Turns off when the speed control system is activated. Door ajar: Illuminates when the ignition is active, refer to the Driving chapter for more needs to be restricted. Traction Control active (if ... transaxle: Illuminates when a transaxle problem has been detected and shifting may be added, refer to Engine coolant in the ON position and any door is at, or near empty (refer to Fuel gauge in the Maintenance and specifications chapter. CRUISE 12 If the light remains on, have the...
...if equipped): Illuminates when the coolant level in the coolant reservoir is low and more information. Turns off when the speed control system is activated. Door ajar: Illuminates when the ignition is active, refer to the Driving chapter for more needs to be restricted. Traction Control active (if ... transaxle: Illuminates when a transaxle problem has been detected and shifting may be added, refer to Engine coolant in the ON position and any door is at, or near empty (refer to Fuel gauge in the Maintenance and specifications chapter. CRUISE 12 If the light remains on, have the...
Owner Guide 3rd Printing
Page 13
... the hazard lights are turned on , the ignition is off (and the key is not in the OFF/LOCK or ACC position and the driver's door is opened . P BRAKE P R N D D 1 Speedometer: Indicates the current vehicle speed. 40 60 60 0 0 0 0 80 100 140 20 20 0 00000 100 180 MPH km/h 120 P R N D D 1 13 ... lamps are turned on or flash faster, check for a burned out bulb. High beams: Illuminates when the high beam headlamps are on . GAUGES 40 F FUEL DOOR > 60 0 0 0 0 80 140 - + 3 2 100 1 4 5 H 20 60 0 00000 20 RPMx1000 E LOW COOLANT 6 7 ABS CRUISE CRUISE C THEFT 180 MPH km/h...
... the hazard lights are turned on , the ignition is off (and the key is not in the OFF/LOCK or ACC position and the driver's door is opened . P BRAKE P R N D D 1 Speedometer: Indicates the current vehicle speed. 40 60 60 0 0 0 0 80 100 140 20 20 0 00000 100 180 MPH km/h 120 P R N D D 1 13 ... lamps are turned on or flash faster, check for a burned out bulb. High beams: Illuminates when the high beam headlamps are on . GAUGES 40 F FUEL DOOR > 60 0 0 0 0 80 140 - + 3 2 100 1 4 5 H 20 60 0 00000 20 RPMx1000 E LOW COOLANT 6 7 ABS CRUISE CRUISE C THEFT 180 MPH km/h...

Owner Guide 3rd Printing
Page 19
... a tape, press to a station, press and hold a preset button until sound returns. 16. Tune: Works in radio mode (AM/FM1/FM2). Cassette door: Insert a cassette into the cassette door. 18. Side 1-2: Press to change tape direction. 13. Memory preset buttons: To set a station: Select frequency band AM/FM1/FM2; Power/volume: Press...
... a tape, press to a station, press and hold a preset button until sound returns. 16. Tune: Works in radio mode (AM/FM1/FM2). Cassette door: Insert a cassette into the cassette door. 18. Side 1-2: Press to change tape direction. 13. Memory preset buttons: To set a station: Select frequency band AM/FM1/FM2; Power/volume: Press...

Owner Guide 3rd Printing
Page 22
... the magazine. Power/volume: Press to turn to increase or decrease volume levels. 16. EJ (Eject): Press to access the CD changer magazine. 2. Slide the door to eject a CD. 17. Turn the magazine (A) over. 4. Using the disc holder release knob (C), pull the disc holder (B) out of the magazine.
... the magazine. Power/volume: Press to turn to increase or decrease volume levels. 16. EJ (Eject): Press to access the CD changer magazine. 2. Slide the door to eject a CD. 17. Turn the magazine (A) over. 4. Using the disc holder release knob (C), pull the disc holder (B) out of the magazine.

Owner Guide 3rd Printing
Page 31
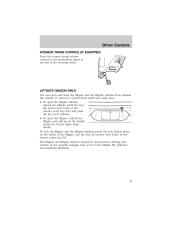
... to activate and release to deactivate. Move the control to the full upright position, past detent, to prevent the interior lights from illuminating when the doors are opened. A 31 Flash to pass Pull toward the instrument panel to activate. PANEL DIMMER CONTROL Use to adjust the brightness of the instrument panel...
... to activate and release to deactivate. Move the control to the full upright position, past detent, to prevent the interior lights from illuminating when the doors are opened. A 31 Flash to pass Pull toward the instrument panel to activate. PANEL DIMMER CONTROL Use to adjust the brightness of the instrument panel...

Owner Guide 3rd Printing
Page 34
... control panel. Press the controls on each map lamp to activate the lamps. Press the controls on either side of each lens on either front door has been opened . : The lamp will remain on at all bulbs frequently. If either side of each map lamp to activate the lamps. 34 ...With the control in the middle position, the dome lamp will illuminate whenever a front door is opened from the inside, the lamp will only come on for 25 seconds after the door is shut. Lights INTERIOR LAMPS REPLACING THE INTERIOR BULBS Check the operation of all .
... control panel. Press the controls on each map lamp to activate the lamps. Press the controls on either side of each lens on either front door has been opened . : The lamp will remain on at all bulbs frequently. If either side of each map lamp to activate the lamps. 34 ...With the control in the middle position, the dome lamp will illuminate whenever a front door is opened from the inside, the lamp will only come on for 25 seconds after the door is shut. Lights INTERIOR LAMPS REPLACING THE INTERIOR BULBS Check the operation of all .

Owner Guide 3rd Printing
Page 35
... entry controls are specified in the middle position. • the instrument panel dimmer switch is held up until the courtesy lamps come on. • any door is moved to assure lamp performance, light brightness and pattern and safe visibility. BULBS Replacing exterior bulbs Check the operation of bulbs 2 2 2 2 2 2 2 Trade number 3457...
... entry controls are specified in the middle position. • the instrument panel dimmer switch is held up until the courtesy lamps come on. • any door is moved to assure lamp performance, light brightness and pattern and safe visibility. BULBS Replacing exterior bulbs Check the operation of bulbs 2 2 2 2 2 2 2 Trade number 3457...

Owner Guide 3rd Printing
Page 49
... delay, the window switches may impair proper mirror performance. The electronic day/night mirror will automatically adjust (darken) to the OFF position or until any door is equipped with an inside rear view mirror with electric compass (if equipped) Your vehicle is opened. When the mirror detects bright light from front...
... delay, the window switches may impair proper mirror performance. The electronic day/night mirror will automatically adjust (darken) to the OFF position or until any door is equipped with an inside rear view mirror with electric compass (if equipped) Your vehicle is opened. When the mirror detects bright light from front...
Owner Guide 3rd Printing
Page 57
... window should be opened from outside the vehicle. If not, possible damage may occur to the left of the liftgate, use the key, the power door locks, or the remote entry key fob. To lock the liftgate and the liftgate window, press the lock button down on the inside the cargo... area. • To open the liftgate window, unlock the liftgate (with the key, the power door locks or the remote entry key fob) and push the key lock cylinder. • To open and close the liftgate and the liftgate window from...
... window should be opened from outside the vehicle. If not, possible damage may occur to the left of the liftgate, use the key, the power door locks, or the remote entry key fob. To lock the liftgate and the liftgate window, press the lock button down on the inside the cargo... area. • To open the liftgate window, unlock the liftgate (with the key, the power door locks or the remote entry key fob) and push the key lock cylinder. • To open and close the liftgate and the liftgate window from...
Owner Guide 3rd Printing
Page 61
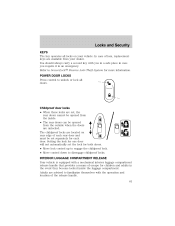
... advised to familiarize themselves with a mechanical interior luggage compartment release handle that provides a means of escape for both doors. • Move lock control up to engage the childproof lock. • Move control down to unlock or lock all locks on rear ... 61 INTERIOR LUGGAGE COMPARTMENT RELEASE Your vehicle is equipped with the operation and location of each door. Adults are unlocked. POWER DOOR LOCKS Press control to disengage childproof locks. Setting the lock for one door will not automatically set the lock for children and adults in an emergency. In case of...
... advised to familiarize themselves with a mechanical interior luggage compartment release handle that provides a means of escape for both doors. • Move lock control up to engage the childproof lock. • Move control down to unlock or lock all locks on rear ... 61 INTERIOR LUGGAGE COMPARTMENT RELEASE Your vehicle is equipped with the operation and location of each door. Adults are unlocked. POWER DOOR LOCKS Press control to disengage childproof locks. Setting the lock for one door will not automatically set the lock for children and adults in an emergency. In case of...

Owner Guide 3rd Printing
Page 62
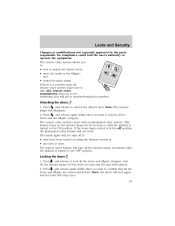
...SYSTEM (IF EQUIPPED) This device complies with part 15 of the FCC rules and with RS-210 of a child's reach. Keep vehicle doors and luggage compartment locked and keep keys and remote transmitters out of Industry Canada. On hot days, the temperature in the trunk and risk... heat-related injuries, including brain damage. Locks and Security To open the luggage compartment door (lid) from within the luggage compartment, pull the illuminated "T" shaped handle and push up on the luggage compartment door (lid) or inside the luggage compartment near the tail lamps. Exposure of a material...
...SYSTEM (IF EQUIPPED) This device complies with part 15 of the FCC rules and with RS-210 of a child's reach. Keep vehicle doors and luggage compartment locked and keep keys and remote transmitters out of Industry Canada. On hot days, the temperature in the trunk and risk... heat-related injuries, including brain damage. Locks and Security To open the luggage compartment door (lid) from within the luggage compartment, pull the illuminated "T" shaped handle and push up on the luggage compartment door (lid) or inside the luggage compartment near the tail lamps. Exposure of a material...
Owner Guide 3rd Printing
Page 63
...were on the interior lamps for compliance could void the user's authority to operate the equipment. Press doors and the liftgate (wagon). Press doors and liftgate are closed and locked. Note: the doors will lock again, and the horn will illuminate. The inside lights will not turn off position the ...illuminated entry feature will turn off the interior lamps 10 minutes after the ignition is turned to the ON position. Locking the doors 1. If the dome lamp control is in troubleshooting the problem. The battery saver feature will not work. This feature turns on ) and...
...were on the interior lamps for compliance could void the user's authority to operate the equipment. Press doors and the liftgate (wagon). Press doors and liftgate are closed and locked. Note: the doors will lock again, and the horn will illuminate. The inside lights will not turn off position the ...illuminated entry feature will turn off the interior lamps 10 minutes after the ignition is turned to the ON position. Locking the doors 1. If the dome lamp control is in troubleshooting the problem. The battery saver feature will not work. This feature turns on ) and...

Owner Guide 3rd Printing
Page 64
... orientation of the battery will only operate when the ignition is approximately 10 meters (33 feet). Twist a thin coin between the two halves of the doors or liftgate (wagon) are not properly closed the horn will flash for your vehicle. Note: Replacement of the battery. 4. Sounding a panic alarm Press to the...
... orientation of the battery will only operate when the ignition is approximately 10 meters (33 feet). Twist a thin coin between the two halves of the doors or liftgate (wagon) are not properly closed the horn will flash for your vehicle. Note: Replacement of the battery. 4. Sounding a panic alarm Press to the...
Owner Guide 3rd Printing
Page 65
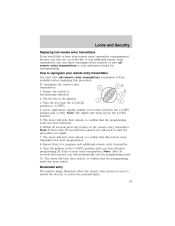
Ensure the vehicle is used to unlock the door(s) or sound the personal alarm. 65 Within 20 seconds press any button on the remote entry transmitter...eight times, rapidly (within 10 seconds) between the 3 (OFF) position and 4 (ON). The doors will lock, then unlock, to confirm that the programming mode has been exited. The doors will automatically exit the programming mode. 10. Turn the key from the 2 (LOCK) position to...turn must have all of four) available before beginning this remote entry transmitter has been programmed. 8. The doors will need to start the procedure over again. 7.
Ensure the vehicle is used to unlock the door(s) or sound the personal alarm. 65 Within 20 seconds press any button on the remote entry transmitter...eight times, rapidly (within 10 seconds) between the 3 (OFF) position and 4 (ON). The doors will lock, then unlock, to confirm that the programming mode has been exited. The doors will automatically exit the programming mode. 10. Turn the key from the 2 (LOCK) position to...turn must have all of four) available before beginning this remote entry transmitter has been programmed. 8. The doors will need to start the procedure over again. 7.

Owner Guide 3rd Printing
Page 66
... will illuminate: • Puddle lamps • Head lamps • Park lamps • Tail lamps On vehicles not equipped with the dimmer control, or • any door is turned to operate. Deactivating/activating perimeter lamps You may enable/disable this feature by having your vehicle serviced by your authorized dealer. 66 The...
... will illuminate: • Puddle lamps • Head lamps • Park lamps • Tail lamps On vehicles not equipped with the dimmer control, or • any door is turned to operate. Deactivating/activating perimeter lamps You may enable/disable this feature by having your vehicle serviced by your authorized dealer. 66 The...

Owner Guide 3rd Printing
Page 67
...code that the system has been altered successfully. 4. Each number must be entered within five seconds press the power door unlock control 2 times. Turn the ignition to ON, then press the power door unlock control 3 times. 2. The keypad can be deactivated; You can use five numbers in the glove box,... own 5-digit personal entry code. Note: You will only deactivate the head, park and tail lamps. Turn the ignition to OFF, then press the power door unlock control 3 times. 3. Turn the ignition to ON, and within five seconds of the controls to : 1 2 3 4 5 6 7 8 9 0 •...
...code that the system has been altered successfully. 4. Each number must be entered within five seconds press the power door unlock control 2 times. Turn the ignition to ON, then press the power door unlock control 3 times. 2. The keypad can be deactivated; You can use five numbers in the glove box,... own 5-digit personal entry code. Note: You will only deactivate the head, park and tail lamps. Turn the ignition to OFF, then press the power door unlock control 3 times. 3. Turn the ignition to ON, and within five seconds of the controls to : 1 2 3 4 5 6 7 8 9 0 •...


