
Owner Guide 3rd Printing
Page 31
... the vehicle during headlamp and parklamp operation. Lights High beams Push the lever toward you to deactivate. Flash to pass Pull toward the instrument panel to activate. A 31 Pull the lever towards you slightly to activate and release to prevent the interior lights from illuminating when the... doors are opened. Move the control to the full upright position, past detent, to deactivate. Move the control to the full down position, past detent,...
... the vehicle during headlamp and parklamp operation. Lights High beams Push the lever toward you to deactivate. Flash to pass Pull toward the instrument panel to activate. A 31 Pull the lever towards you slightly to activate and release to prevent the interior lights from illuminating when the... doors are opened. Move the control to the full upright position, past detent, to deactivate. Move the control to the full down position, past detent,...

Owner Guide 3rd Printing
Page 34
... opened. If equipped with a moon roof, the map lamps are located on each map lamp to activate the lamps. If either front door has been opened . : The lamp will remain on at all bulbs frequently. Press the controls on either side of each map lamp to activate the ...lamps. 34 Press the controls on the moon roof control panel. The map lamp controls (if equipped) are located on either side of each lens on the dome lamp. Dome lamps and map lamps • ON...
... opened. If equipped with a moon roof, the map lamps are located on each map lamp to activate the lamps. If either front door has been opened . : The lamp will remain on at all bulbs frequently. Press the controls on either side of each map lamp to activate the ...lamps. 34 Press the controls on the moon roof control panel. The map lamp controls (if equipped) are located on either side of each lens on the dome lamp. Dome lamps and map lamps • ON...

Owner Guide 3rd Printing
Page 35
... America and an "E" for Europe to the passenger side position. Headlamp bulbs must be marked with the control in the middle position. • the instrument panel dimmer switch is held up until the courtesy lamps come on. • any of the remote entry controls are specified in the ACC or ON... all the bulbs frequently. With the ignition key in the chart below. Lights Rear dome lamp (if equipped) The dome lamp lights when: • any door is opened with an authorized "D.O.T."
... America and an "E" for Europe to the passenger side position. Headlamp bulbs must be marked with the control in the middle position. • the instrument panel dimmer switch is held up until the courtesy lamps come on. • any of the remote entry controls are specified in the ACC or ON... all the bulbs frequently. With the ignition key in the chart below. Lights Rear dome lamp (if equipped) The dome lamp lights when: • any door is opened with an authorized "D.O.T."
Owner Guide 3rd Printing
Page 57
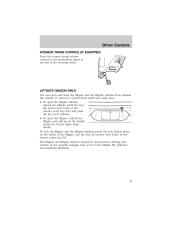
..., press the lock button down on the inside the cargo area. • To open the liftgate window, unlock the liftgate (with the key, the power door locks or the remote entry key fob) and push the key lock cylinder. • To open and close the liftgate and the liftgate window from..., or the remote entry key fob. LIFTGATE (WAGON ONLY) You can open the liftgate, unlock the liftgate and pull up on the instrument panel to the liftgate lift cylinders and attaching hardware. 57 It cannot be closed before driving your vehicle. Driver Controls INTERIOR TRUNK CONTROL (IF EQUIPPED) Press ...
..., press the lock button down on the inside the cargo area. • To open the liftgate window, unlock the liftgate (with the key, the power door locks or the remote entry key fob) and push the key lock cylinder. • To open and close the liftgate and the liftgate window from..., or the remote entry key fob. LIFTGATE (WAGON ONLY) You can open the liftgate, unlock the liftgate and pull up on the instrument panel to the liftgate lift cylinders and attaching hardware. 57 It cannot be closed before driving your vehicle. Driver Controls INTERIOR TRUNK CONTROL (IF EQUIPPED) Press ...

Owner Guide 3rd Printing
Page 97
Do not lean your Ford or Lincoln Mercury dealer. The side air bag system consists of the following: • An inflatable ...air bags and increase the risk of injury in an accident. Do not attempt to inflate between the front and rear doors. How does the side air bag system work? The side air bag could injure you as used for the front... the collision will be inflated, even if the respective seat is provided. See your head on the pillars between the door panel and occupant to allow air bag deployment. • The same warning light, electronic control and diagnostic unit as it ...
Do not lean your Ford or Lincoln Mercury dealer. The side air bag system consists of the following: • An inflatable ...air bags and increase the risk of injury in an accident. Do not attempt to inflate between the front and rear doors. How does the side air bag system work? The side air bag could injure you as used for the front... the collision will be inflated, even if the respective seat is provided. See your head on the pillars between the door panel and occupant to allow air bag deployment. • The same warning light, electronic control and diagnostic unit as it ...
Owner Guide 3rd Printing
Page 132
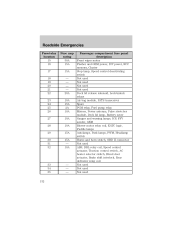
... 27 28 29 30 31 32 Fuse amp rating 30A 15A 15A - - - - 20A 10A 15A 2A 10A 10A 10A 15A 15A - 10A Passenger compartment fuse panel description Front wiper motor Flasher and GEM power, ICP power, RCC memory, Cluster Stop lamp, Speed control deactivating switch Not used Not used Not used... switch Horns and horn switch, OBD II connector Not used ABS, DRL relay coil, Speed control actuator, Traction control switch, AC heater selector switch, Blend door actuator, Brake shift interlock, Rear defroster relay coil Not used Not used Not used 33 34 35 132 - - -
... 27 28 29 30 31 32 Fuse amp rating 30A 15A 15A - - - - 20A 10A 15A 2A 10A 10A 10A 15A 15A - 10A Passenger compartment fuse panel description Front wiper motor Flasher and GEM power, ICP power, RCC memory, Cluster Stop lamp, Speed control deactivating switch Not used Not used Not used... switch Horns and horn switch, OBD II connector Not used ABS, DRL relay coil, Speed control actuator, Traction control switch, AC heater selector switch, Blend door actuator, Brake shift interlock, Rear defroster relay coil Not used Not used Not used 33 34 35 132 - - -

Owner Guide 3rd Printing
Page 193
... different jobs, they often wear differently. Maintenance and Specifications • Adjust tire pressure to recommended specifications found on the Certification Label located on the driver's door panel. If you notice that the tires wear unevenly, have them as indicated in loss of vehicle control.
... different jobs, they often wear differently. Maintenance and Specifications • Adjust tire pressure to recommended specifications found on the Certification Label located on the driver's door panel. If you notice that the tires wear unevenly, have them as indicated in loss of vehicle control.

Owner Guide 3rd Printing
Page 207
Index instrument panel ...158 interior ...158-159 interior trim ...159 plastic parts ...157 washing ......197, 199 Cruise control (see Lamps) ...30 Defrost rear window ...29 Dipstick automatic transmission fluid ...189 engine oil ...166 Doors lubricant specifications ...197 Driving under special conditions ...121 through water ...121 E Emergencies, roadside jump-starting ...139 Emission control system......151 D Daytime running lamps (see Speed control) ...52 Customer Assistance ...127 Ford accessories for your vehicle ...160 Ford Extended Service Plan ...148 Getting assistance outside the U.S.
Index instrument panel ...158 interior ...158-159 interior trim ...159 plastic parts ...157 washing ......197, 199 Cruise control (see Lamps) ...30 Defrost rear window ...29 Dipstick automatic transmission fluid ...189 engine oil ...166 Doors lubricant specifications ...197 Driving under special conditions ...121 through water ...121 E Emergencies, roadside jump-starting ...139 Emission control system......151 D Daytime running lamps (see Speed control) ...52 Customer Assistance ...127 Ford accessories for your vehicle ...160 Ford Extended Service Plan ...148 Getting assistance outside the U.S.

Owner Guide 3rd Printing
Page 209
...system ...30 bulb replacement specifications chart ...35 cargo lamps ...31 daytime running light ...30 headlamps ...30 headlamps, flash to pass ...31 instrument panel, dimming ...31 interior lamps ...34-36 replacing bulbs ...35, 37, 39-42, 44 Lane change indicator (see Turn signal) ...33 Liftgate... parts) ...195 Pedals (see Power adjustable foot pedals) ...52 Power adjustable foot pedals ...52 Power distribution box (see Fuses) ...133 Power door locks ...61 Power point ...48 Power steering ...116 fluid, checking and adding ...188 fluid, refill capacity ...196 fluid, specifications ...197, 199...
...system ...30 bulb replacement specifications chart ...35 cargo lamps ...31 daytime running light ...30 headlamps ...30 headlamps, flash to pass ...31 instrument panel, dimming ...31 interior lamps ...34-36 replacing bulbs ...35, 37, 39-42, 44 Lane change indicator (see Turn signal) ...33 Liftgate... parts) ...195 Pedals (see Power adjustable foot pedals) ...52 Power adjustable foot pedals ...52 Power distribution box (see Fuses) ...133 Power door locks ...61 Power point ...48 Power steering ...116 fluid, checking and adding ...188 fluid, refill capacity ...196 fluid, specifications ...197, 199...
Quick Reference Guide 1st Printing
Page 1
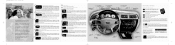
...the windshield defroster ducts. Ford Motor Company Customer Relationship Center... Label located on the driver's door panel. Select AM, FM1, or ...AT E C O N T R O L S Y S T E M G A H I J K B C D (if equipped) E S S E N T I A L I N F O R M AT I O N G U I D E T A U R U S Q U I TA U R U S 2003 MODEL QUICK REFERENCE GUIDE J F July 2002 First Printing Quick Reference REAR WINDOW WIPER & WASHER (Wagon Only) Roadside Assistance Centers Country Phone Number (800) 241-3673...Taurus Litho in random order. E F G H Octane Recommendations - In the wagon, stored in the left side rear trim panel...
...the windshield defroster ducts. Ford Motor Company Customer Relationship Center... Label located on the driver's door panel. Select AM, FM1, or ...AT E C O N T R O L S Y S T E M G A H I J K B C D (if equipped) E S S E N T I A L I N F O R M AT I O N G U I D E T A U R U S Q U I TA U R U S 2003 MODEL QUICK REFERENCE GUIDE J F July 2002 First Printing Quick Reference REAR WINDOW WIPER & WASHER (Wagon Only) Roadside Assistance Centers Country Phone Number (800) 241-3673...Taurus Litho in random order. E F G H Octane Recommendations - In the wagon, stored in the left side rear trim panel...
Quick Reference Guide 1st Printing
Page 2
...functional. Press this easy-to-use of the wiper blades is required. 3 From the advanced Personal Safety System to the bountiful amenities, every Taurus is depressed. The interior lights will also illuminate. 4 POWER ADJUSTABLE FOOT PEDALS (if equipped) Press and hold the rocker control to adjust ... to activate the panic alarm. Next, release the auxiliary latch located under the front center of the instrument panel, the auxiliary power point is used to unlock the doors or sound the panic alarm. The system defaults to activate the hazard flashers. Return the selector control to...
...functional. Press this easy-to-use of the wiper blades is required. 3 From the advanced Personal Safety System to the bountiful amenities, every Taurus is depressed. The interior lights will also illuminate. 4 POWER ADJUSTABLE FOOT PEDALS (if equipped) Press and hold the rocker control to adjust ... to activate the panic alarm. Next, release the auxiliary latch located under the front center of the instrument panel, the auxiliary power point is used to unlock the doors or sound the panic alarm. The system defaults to activate the hazard flashers. Return the selector control to...


